One of the features of WordPress is the Widgets. They are used in displaying data or information provided by plugins and themes.
Every WordPress install is bundled with a number of default Widgets such as Pages (A list of your site’s Pages), Search (A search form for your site), Archives (A monthly archive of your site’s posts), Calendar, and Text etc.
In this tutorial, I will show us how Widgets in WordPress are developed. To keep things succinct and simple, we will be building a simple Hello World Widget.
Coding WordPress Widget
To create a Widget, you need to extend the WP_Widget PHP class.
Let’s get started with development of our Hello World Widget plugin
Firstly, include the plugin header as follows.
<?php

/*
  Plugin Name: Hello World Widget
  Plugin URI: https://w3guy.com/wordpress-widgets-api
  Description: Hello World Widget by Tech4sky
  Author: Agbonghama Collins
  Author URI: https://w3guy.com
 */
Create the widget class and extending WP_Widget.
class Hello_Widget extends WP_Widget {
// ...
}
Setup the widget name and description via the magic __construct method like this:
function __construct() {
        parent::__construct(
            'hello_widget', // Base ID
            __('Hello World', 'text_domain'), // Widget Name
            array( 'description' => __( 'Simple Hello World Widget', 'text_domain' ), )
        );
    }
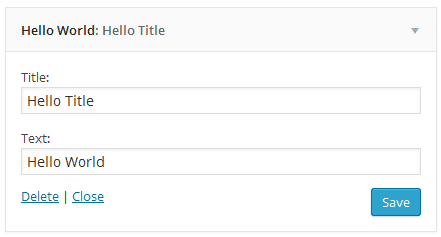
The form() method creates the Back-end widget form.
Our widget will consist of two form field – Title (title of the widget) and Text (where our “Hello Word” text will be entered.)
public function form( $instance ) {

        // if text contain a value, save it to $text
        if ( isset( $instance[ 'text' ] ) ) {
            $text = $instance[ 'text' ];
        }
        // if title contain a value, save it to $title
        if ( isset( $instance[ 'title' ] ) ) {
            $title = $instance[ 'title' ];
        }
        else {
            // else set the $title to string Hello Title
            $title = __( 'Hello Title', 'text_domain' );
        }
        ?>
        <p>
        <label for="<?php echo $this->get_field_id( 'title' ); ?>"><?php _e( 'Title:' ); ?></label>
        <input class="widefat" id="<?php echo $this->get_field_id( 'title' ); ?>" name="<?php echo $this->get_field_name( 'title' ); ?>" type="text" value="<?php echo esc_attr( $title ); ?>">
        </p>

        <p>
        <label for="<?php echo $this->get_field_id( 'text' ); ?>"><?php _e( 'Text:' ); ?></label>
        <input class="widefat" id="<?php echo $this->get_field_id( 'text' ); ?>" name="<?php echo $this->get_field_name( 'text' ); ?>" type="text" value="<?php echo esc_attr( $text ); ?>">
        </p>
        <?php
    }
The widget() method displays the Widget information (i.e. the Widget title and text) at the front-end.
// array $instance Stores values from database.
    public function widget( $args, $instance ) {
        $title = apply_filters( 'widget_title', $instance['title'] );

        echo $args['before_widget'];
        if ( ! empty( $title ) )
            echo $args['before_title'] . $title . $args['after_title'];
            echo $instance['text'];
            echo $args['after_widget'];
    }
Finally is the update() method that sanitize then save the widget form values to the database.
public function update( $new_instance, $old_instance ) {
        $instance = array();
        $instance['title'] = ( ! empty( $new_instance['title'] ) ) ? strip_tags( $new_instance['title'] ) : '';
        $instance['text'] = ( ! empty( $new_instance['text'] ) ) ? strip_tags( $new_instance['text'] ) : '';

        return $instance;
}
Note: we are sanitizing the values using WordPress strip_tags function which Strip HTML and PHP tags from a string. You are at liberty to apply your own sanitation rule.
At this juncture, we are done coding the widget class Hello_Widget.
In order for our widget to be recognizable by WordPress, we need to register our widget class.
function register_hello_widget() {
    register_widget( 'Hello_Widget' );
}
add_action( 'widgets_init', 'register_hello_widget' );
On activation of our Hello World widget plugin, drag and drop the widget to your desired widgetize area to reveal the widget form as depicted below.
The front-end display of the widget varies from theme to theme. Below is a screenshot of the Widget in my locally hosted WordPress.

Wrap UP
In you have gotten this far, you should now be able to code your own WordPress widget and learn how plugins are created in WordPress.
Here is the link to the Widget plugin so that you can use it in your WordPress site and also sturdy the code to learn how it works.
To broaden your understanding of Widgets in WordPress, read this article of mine at Designmodo on How to Build a Social Media Profile Widget in WordPress. You will learn some advance concept of coding WordPress Widget.