The eLearning industry is fast-growing, with more people coming online to upskill and improve their meaning potential. The eLearning industry is divided into two parts. We have the learners and the teachers or instructors.
As a teacher or course creator, an eLearning website is a crucial part of getting your content out there. There are a bunch of established eLearning platforms like Teachable, Coursera, and Udemy, but using these platforms to host your courses means your work is under their rules and branding, and you also have to pay for their services.
As a course creator or online instructor, you might find it more economical and beneficial if you own your eLearning website. You can quickly build one with zero coding skills using WordPress and Tutor LMS.
What is Tutor LMS?
You need a Learning Management System (LMS) to build an eLearning website in WordPress. An LMS is a software that provides the framework or system that handles every aspect of an eLearning process.
An LMS allows you to create and manage an eLearning platform from a central source. It gives you all the tools to create, deliver, track, sell, and manage an eLearning website.
By default, WordPress does not come with an LMS capability. That is why you need an LMS plugin like Tutor LMS.
Tutor LMS is a complete WordPress LMS plugin for building an eLearning website on WordPress. It comes with all the features that a modern eLearning website should have, and it also has a growing list of add-ons that will enable you to extend its capabilities beyond what you could imagine.
Tutor LMS allows you to create courses, drip content, create quizzes, sell courses, send emails, generate certificates, and more. As you can see, this is a complete toolbox for building and launching an eLearning website without coding or years of technical knowledge.
In this guide, we will create an eLearning website on WordPress with Tutor LMS by following a step-by-step approach, and by the end of this article, you will have created an eLearning website, hosted a course, and monetized your website.
How to Create an eLearning Website with Tutor LMS
So far, we have learned about Learning Management Systems and Tutor LMS. Now, we will dive into building our eLearning website with Tutor LMS.
In the steps below, we will cover everything you need to do for a quick setup of Tutor LMS, eLearning website, and payment integration on your eLearning site.
Installing the Tutor LMS Plugin
The first step in this process is to install and activate the Tutor LMS plugin. The Tutor LMS plugin has a free and pro version. If you want to take advantage of all features available in this plugin, I recommend you get the Pro version.
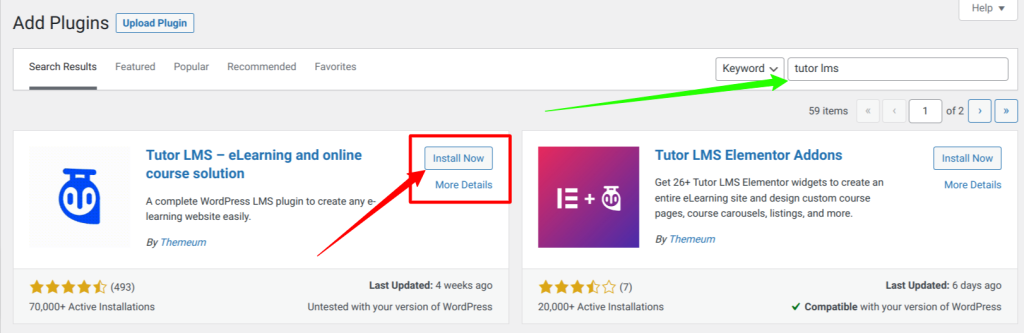
Navigate to Plugins > Add New, search for Tutor LMS, and install and activate it.
Once you click the activate button, you will be greeted with the Tutor LMS plugin onboarding screen, which will walk you through a series of necessary steps to set up your eLearning website properly.
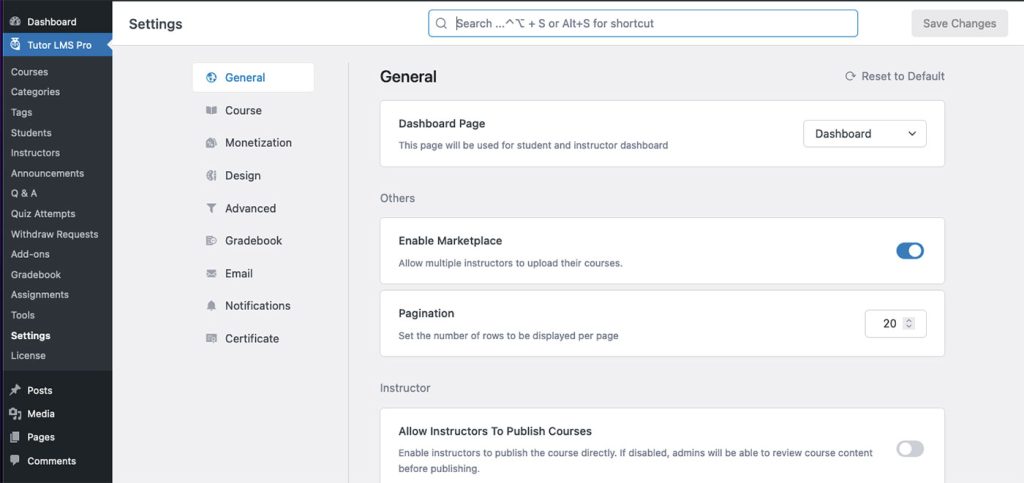
There are a bunch of other things that you can configure from the Tutor LMS settings page. You can review them to make changes by navigating to Tutor LMS > Settings.
Also, if you get the Tutor LMS Pro, you will have access to many premium add-ons to enhance your eLearning website further. Some Addons you might find helpful are Notifications, Content Drip, Calendar, Tutor Assignments, Email, Course Attachments, and Tutor Certificate.
Install a Tutor LMS Theme
If you are already familiar with WordPress, you know every WordPress site needs a theme. For the uninitiated, WordPress themes controls the design, display, and layout of content on a WordPress website, the theme helps you to organize your website content and present it to your users.
To build your eLearning website, you will need to install and activate a Tutor LMS compatible theme; luckily for us, there are a bunch of Tutor LMS themes out there, and they are available for free.
In this guide, we will use the Tutor Starter theme, a free Tutor LMS theme.
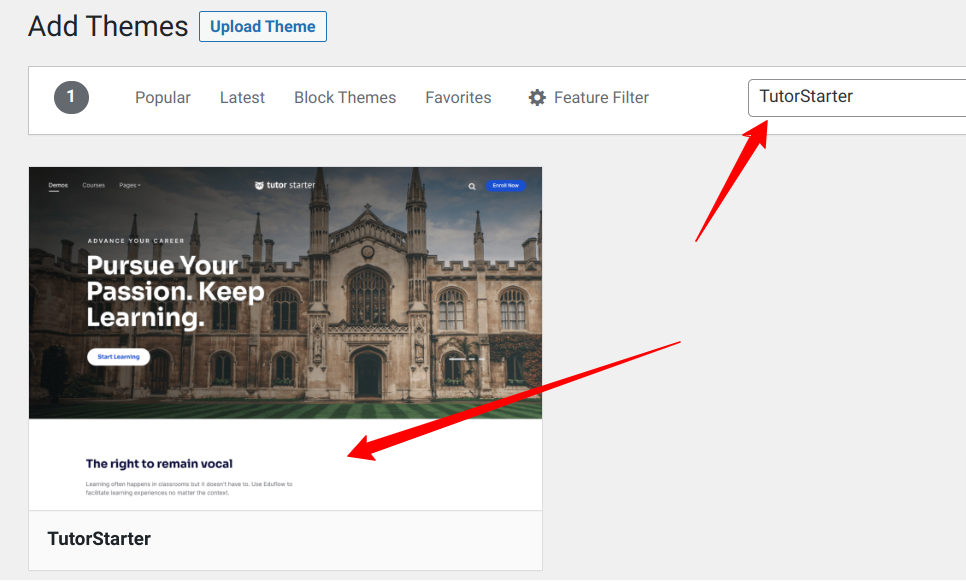
From your WordPress dashboard, navigate to Appearance > Themes, choose Add New and search for TutorStarter. Install and Activate it.
Once you have installed and activated the theme, we need to install a companion plugin for this theme. Navigate to Plugins>Add New, search for a plugin called TutorMate, and install and activate it. TutorMate is a TutorStarter theme companion plugin enabling us to import predesigned demo pages for faster development.
Setup a Starter eLearning Site
Now that our theme is installed and activated, we can import a starter template into our website.
Navigate to Tutor Starter > Starter Sites from the left side admin panel. You will be presented with a page with four starter templates that you can immediately import into your WordPress website.
For this guide, we will be using the Marketplace template. You can see a demo of each template by clicking the preview button on each template.
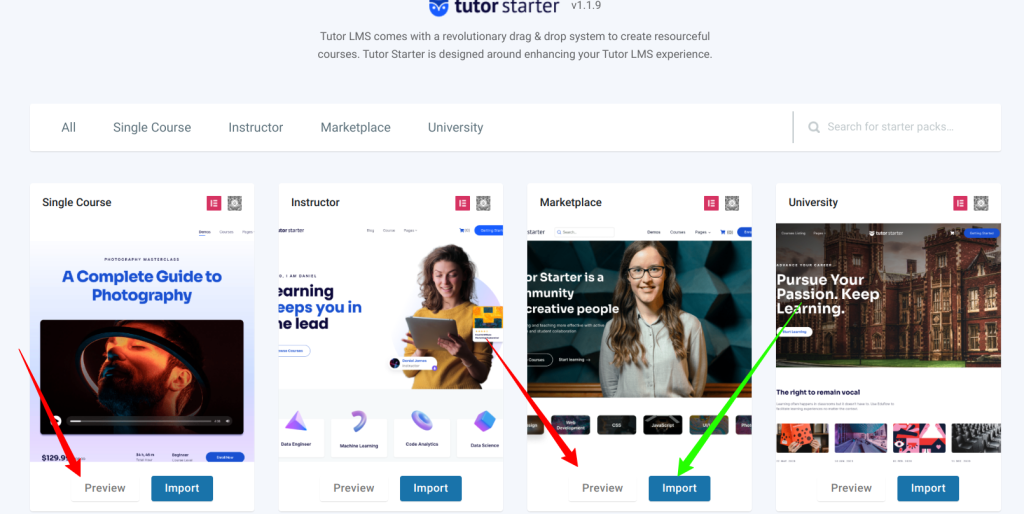
Choose the starter site you want and click import, then select Elementor or Gutenberg for the building environment you prefer and click import.
Once you have imported all the elements, click View Site to see how your site will look. You will see that Tutor Starter has created a beautifully-designed layout for your site, and what is left is to make some minor changes, and you are good to go.
Create a Course with Tutor LMS
Now that we have set up the Tutor LMS plugin and also gotten an excellent starter design on our eLearning website, we can create a course for our students.
Creating a course with Tutor LMS is relatively easy. Navigate to Tutor LMS > Courses, then click on Add New.
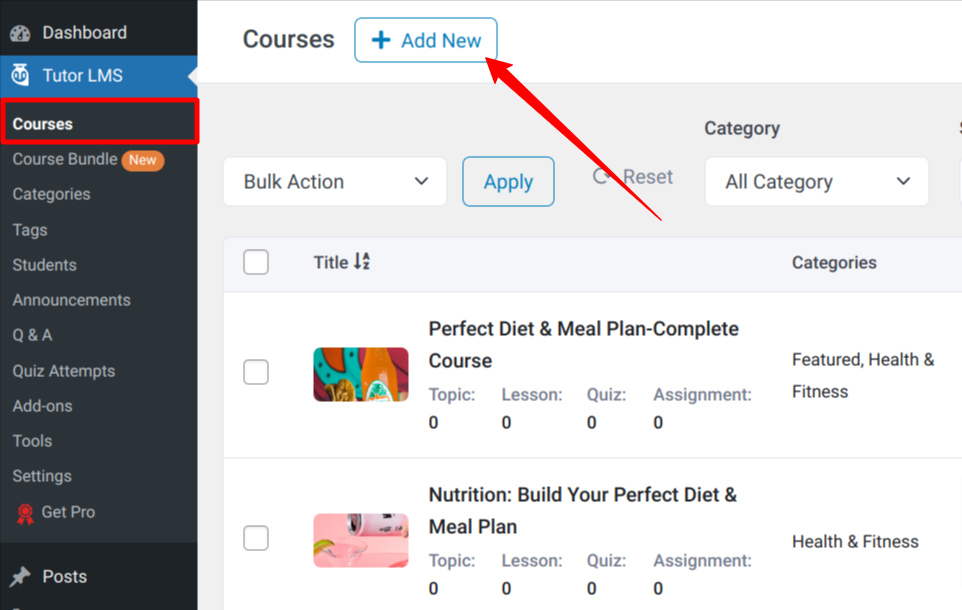
You will be presented with a course editor similar to the WordPress posts editor. Once you’re on the course editor page, fill in the course Title, add some description in the content editor, and add an excerpt that will appear on the course page.
You should scroll down the course creation page to view the available sections and add the needed information.

When you add all the needed information for your course, click Save Draft and then Preview to preview the course in a new tab.

The course builder section on the course editing page is where you add the various topics to your course content. Scroll down on the course editing page till you get to this section. Each topic in this section can have lessons and quizzes attached to it.
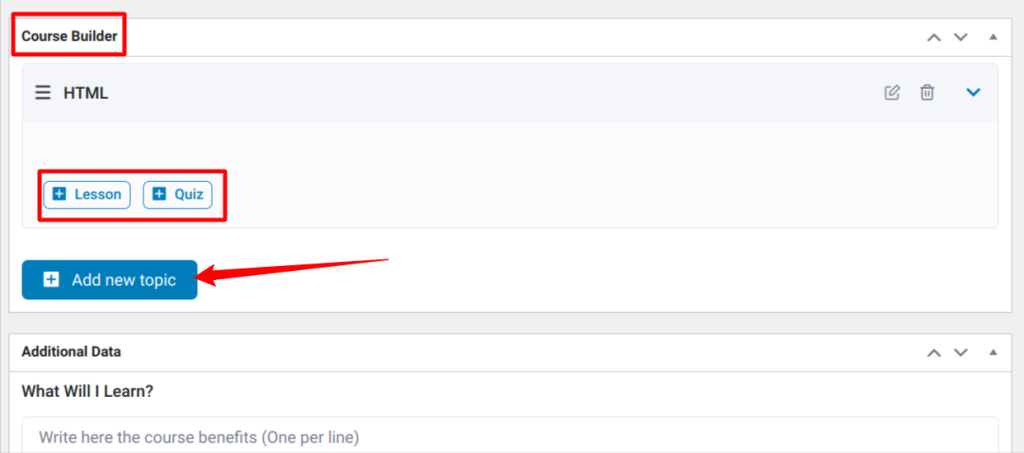
Once you finish all modifications, click the Publish button, and your course will be live on the website. Now, students can enroll in your course and start going through the available topics.
This is how easy it is to create courses with Tutor LMS.
How to Monetize Your Tutor LMS Courses with ProfilePress
Creating a course or training is not that easy, so it is a good thing if you want to charge a fee for your course. To do that, you will need the help of a monetization addon because Tutor LMS does not provide this feature; instead, it allows you to integrate with many monetization options, such as ProfilePress.
ProfilePress is an eCommerce and WordPress membership plugin that allows you to build powerful eCommerce websites. It is one of the best WordPress payment plugins and offers a simple and easy way to start accepting credit card payments on your website.
ProfilePress allows you to accept one-time or recurring payments via PayPal, Stripe, Paystack, and more.
Integrating ProfilePress with Tutor LMS is quite straightforward. The first step is to get your copy of ProfilePress and install it on your website.
You will need to purchase a ProfilePress Pro License and install the ProfilePress plugin. To do that, go to the ProfilePress website to purchase a suitable license plan.
After purchasing your copy of the ProfilePress Plugin, you will receive a confirmation email with a link to download the plugin zip file and your license key. You can also download the plugin from your account page on the ProfilePress website.
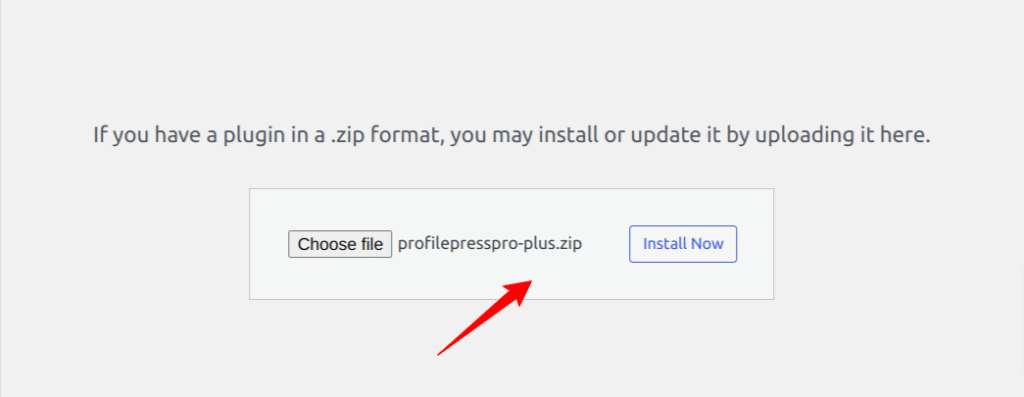
Once you have downloaded the plugin, login to your WordPress admin dashboard, and navigate to the Plugins page; click on the “Add New” button and click “Upload Plugin“.
Next, click “Choose file” to select the previously downloaded plugin zip file. Click “Install Now.”
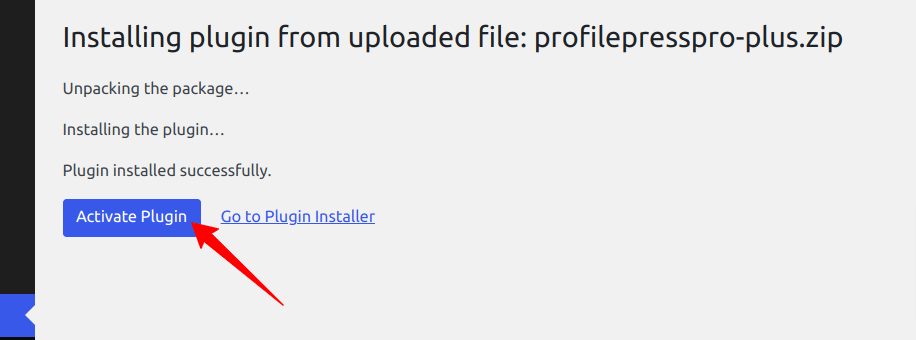
After installation is complete, click the Activate Plugin button.
At the top of the page, you will see a notification that says, “ProfilePress needs to create several pages,” Click on the “Create Pages” button to complete the plugin setup.
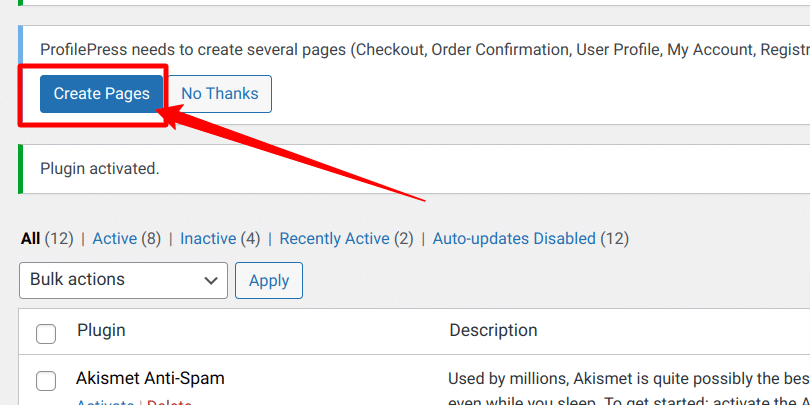
If you do not see this notification, navigate to ProfilePress > Dashboard and click the “Create pages” button to complete the plugin setup.
With this done, we have completed the initial setup of the ProfilePress plugin on our WordPress site.
Integrate Stripe Payment Gateway
After installing and setting up ProfilePress, the next step is to set up a payment gateway. We will use the Stripe Payment gateway for our WordPress payment forms for this guide. You can configure the Stripe payments on your site by navigating to ProfilePress > Settings > Payments > Payment Methods and choosing Stripe.
Click on the “Connect Stripe” button, follow the prompts, and you are all set to start accepting payments from your customers.
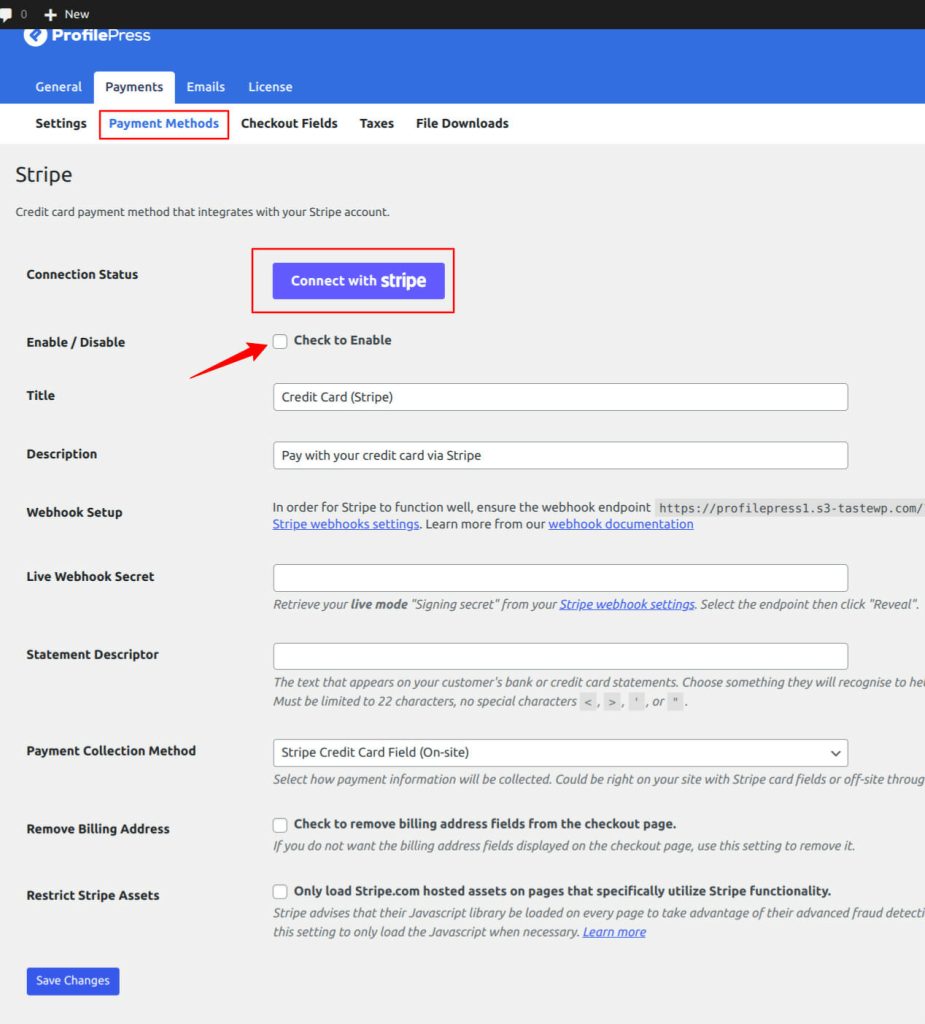
If you don’t want to use Stripe, ProfilePress supports other popular payment gateways like PayPal, Razorpay, Paystack, and Mollie.
Activate Tutor LMS Addon in ProfilePress
The next step is to activate the Tutor LMS Addon in ProfilePress. Navigate to ProfilePress > Addons, scroll until you find the Tutor LMS addon, and activate it.
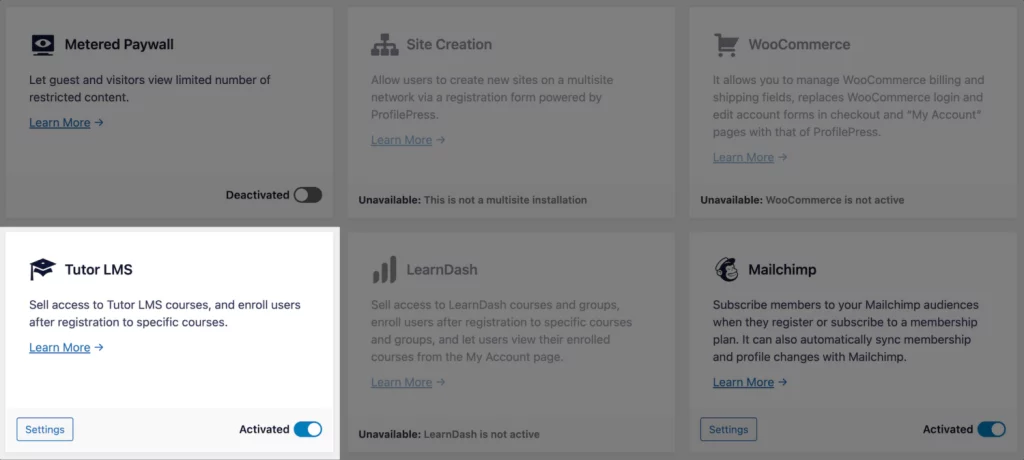
After activating the addon, you can find its setting by navigating to ProfilePress > Settings > Tutor LMS.
Selling Tutor LMS Courses with ProfilePress
ProfilePress Tutor LMS addon lets you sell your courses with ease. It works by associating one or multiple courses to a membership plan.
You can combine two or more related courses into a bundle, price it lower than the cost individually, and sell this to your users. There are a lot of things you can do with the ProfilePress integration.
Navigate to ProfilePress > Membership Plans to create a new membership plan or open up the edit screen of an existing plan that you want to use to sell your course.
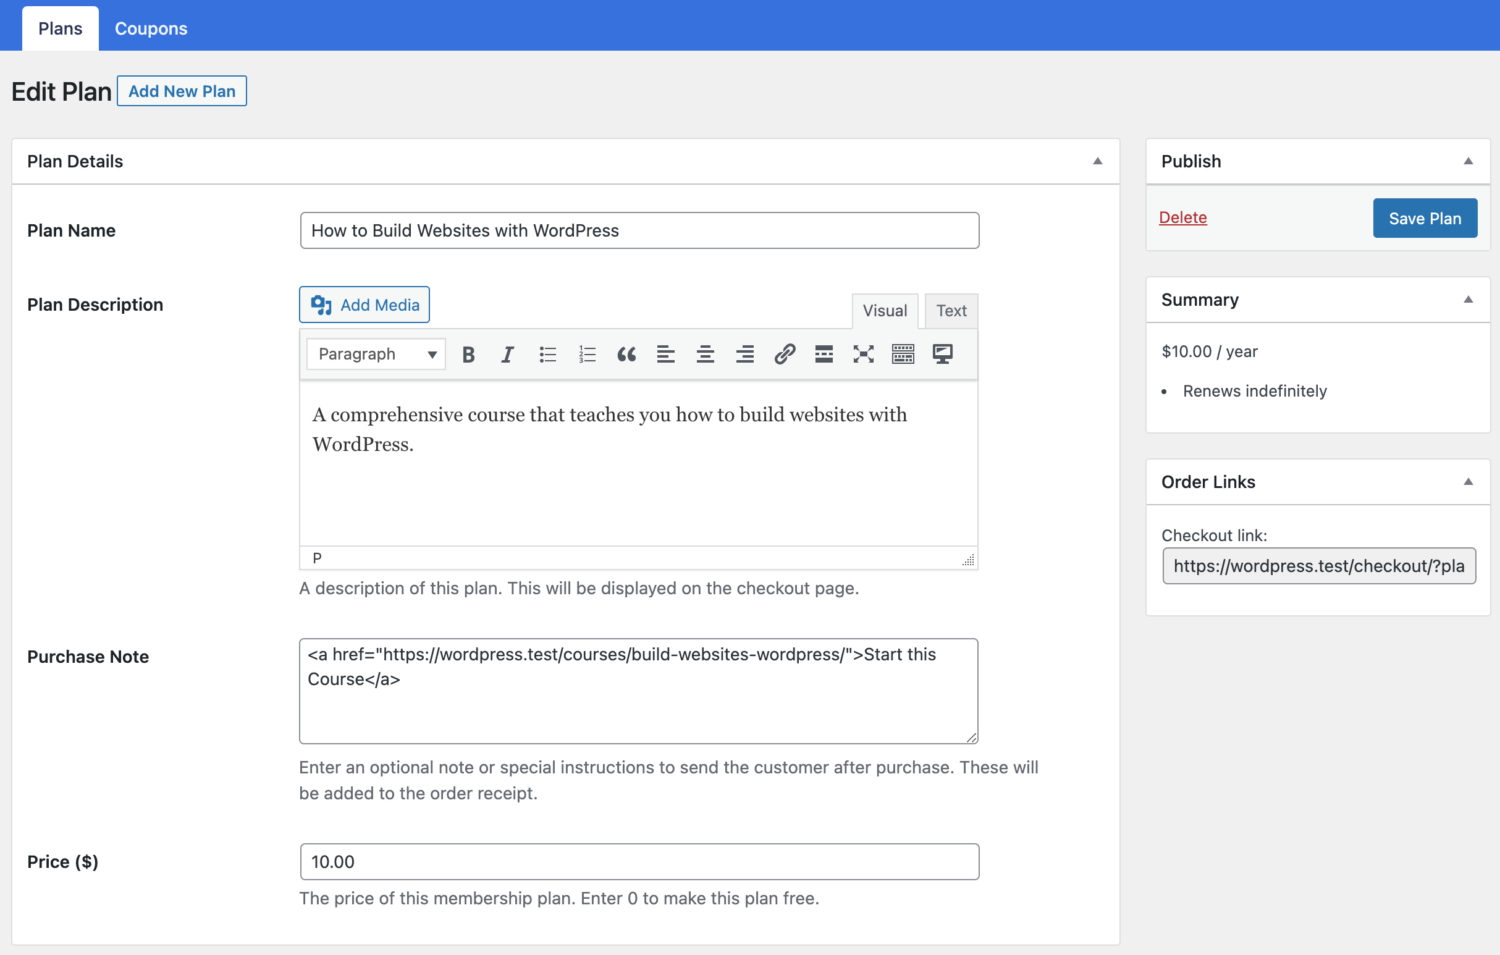
Provide the plan name, description, and price.
ProfilePress has a built-in field called “Purchase Note” shown to the customer after a successful purchase on the order confirmation page and in the customer’s receipt email. Consider using this field to provide instructions or the next steps for taking your course, along with a link to the course page.
This field accepts HTML so you can include a direct link to the course for the student. Here’s an example of creating a link to your course. Replace the URL with the URL to your specific course.
“<a href=”https://yoursite.com/courses/build-websites-101/”>Start this Course</a>”
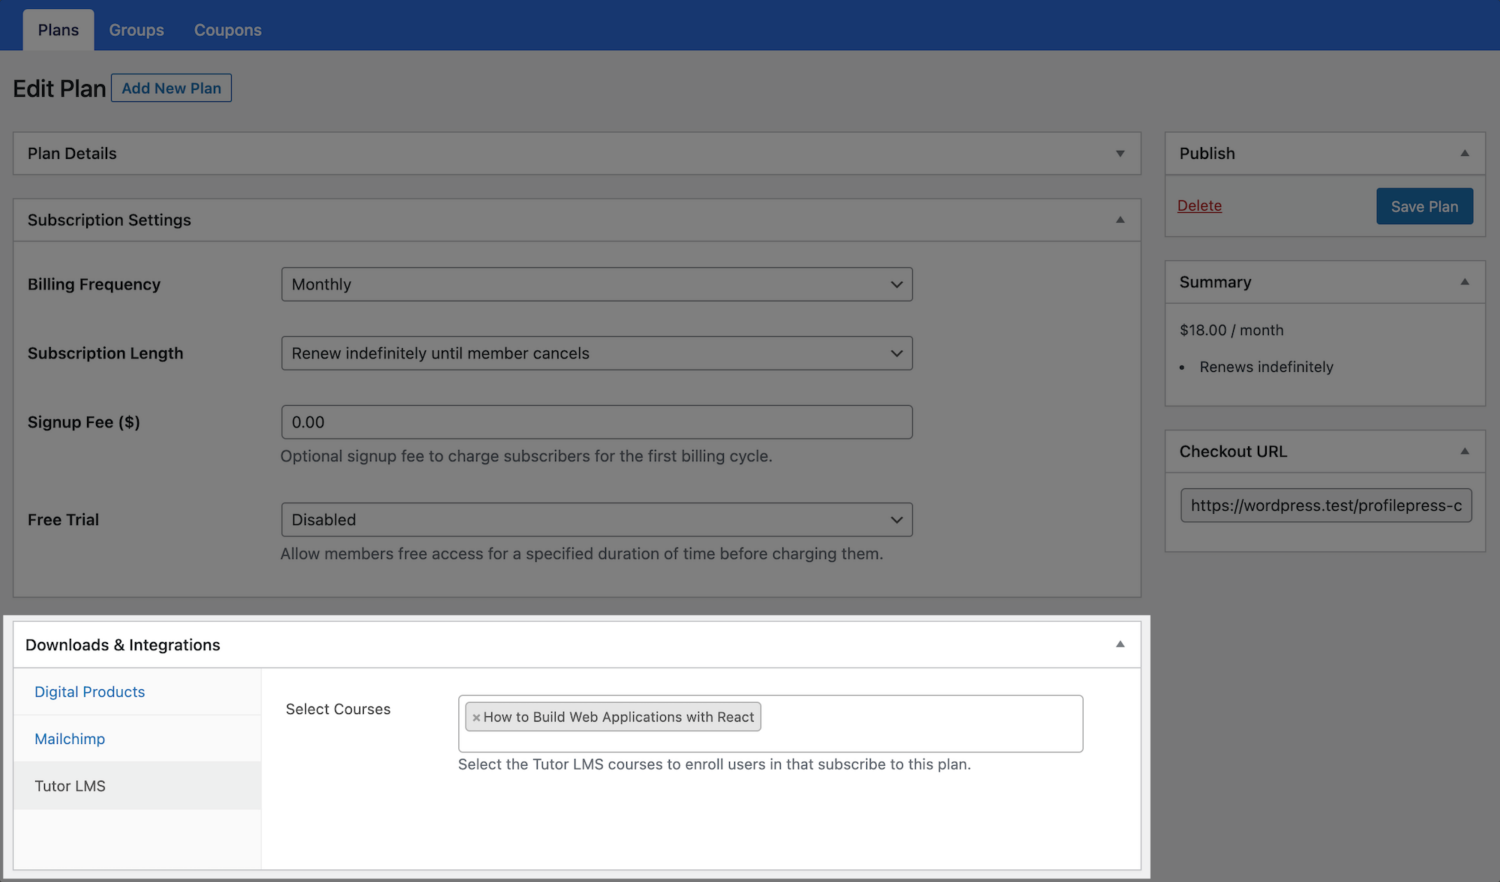
Scroll down to the Subscription Settings section to set the plan or course fee as a recurring payment that can be charged daily, weekly, monthly, quarterly, every six months, or yearly.
Finally, on the Downloads & Integrations section, select the Tutor LMS courses and groups to grant users access after purchasing the membership plan. Select the course you created earlier to start charging a fee for it.
Save your changes, and your membership plan will be created. Note that if the membership plan is a subscription that charges a recurring fee, access is automatically revoked if the subscription is refunded or expired.
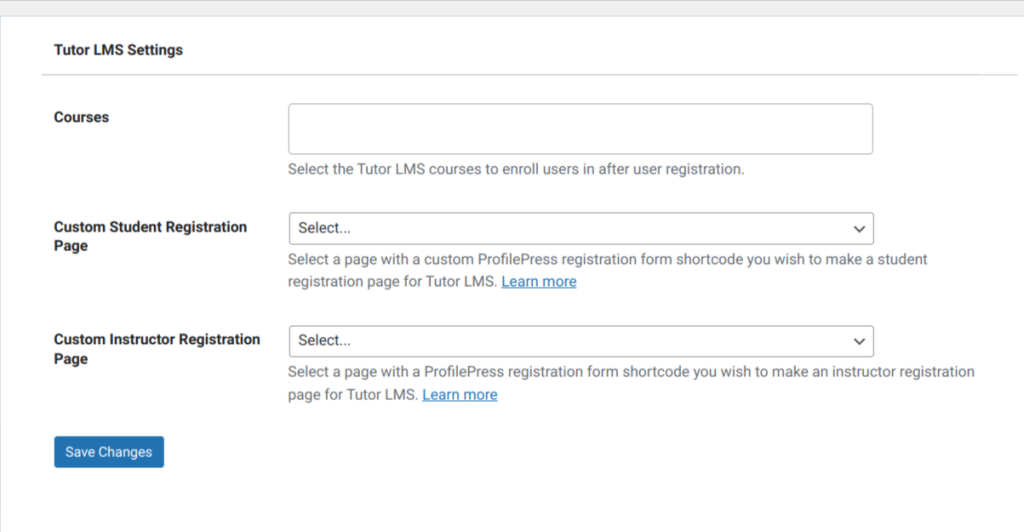
Connect Tutor LMS with ProfilePress
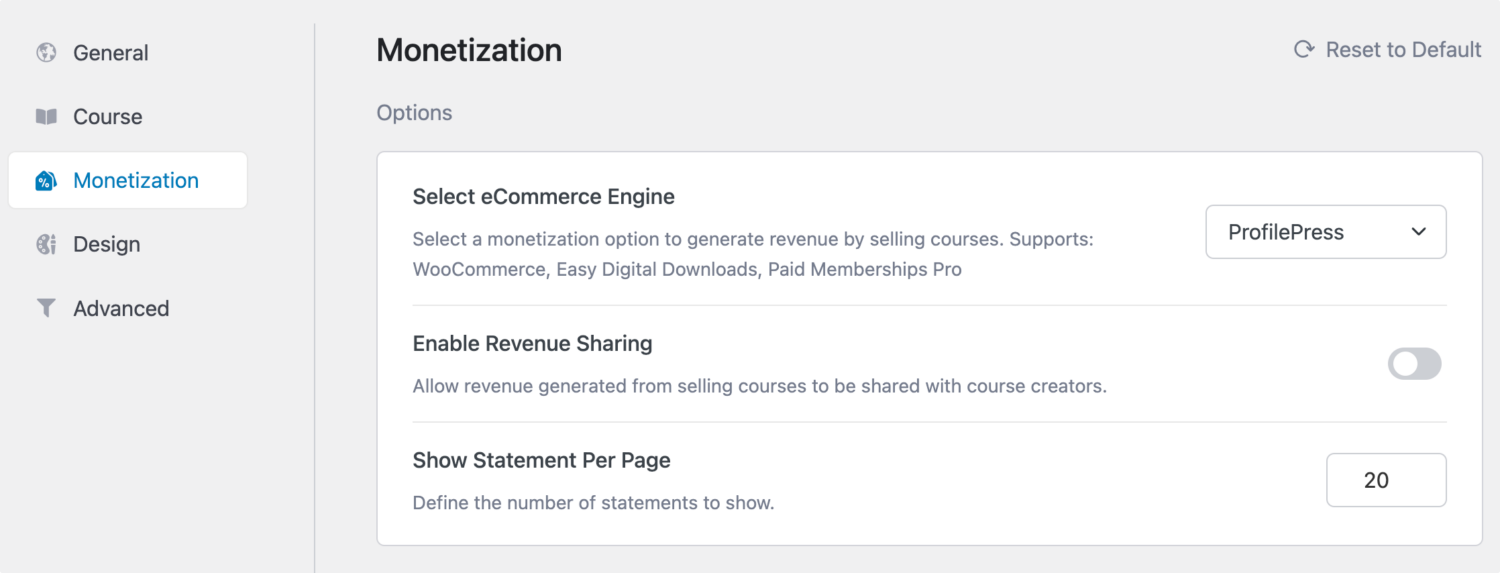
The next step is to connect Tutor LMS to ProfilePress. Tutor LMS has a Monetization page in its settings, allowing you to choose a Monetization engine for your eLearning website.
Navigate to Tutor LMS > Settings > Monetization. Select ProfilePress as your eCommerce Engine and click the Save Changes button at the top.
With this done, When users visit any course page protected by a ProfilePress membership plan, they will see a “Subscribe Now” button that takes them to the checkout page to complete their purchase.
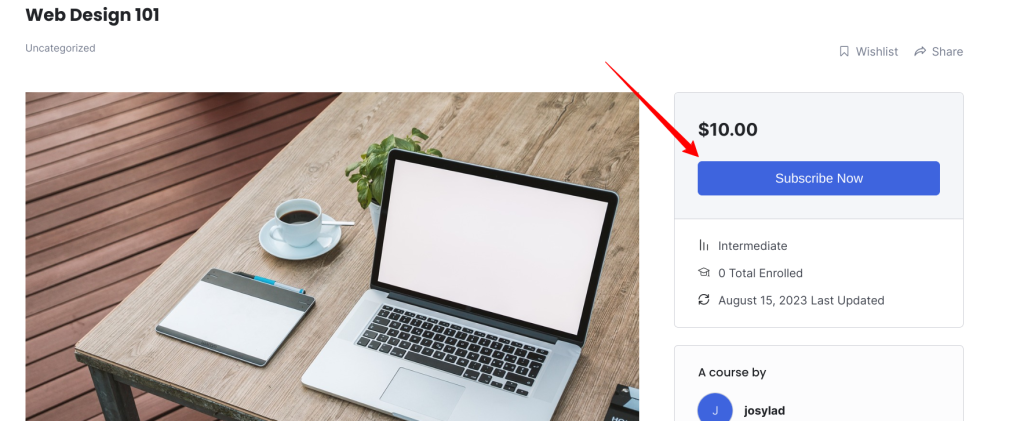
If you selected the course you created earlier while creating the ProfilePress membership plan, then this course would be a paid course by now; the subscribe button and price will be visible on the course page.
Conclusion
Creating an eLearning website does not need to be an expensive or rigorous task. With WordPress, Tutor LMS, and ProfilePress, you can quickly build a robust eLearning website.
Tutor LMS is a great tool to deploy for your Learning Management System quickly. When combined with ProfilePress, your eLearning platforms become more supercharged, especially with the Payments Integrations available through ProfilePress Tutor LMS Addon.