I have heard and read so many positive reviews on PhpStorm IDE in the past. I didn’t bother giving it a try as I was a long time and satisfied user of Aptana Studio.
I recently stopped using Aptana for PHP development because I got tired waiting for an update to support PHP 5.4 and later.
At last, a chance to try out PhpStorm.
So far, I am quite satisfied and happy with it hence I purchased an academic License to continue using it after the trial period elapsed.
As a WordPress plugin developer, I got excited when I discovered PhpStorm support WordPress out-of-the-box.
In this article, I will walk us through the steps on setting up PHP Code Sniffer on PhpStorm
PHP Code Sniffer is a PHP5 script that tokenises PHP, JavaScript and CSS files to detect violations of a defined coding standard. It is an essential development tool that ensures your code remains clean and consistent. It can also help prevent some common semantic errors made by developers.
Personally, I use the WordPress standard to ensure my plugins code adhere to the WordPress coding standards.
We will get PHP Code Sniffer installed via PEAR.
If you are using a WAMP (Windows-Apache-MySQL-PHP) developmental server other than XAMPP, there is a possibility that PEAR isn’t installed.
If PEAR is absent, follow the steps below to get it installed.
- Download PEAR’s installation PHAR file, copy and paste it to your PHP server installation directory (i.e. where php.exe resides).
- Open windows command prompt: Start -> type in ‘cmd’ -> press Enter.
- CD into your php server folder (in XAMPP, the folder is C:\path\to\xampp\php) like this:
cd c:\path\to\php\server\folder - Run the following command to start the PEAR installation.
php go-pear.phar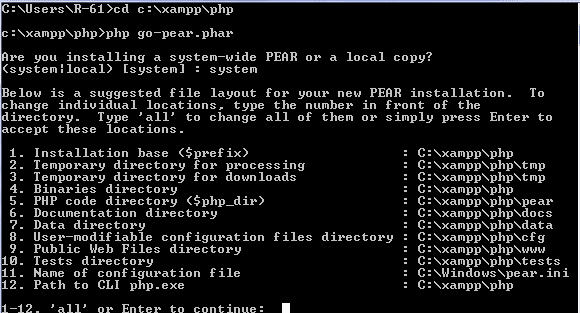
- Follow the on-screen instructions to complete the installation.
If like me, you use XAMPP, you don’t need to install PEAR and PHP_CodeSniffer because they ship with XAMPP by default.
To confirm that CodeSniffer is installed, run the following command phpcs -i and you should see a list of installed Coding standard otherwise run the pear command below to get it installed.
pear install PHP_CodeSniffer
Now that we have CodeSniffer installed, next is to set it up in PhpStorm alongside the WordPress Coding Standards.
The list of installed Coding standard on my XAMPP doesn’t include that of WordPress hence the installation.
I will use XAMPP as the base of our Phpstorm Code Sniffer setup.
- Download the CodeSniffer WordPress standard.
- Unpack the downloaded archive, copy the WordPress folder and paste it to XAMPP CodeSniffer’s “Standard” folder located at path\to\xampp\php\pear\PHP\CodeSniffer\Standards
- Navigate to PhpStorm settings via File -> Settings or Ctrl + Alt + S
- Configure PHP Code Sniffer by providing the path (path\to\xampp\php\phpcs.bat) in Settings | PHP | Code Sniffer.
Click the Validate button to check if the Code Sniffer tool can be reached.
- Go to Settings | Inspections | PHP | PHP Code Sniffer validation. Select WordPress or the available coding standard in the list (use the refresh button if needed). Click OK.

Now your code is inspected by PHP Code Sniffer with the selected Coding Standard.
In addition to PhpStorm’s inspections, you will see notifications marked phpcs in the editor.

If you run batch inspections with Code | Inspect Code PHP Code Sniffer, the results of PHP Code Sniffer inspections will be listed in the section PHP | PHP Code Sniffer validation.

Whew!!! Tutorial Ends here.
Have any question, suggestion, criticism? Let me know in the comments.