Do you want to add social logins to your WordPress website?
As a website owner, offering the best user experience is crucial to your business, especially if you run an eCommerce or membership website. If your website requires user registration, you can leverage social login to reduce the friction in the login, checkout, and registration process and give a better user experience to your site visitors.
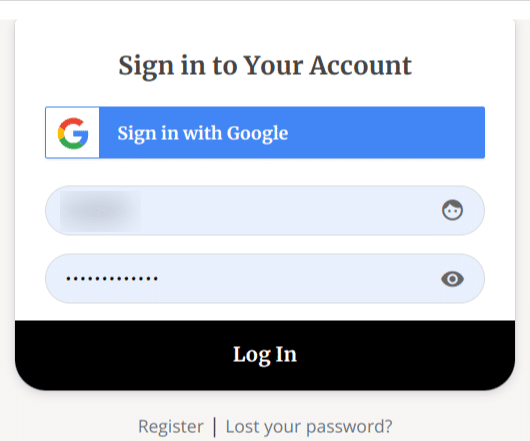
Social login allows users to create an account on your WordPress website using their existing social media accounts, such as Facebook, Google, Twitter, and Linkedin. Instead of filling out a long form will several fields, users can log in with a single click using their social media account.
With social login, your users do not need to double-check their passwords, confirm their emails, or provide a bunch of information before they can create an account on your website.
In this article, I will show you how to add social login to your WordPress website using a WordPress user registration plugin called ProfilePress.
ProfilePress is the easiest way to add a social login feature to your WordPress site. It will allow your users to create an account using their existing social media accounts easily.
ProfilePress supports all popular social media platforms, including Facebook, Twitter, Google, LinkedIn, Yahoo, Microsoft, Amazon, GitHub, VK.com, and WordPress.com. The best part of using ProfilePress is that it has many other features you will find helpful in building your membership website.
Why Add Social Login to Your WordPress Website?
You can derive various benefits from adding social login to your website, and I will be sharing a few of them below.
1. Ease of use
Most people, especially millennials, don’t like filling out long user registration forms and keeping track of another username and password. However, with social login, people only need to click a few buttons, and they will have successfully created their account on your website.
2. Simplified Login
With a social login feature, users can quickly access your website without inputting a username and password on any form. They do not need to remember a password; they only need to click a button, and they can explore your website instead of trying to remember or reset their login details.
3. Less Spam
Social login allows you to get more accurate data about your users. When a user chooses to log in with their social media account, the information they will receive from their social media account is usually accurate. You will receive almost precise information about the name, gender, age, etc. This helps you to reduce spam registrations and fake user information on your website.
How to install the ProfilePress Plugin
To start adding social login to your WordPress site, you will need to purchase a ProfilePress Pro License and install the ProfilePress plugin. To do that, head to the ProfilePress website to purchase a suitable license plan.
After purchasing your copy of the ProfilePress Plugin, you will receive a confirmation email with a link to download the plugin zip file and your license key. You can also download the plugin from your account page on the ProfilePress website.
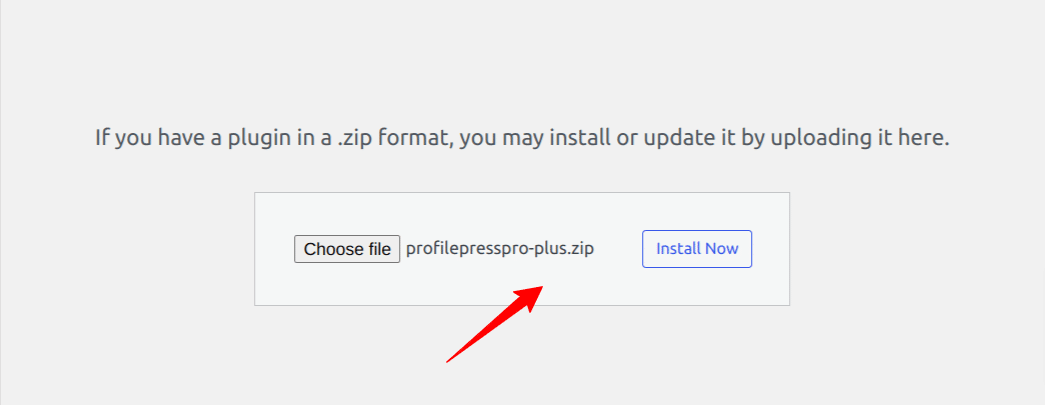
Once you have downloaded the plugin, login to your WordPress admin dashboard, and navigate to the Plugins page; click on the “Add New” button and click “Upload Plugin“.
Next, click “Choose file” to select the previously downloaded plugin zip file. Click “Install Now.”
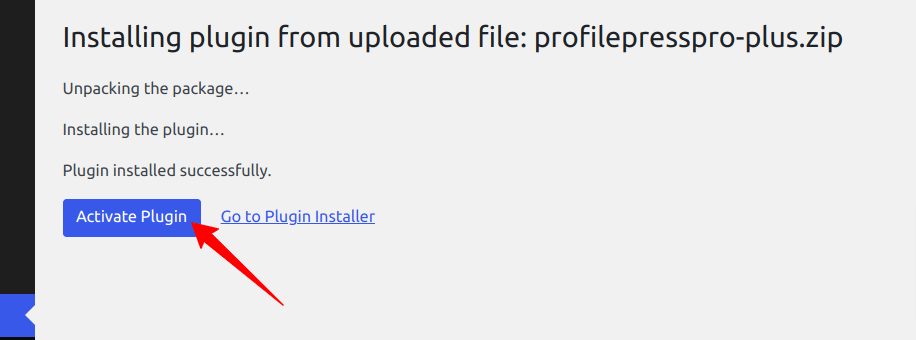
After installation is complete, click the Activate Plugin button.
At the top of the page, you will see a notification that says, “ProfilePress needs to create several pages,” Click on the “Create Pages” button to complete the plugin setup.
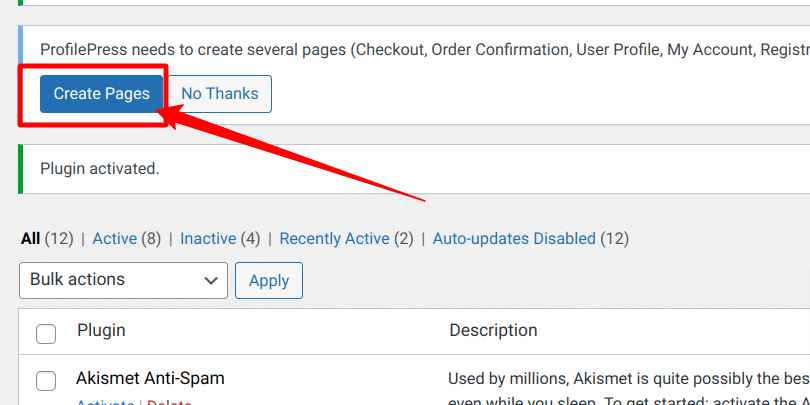
If you do not see this notification, navigate to ProfilePress > Dashboard and click the “Create pages” button to complete the plugin setup.
With this done, we have completed the initial setup of the ProfilePress plugin on our WordPress site, and we can move on to the next step, which is creating the user registration form.
How To Add Social Login with ProfilePress
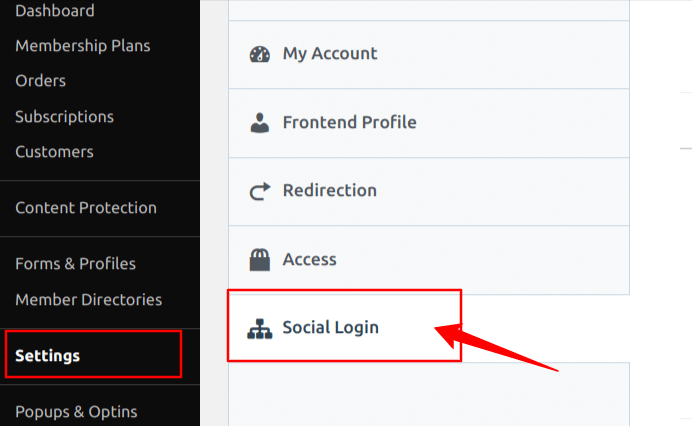
Now that our ProfilePress is all setup, the first step to adding social login to your website is to activate the “Social Login Add-on” from the Add-ons page.
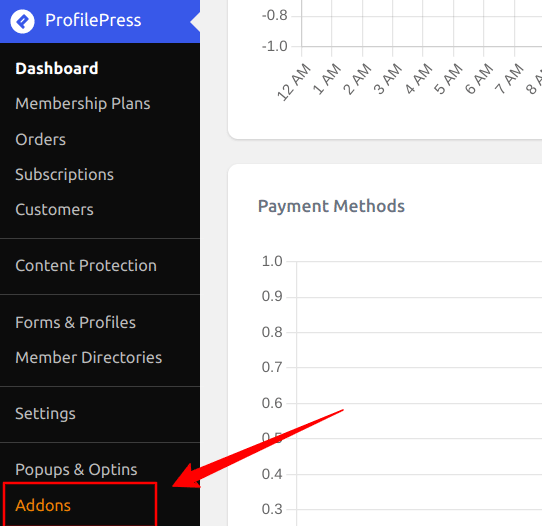
Navigate to ProfilePress > Add-ons, and on this page, you need to scroll down to find Social Login and activate it.

Next, go to ProfilePress > Settings and click on the Social login tab from the left menu. You can enter the API details for all supported social platforms on this page.
For this article, we will use Google as an example. We will set up our website so anyone can log in with their Google account.
If you want to set up any of the other social networks, you can check the ProfilePress Documentation for each social platform configuration.
Google Application Setup
The first step is to visit the Google Developers Console, where you must create a project. Next, you will need to signup or log in to your existing Google account.
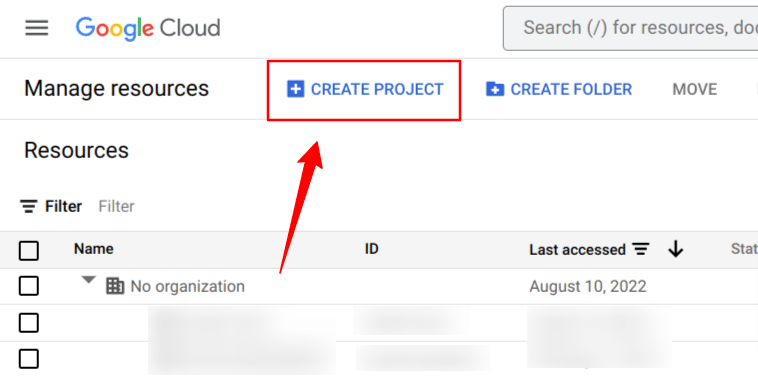
Once logged in, click the “Create Project” button, and you will be presented with a form requesting some information. Enter a Project name and click on the “Create” button.

Once the project is created, select it from the list of all projects, and it will take you to your project dashboard.
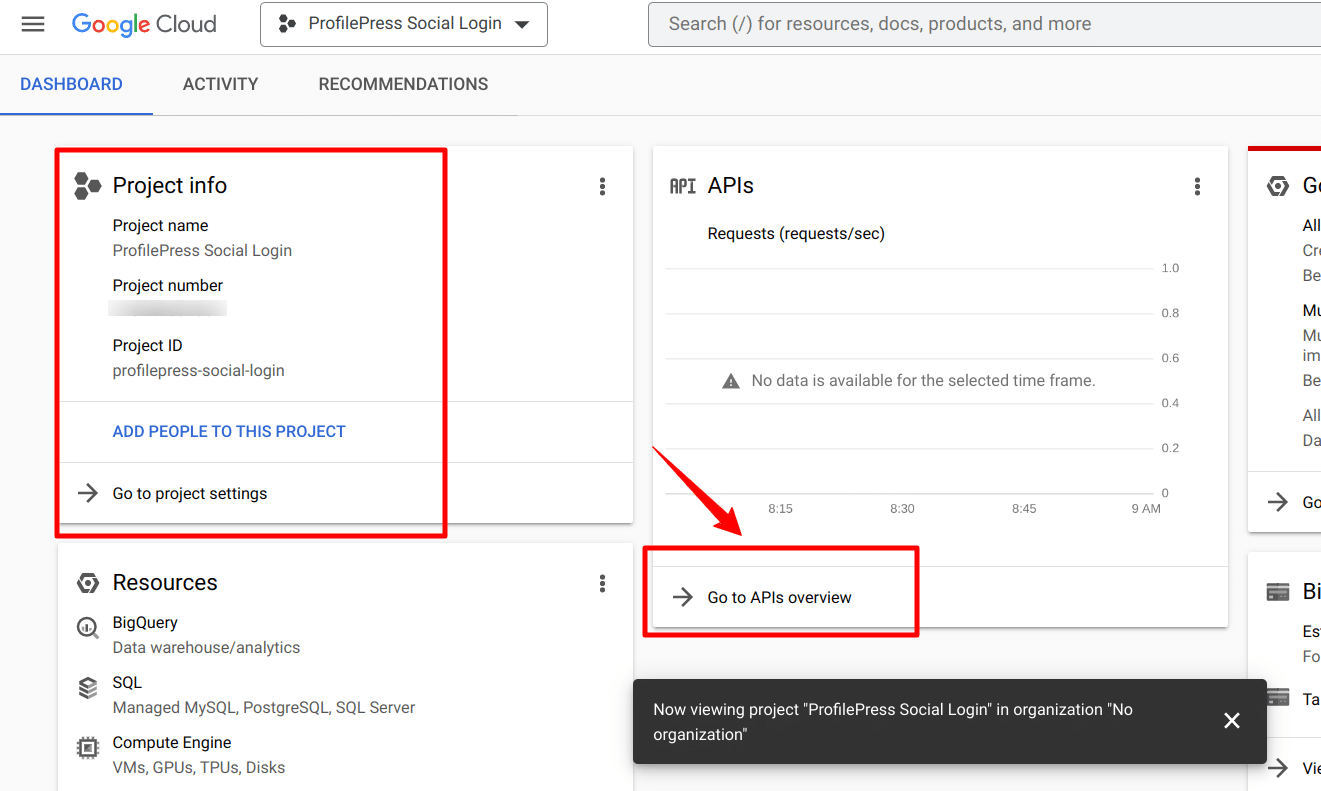
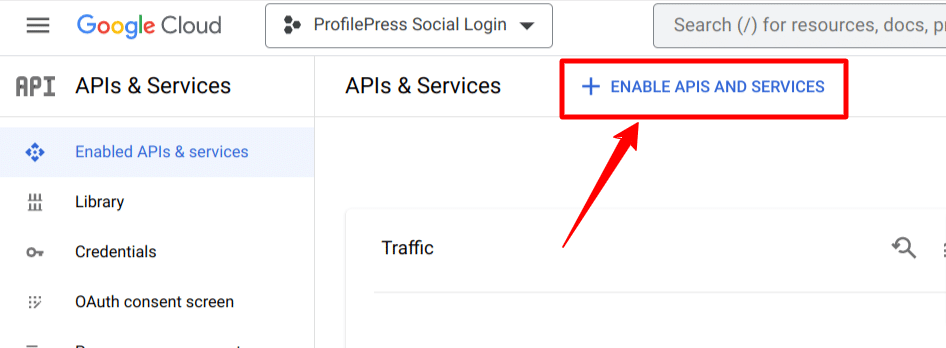
Next, click on the “Go to APIs overview” link from the project dashboard and then click on the “ENABLE APIS AND SERVICES” button.
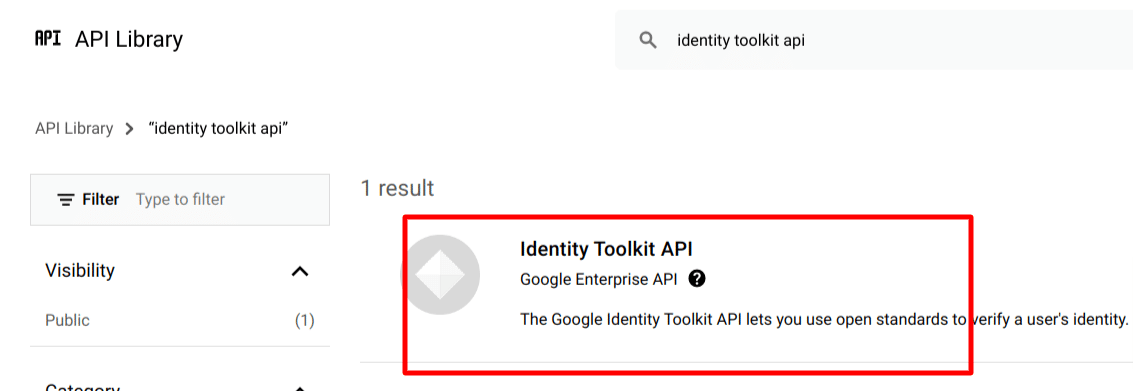
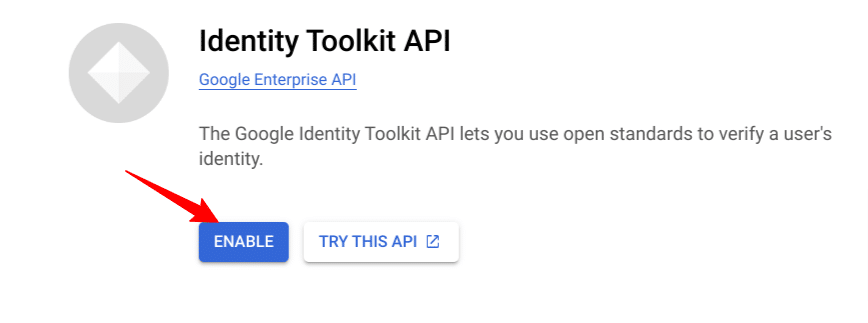
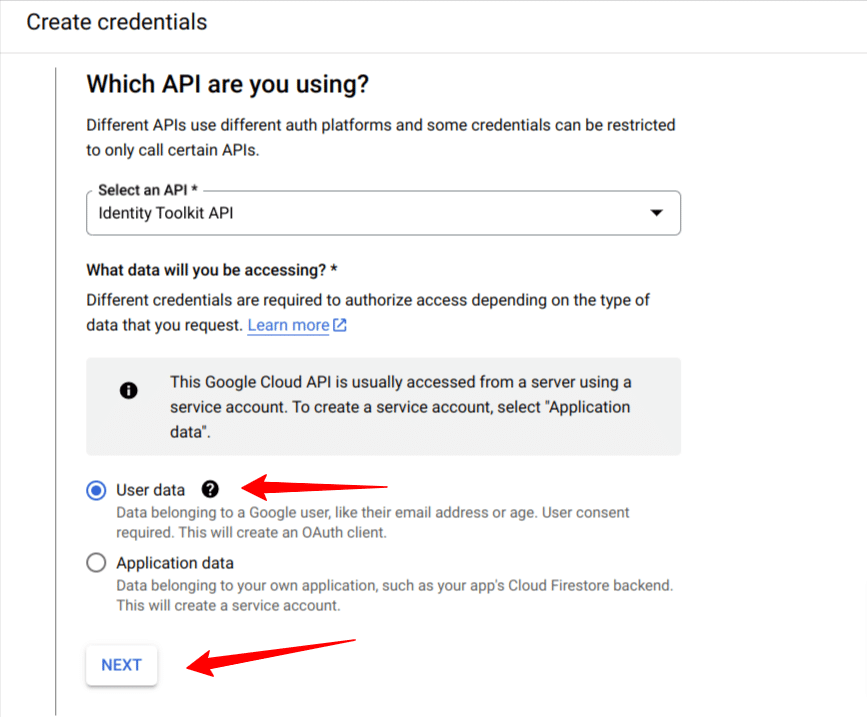
Search for “Identity Toolkit API” and enable it.
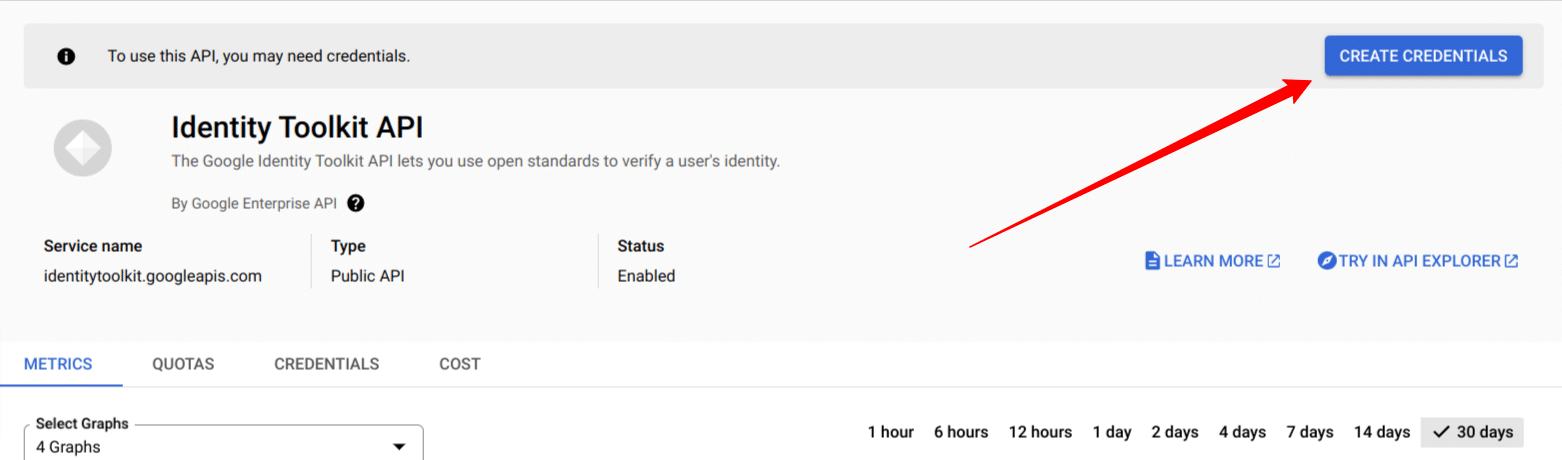
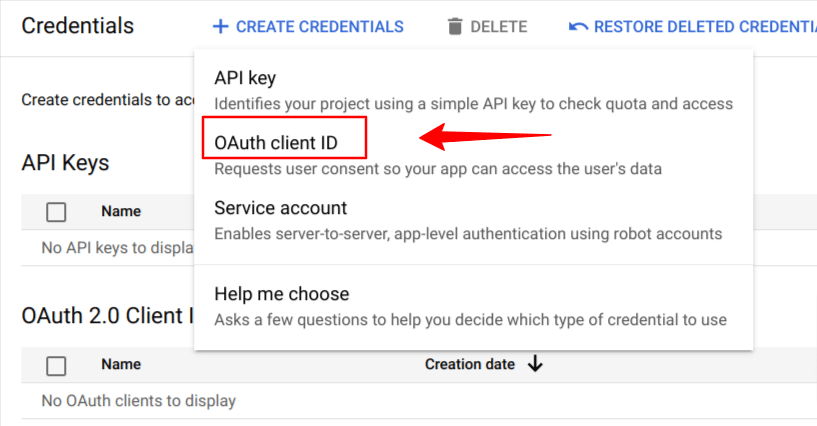
You will be redirected to its Identity Toolkit Service page. Click on the Create Credentials button at the top to be redirected to the page where you will create your OAuth credentials.
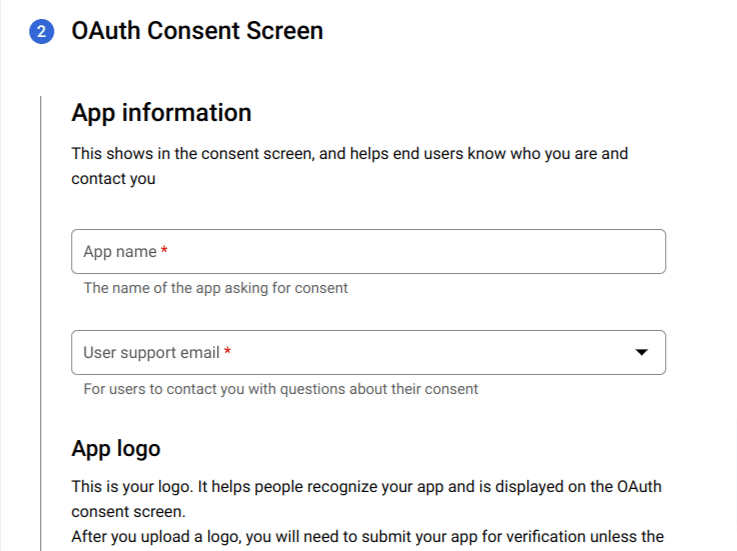
Before you can create an OAuth credential, you will be asked to first complete a consent screen with information about your application where you will need to supply an App name, logo, support email, and authorized domain as well as URL to your homepage, privacy policy and terms of service.
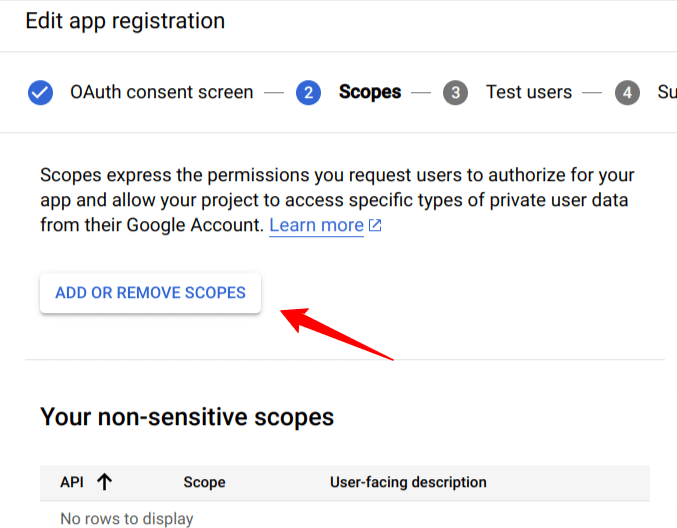
Save and continue. On the Scopes screen, add the scopes shown below.
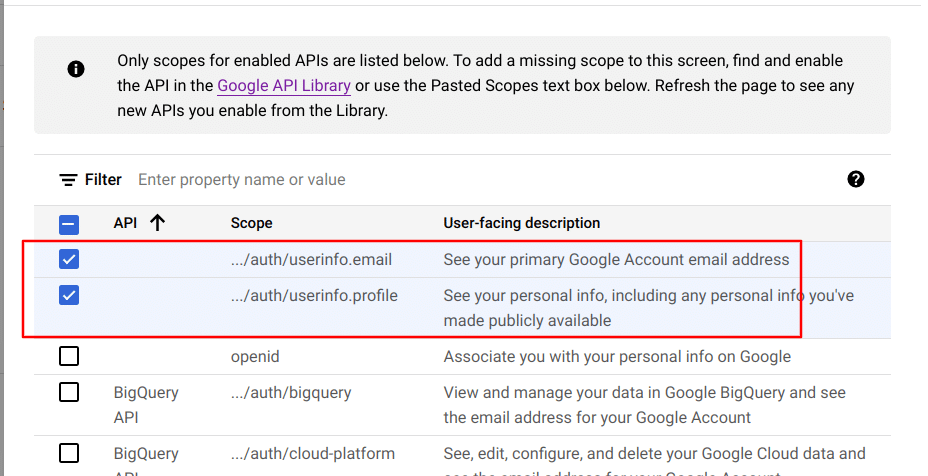
Scroll down and click the update button to save the scopes. Then click “Save and Continue” on the main page, and you are done with the scopes.
Next, Click on the Credentials from the left sidebar menu, click Create Credentials button at the top, then choose OAuth client ID.
Select “web application” as the application type, set a name, and add the following as “Authorized redirect URIs.”https://yourwebsite.com/ppauth/google. Replace “yourwebsite.com” with your website domain.
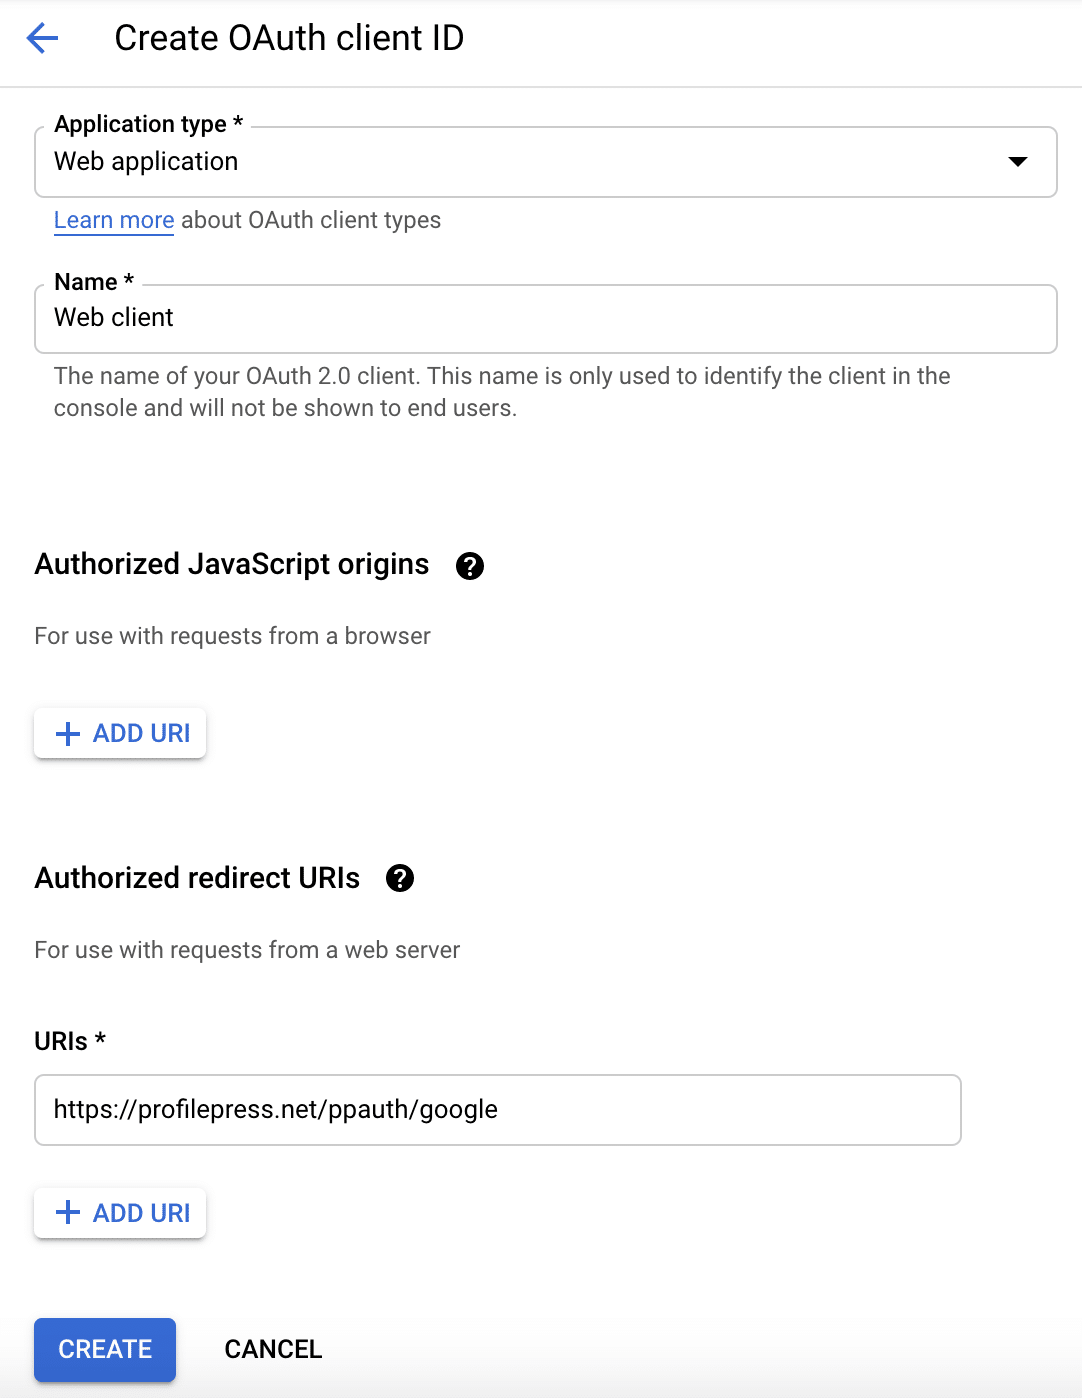
Click the Create button when you’re done, and a popup with your OAuth credentials will be shown to you. If there isn’t a popup, click the application title to reveal the credentials.

Copy and save the API key and secret to a secure location.
Adding API Details to ProfilePress
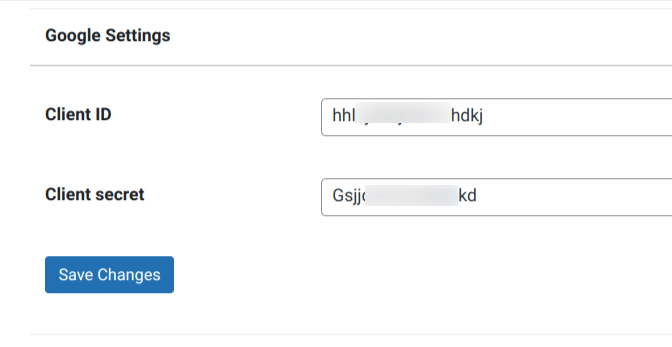
Once you complete the above step, you should have your application OAuth information.
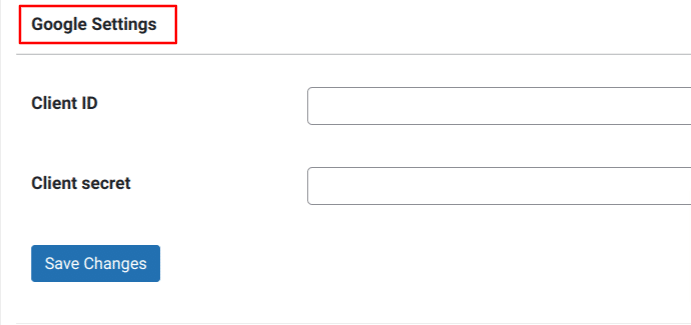
The OAuth information will include your client ID and client Secret, highlight the client Secret, copy it, and return to the Profilepress social login settings page. Next, scroll down to the Google settings section and paste it into the client secret field.
Next, copy the client ID, then paste it into the client ID field of the Google settings section. Finally, click on “save changes” to save your settings.
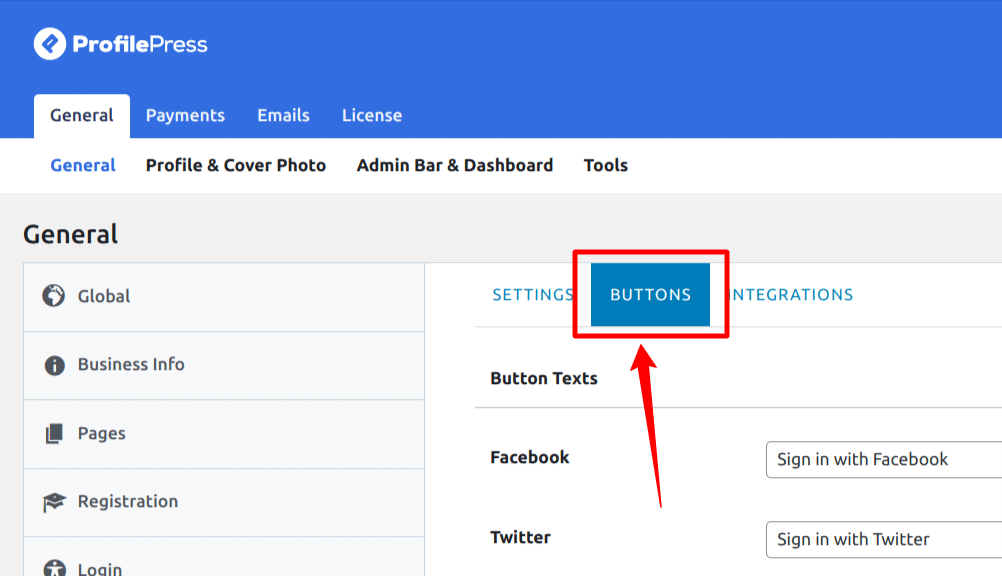
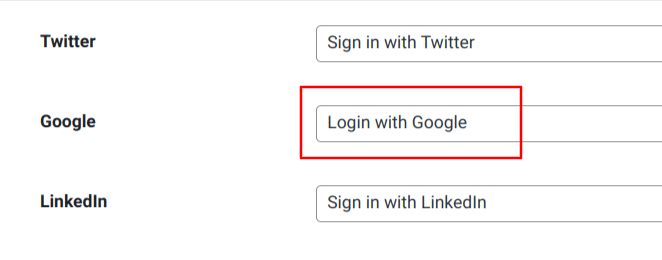
Next, click “Buttons” from the top menu pane to modify our social login button text for each social platform. Go down to the Google field, and you can change the default value to – “Login with Google” and save your changes.
Integrating the Google Social Login into Your Website
Using the available integration options, we can now integrate the Google social login feature into our website pages. You can add social login to your WordPress website through Shortcodes, Advanced Shortcodes, and HTML links.
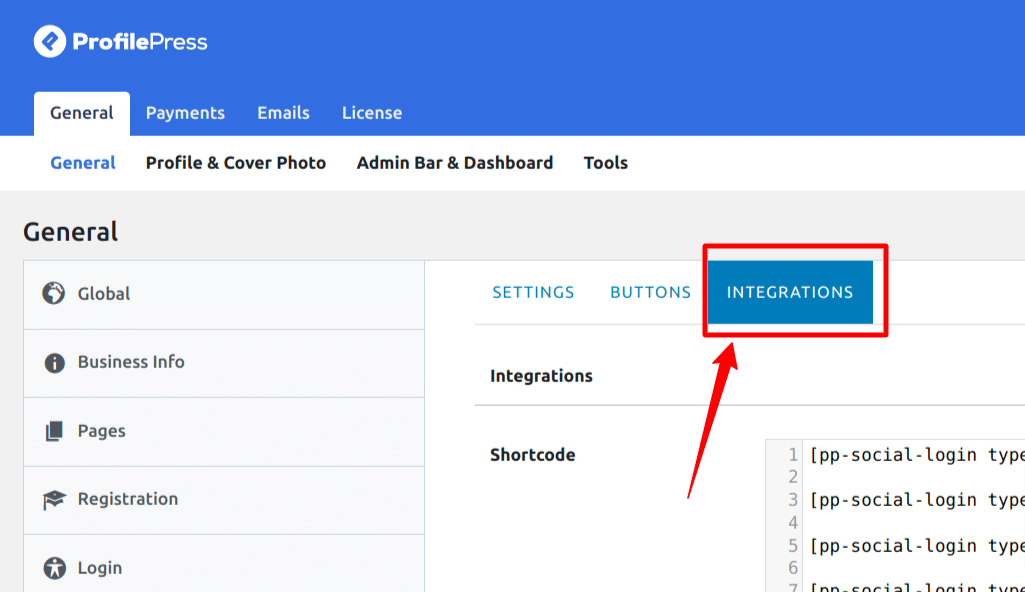
Click “Integrations ” from the top menu panel on the settings page to see the three integration options.
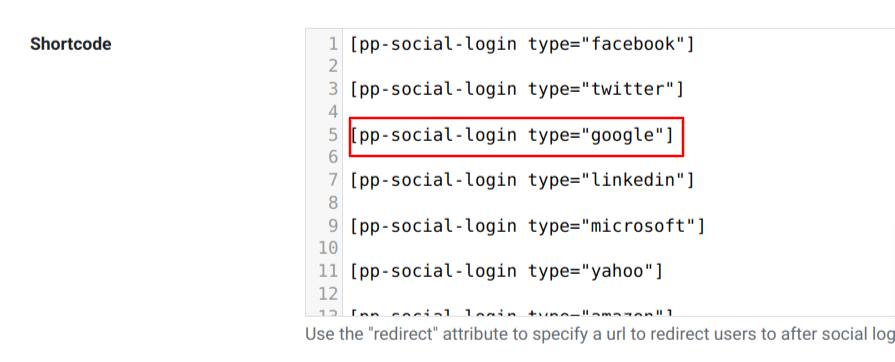
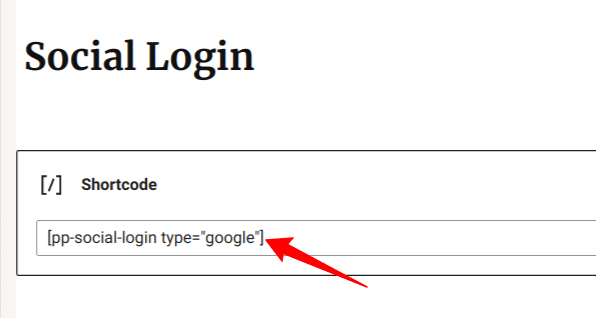
Now, let us integrate the shortcode, the first option on the list. The shortcode field displays all available shortcodes for all supported social platforms. Next, scroll down to copy the shortcode for the Google social login, and we will add it to a WordPress page.
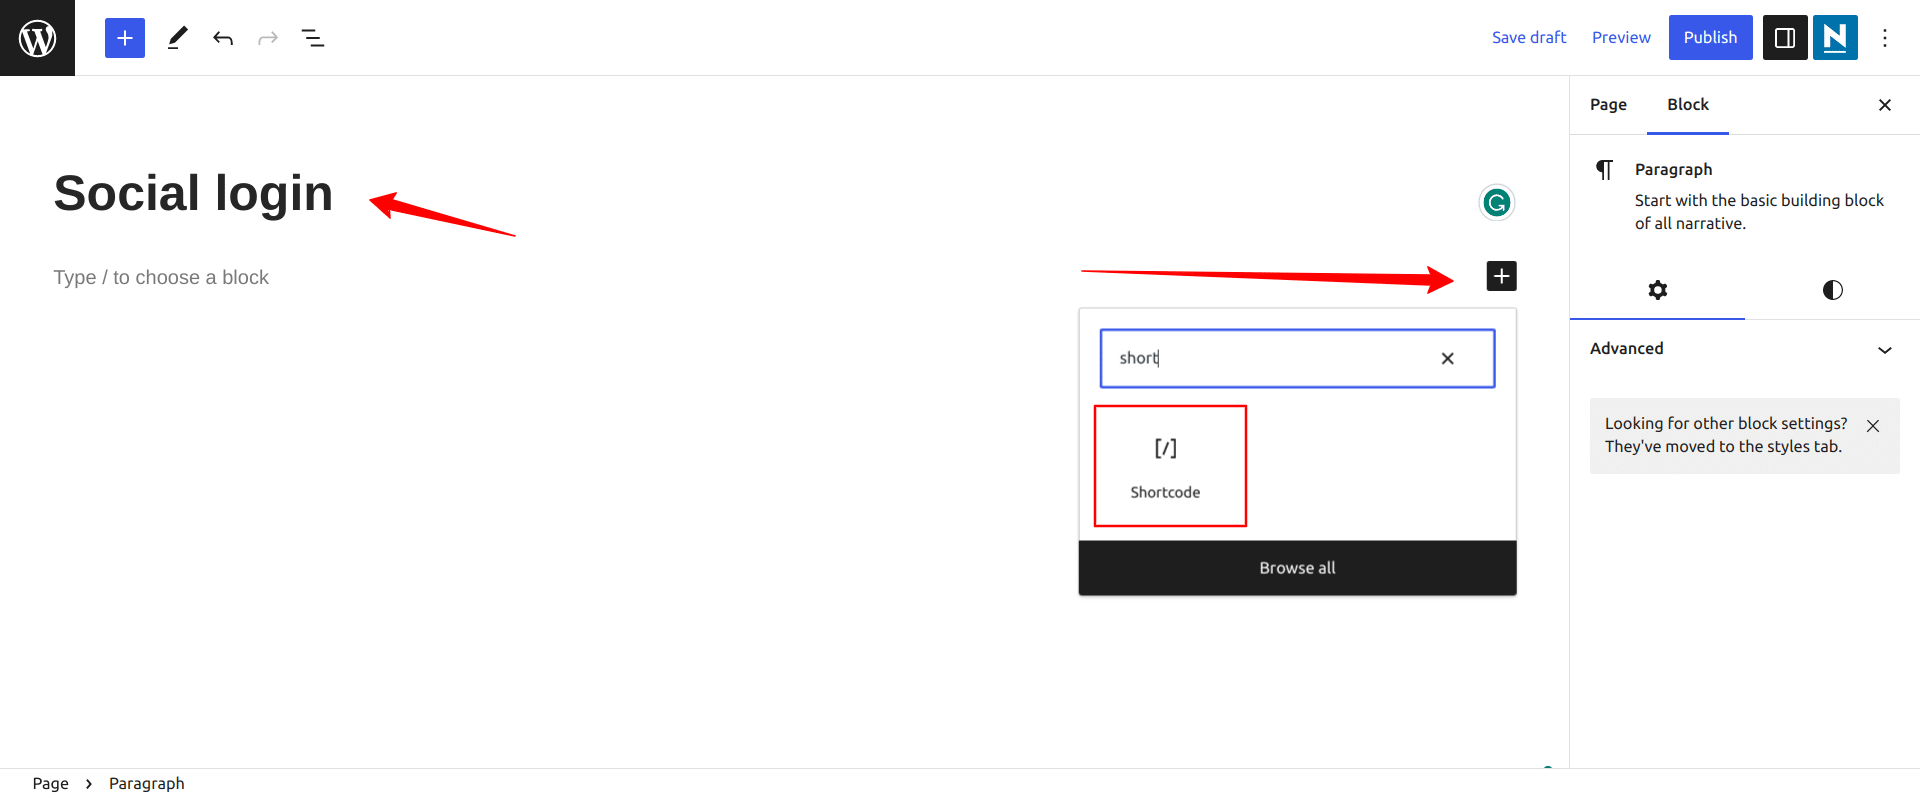
Next, Navigate to Pages > Add New, and add a Title – Social login. Then, if you use the block editor, add a shortcode block and paste the WordPress shortcode into this block.
Click on “Preview in a new tab,” and you should see a Google sign-in button. If you click on the button, it should take you to the Google sign-in authorization page, and this is precisely what your users will see when they want to log in to your website.

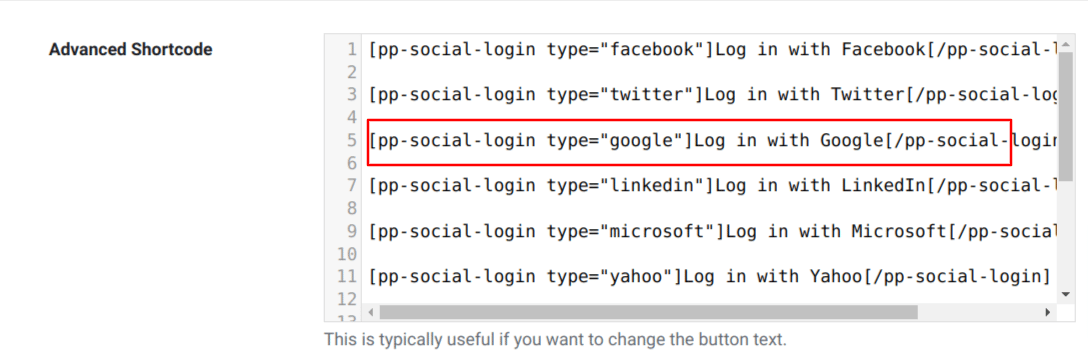
Now, let’s take a look at the Advanced shortcode. The main difference between the shortcode and Advanced shortcode integration is that you can edit the social login button text in the Advanced Shortcode.
Scroll down to Copy the advanced shortcode for the Google social login, and we will add it to our WordPress page.
Go back to the previously created social login page, delete the previous shortcode, and paste the new Advanced shortcode into the shortcode block; Click on “Preview” to see the changes.
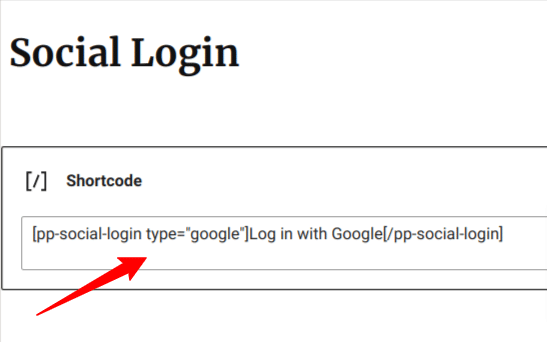
You will see that the button text is “Log in with Google,” now, with the advanced shortcode, we can easily change it by editing the text embedded in the shortcode.
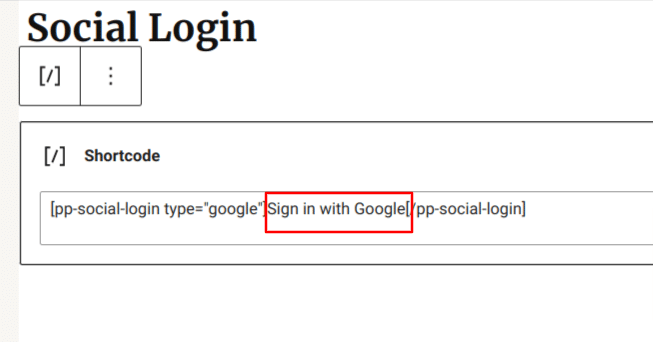
Go back to the page and edit the text in the shortcode, change it to “sign in with Google,” click on preview, and you should see an updated button text.

The HTML link integration will allow you to place a login link anywhere on your website to enable users to quickly access your website without filling out a login form. For example, you could use this link in your footer or sidebar widgets.
Adding Social Login to your WordPress Login Form
In the previous section, we have seen how to place the social login buttons on a WordPress page or anywhere else using the shortcodes, but most times, you would prefer to have the social login option on your WordPress login form so that users can opt to use it instead of a username and password.
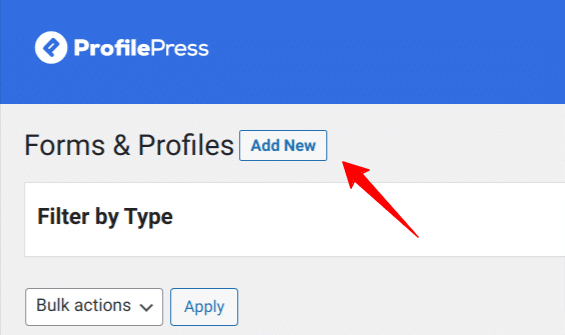
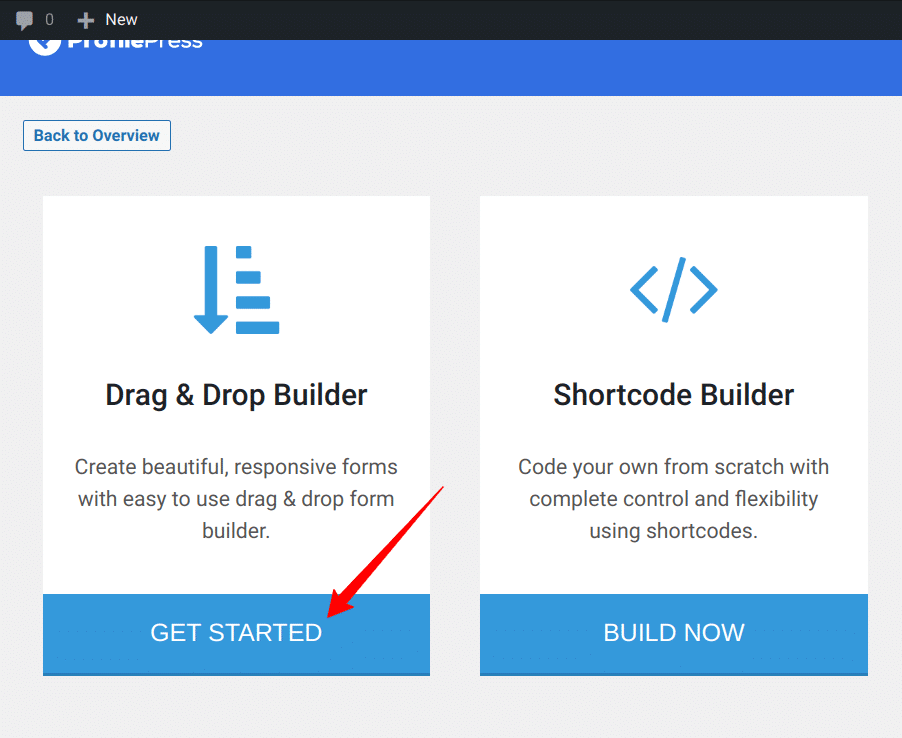
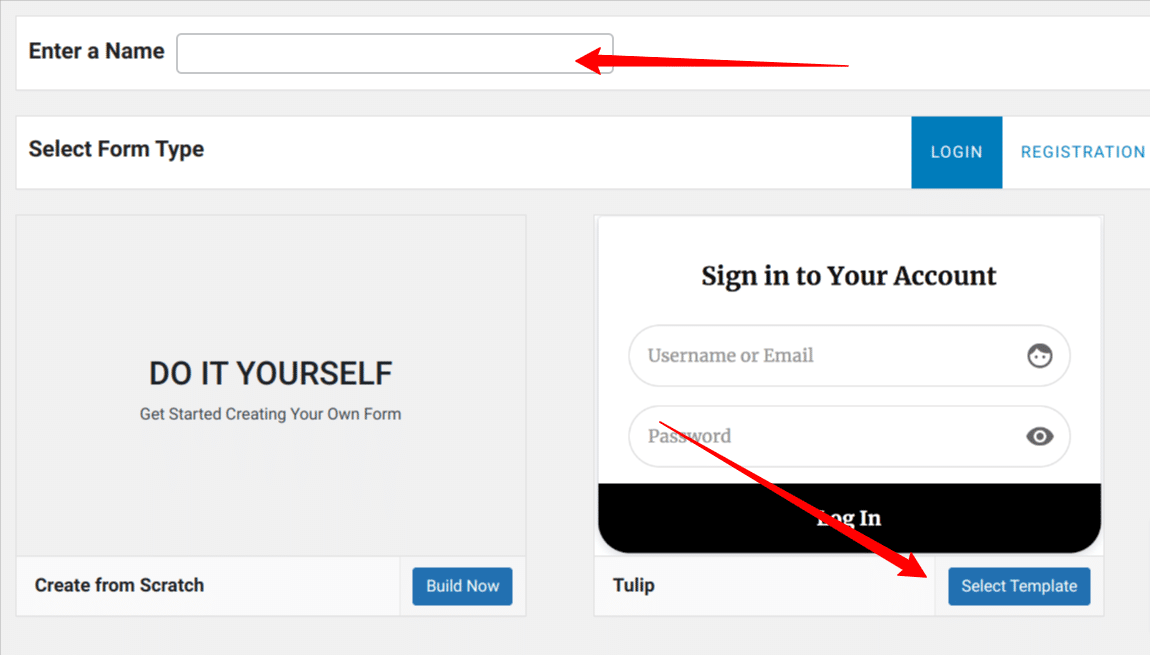
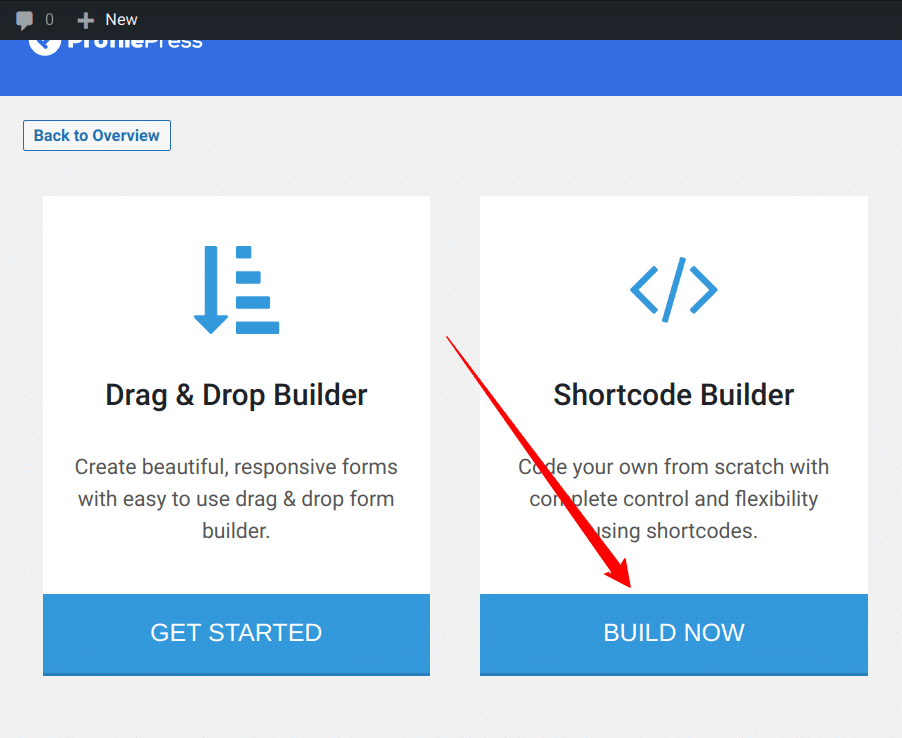
Navigate to ProfilePress > Forms & Profiles, click “Add New,” choose the Drag & Drop Builder, enter a form name – Login, and choose the first template from the available login form templates.
You will be redirected to the login form builder page, where you can edit the form and add more elements, such as the social login.
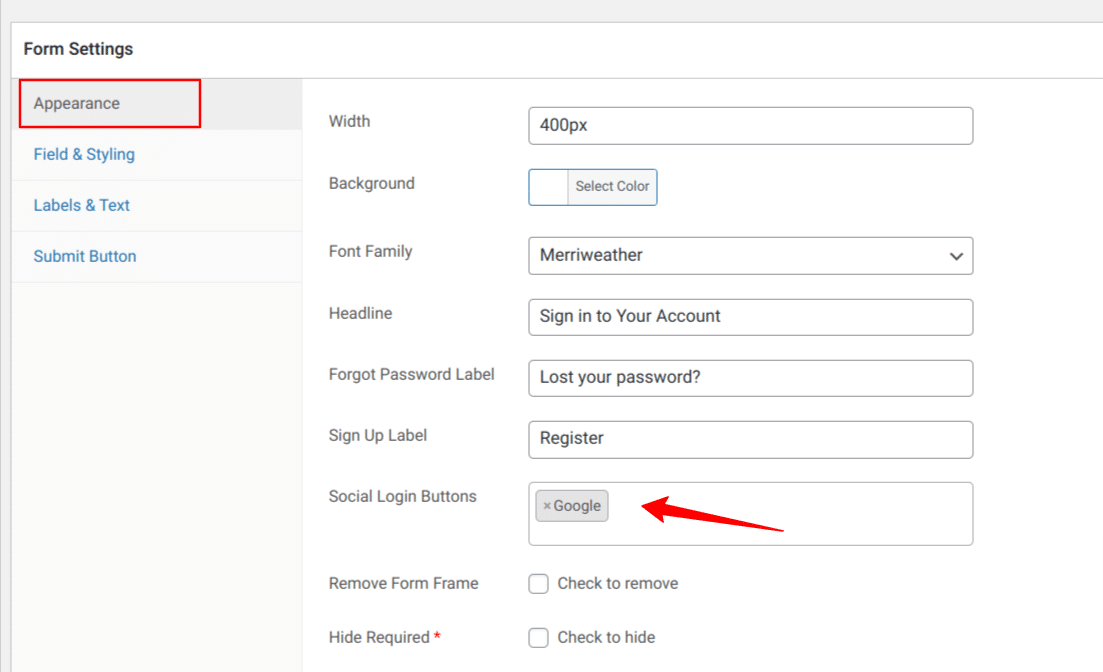
Scroll down to the Form settings section, and under “Appearance,” look for the “Social login Buttons” field, remove all the preselected options, and add only Google to this field. Next, click “save changes” and click on Live Preview to view the form.
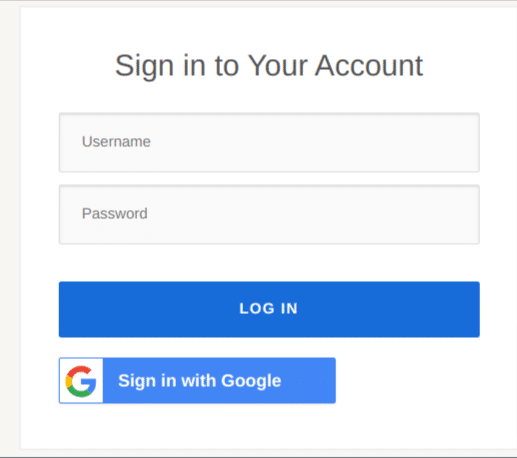
Now, you should see a login form with the Google social login option, and when you click on it, it will take you to the Google authorization page.
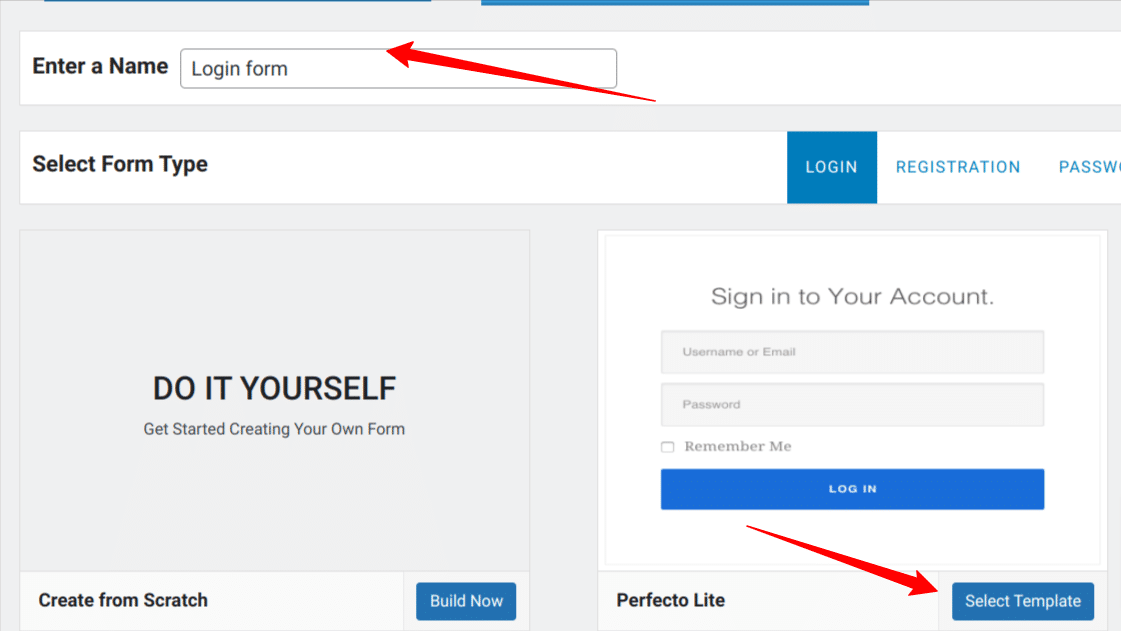
If you prefer to use the shortcode form builder, navigate to ProfilePress > Forms & Profiles, select ‘Shortcode Builder“, enter a name for your form – Login form, and choose a template.
You will be redirected to the shortcode form builder page; on this page, you can use HTML to build your form. Once you start editing your code, you will see a preview on the right-hand side.
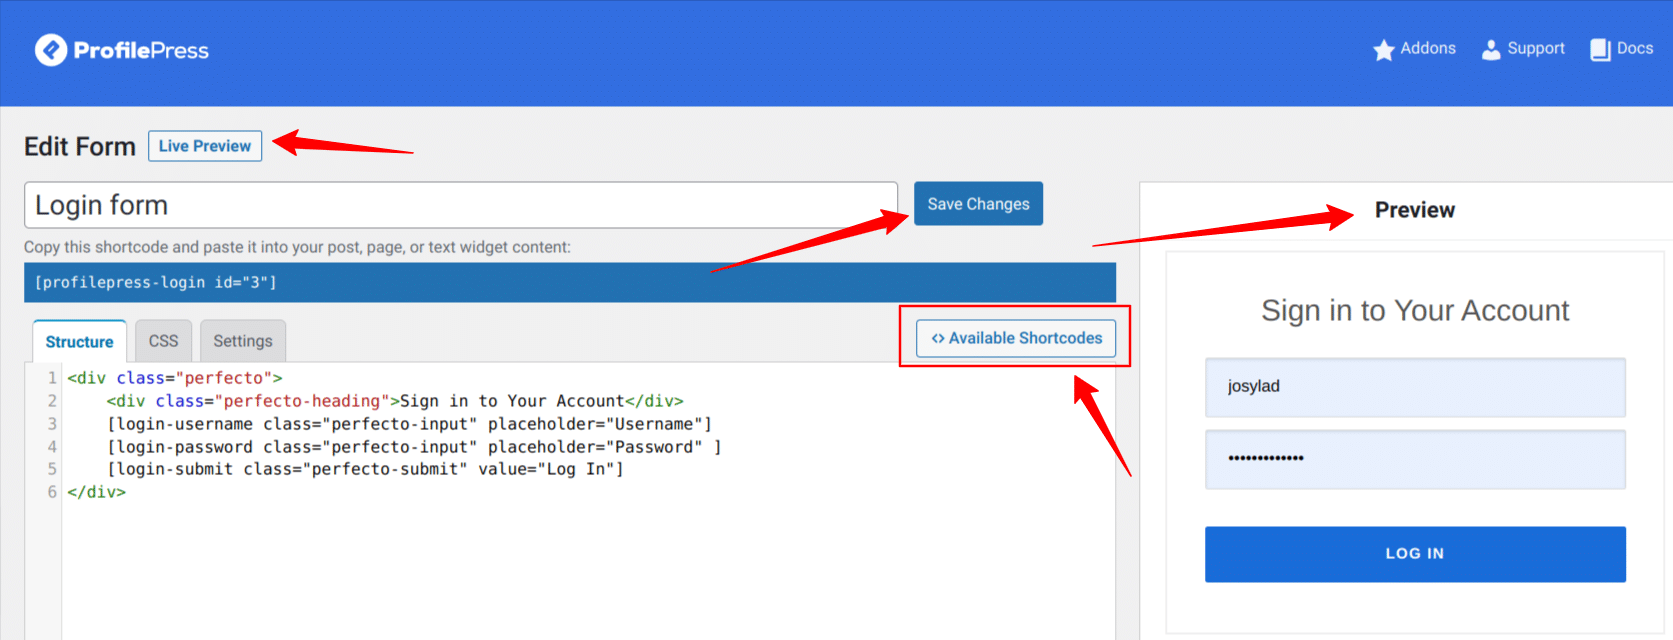
Click on the available shortcodes, then search for Social login and click on Select. You will see a dropdown to choose the social platform you want to add to your login form. Scroll down and select Google from the list, and you can also add a redirect URL to specify where to take the user after logging in.
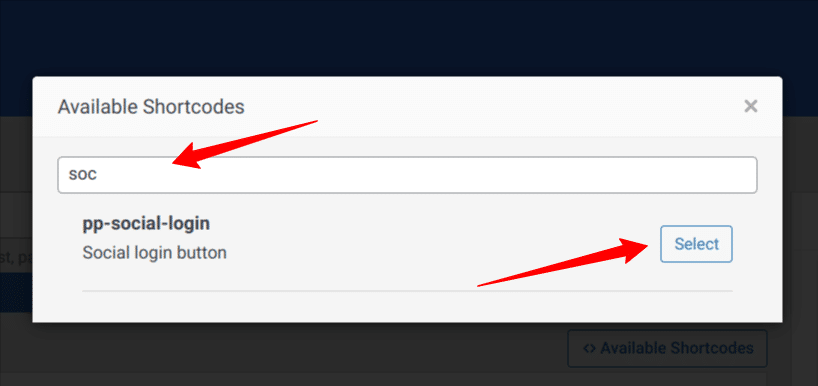
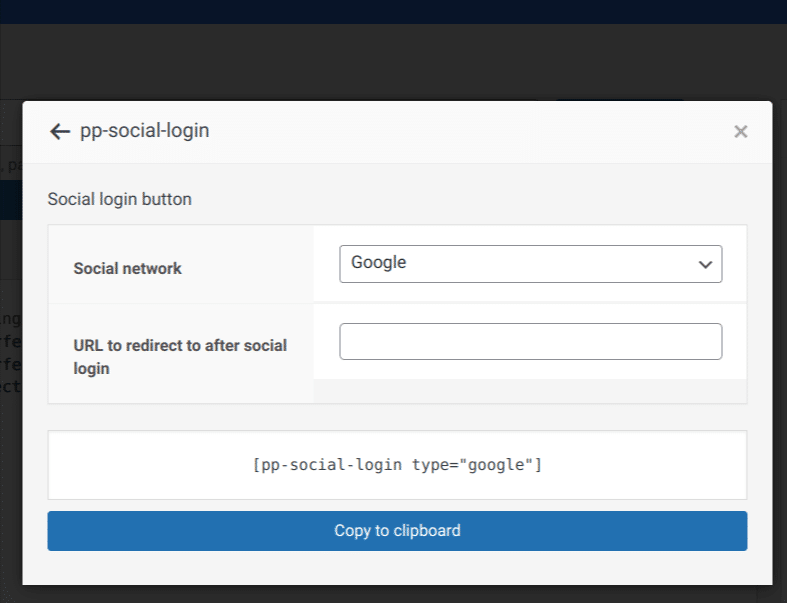
Click on “Copy to clipboard” once you are done, and click “Ok” at the top. Once you return to the form builder page, you can paste the shortcode and style it however you want.
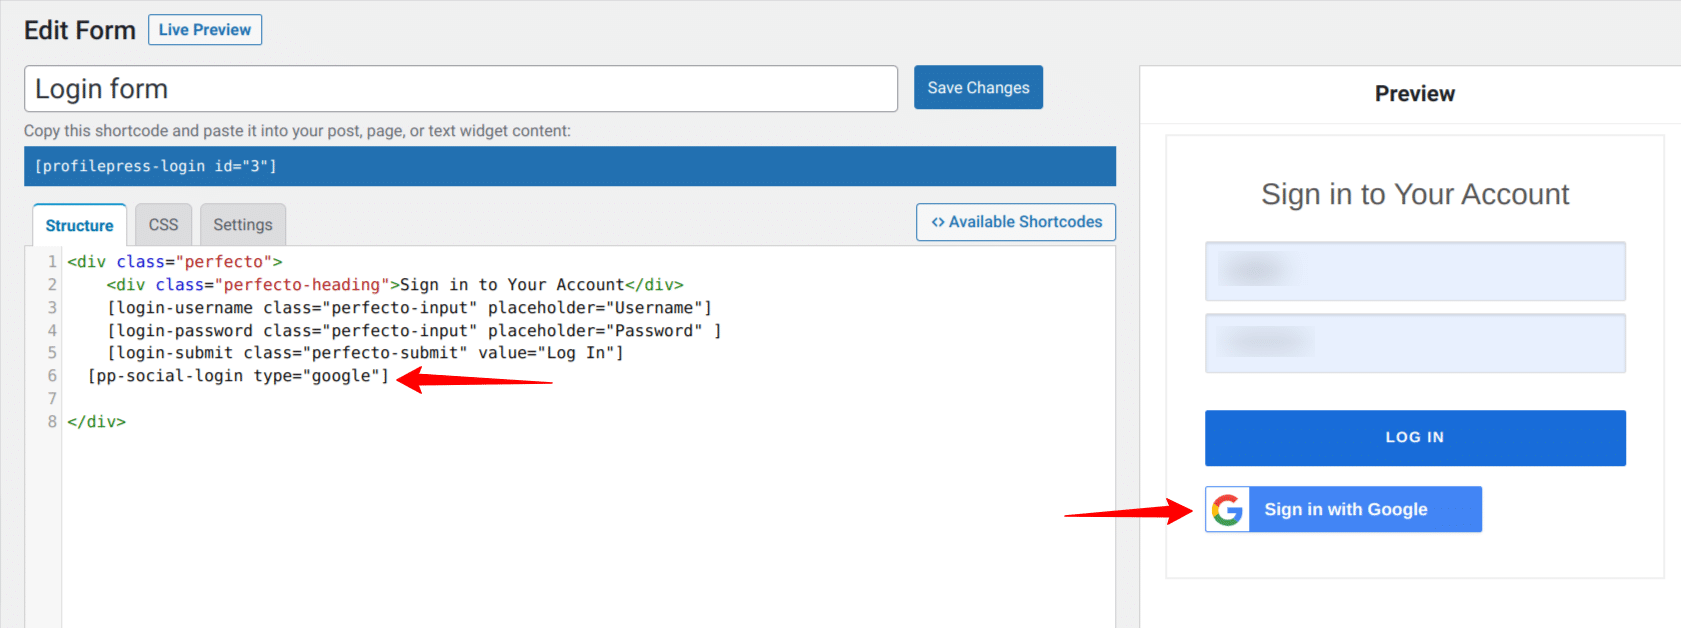
Once you are done, click “Save changes” and “Live preview” to view your login form. Now you should see the Google login option on the form.
Final Words
Integrating social login into your WordPress website allows users to easily access your website without needing to fill out any long form. It also allows you to ensure the credibility of your users and reduce spam registrations.
Adding social login to your WordPress Website is easy and quick with a plugin like ProfilePress, the best WordPress Social login plugin. You do not need coding experience to use it; it supports all major social networks.
Get your copy of ProfilePress today and easily add social login to your website.