Do you want to make your WordPress website private?
While many websites are designed for public access, there are times when website owners may want to restrict access to their content and make their WordPress site private. Controlling access to your WordPress site can be essential for various reasons, whether for a membership-based site, a private blog, or a staging environment.
Making a WordPress site private can be accomplished through plugins, although there are also options to adjust visibility for individual posts and pages without using any plugins. For more feature-rich functionality, dedicated plugins are recommended.
This article will explain how to create a private WordPress site. We’ll cover the steps for making your website private and discuss how to do the same for specific posts and pages. Additionally, we’ll delve into utilizing the ProfilePress plugin to achieve privacy settings for your WordPress site.
Reasons for Making a WordPress Site Private
Before we delve into the technical aspects of making your WordPress site private, let’s explore some common reasons why website owners choose to implement privacy measures:
- Restricted Access Control: By setting your WordPress site to private, you have complete control over who can access its content. This level of privacy is particularly crucial for sensitive information or exclusive content meant for a specific audience.
- Membership or Subscription-Based Content: If you offer premium content, courses, or subscription-based services, making your site private ensures that only paying members or subscribers can access the valuable resources you provide.
- Enhanced Security: Privatizing your WordPress site adds an extra layer of security, shielding it from potential threats and unauthorized access. This is especially important for businesses or organizations that handle confidential data.
- Intranet or Internal Communication: Businesses often utilize private WordPress sites as intranets for internal communication, document sharing, and collaborative work among employees.
In reality, you would hardly ever make an entire website private permanently. Instead, you’ll typically limit who can get in, excluding casual visitors and those without accounts. After that, you might gradually share more content with people who sign up, have specific roles, or are paying customers. Site managers and maybe editors will probably get complete access to make sure everything runs smoothly. So, by looking at what your website aims for and who it wants to reach, you can figure out if making your WordPress site private is the best choice for you.
How to Make Individual Posts and Pages Private
You can utilize the built-in privacy settings to set specific posts and pages as private on WordPress.
Navigate to the edit screen of the post or page you want to make private. Then look for the Post or Page sidebar on the right-hand side of the screen.
Next, check within the Summary section, and locate the “Visibility” option.
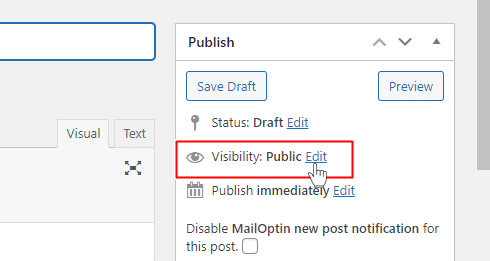
If you click the Public link, the Visibility option will show up.
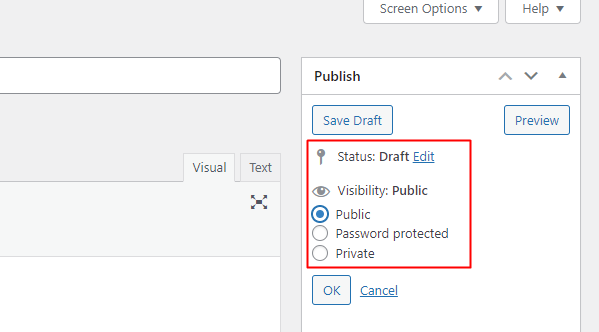
You have three options for post visibility:
- Public (everyone can see it)
- Password protected (you can add a password to it)
- Private (only Admin and Editor users can see it)
Once you select the desired option and save your changes, the page or post will become private.
How to Restrict Access to Entire WordPress Site
First, you’ll need to install and activate the ProfilePress plugin to begin the process. To do this, visit the ProfilePress website and choose the pricing plan that best aligns with your requirements.
After your purchase, you will receive a confirmation email containing a link to download the plugin’s zip file and your license key. Alternatively, you can download the plugin from your account page on the ProfilePress website.
Once the plugin has been downloaded, proceed to your WordPress admin dashboard. Navigate to the Plugins page, click the Add New button, and select Upload Plugin.
Choose the previously downloaded plugin zip file by clicking Choose File, then Install Now.
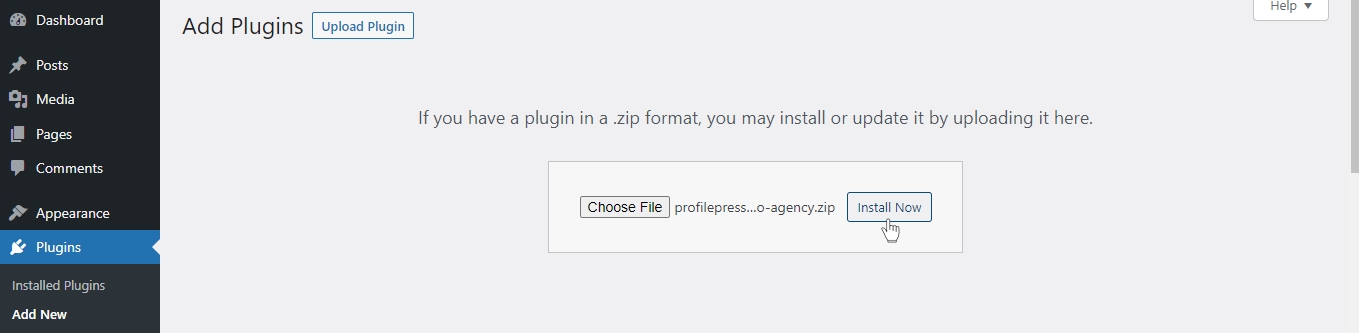
Wait a few seconds for the installation to be completed. Once the plugin is installed, click on Activate Plugin to activate it on your site.

Next, you’ll see a notification at the top of your WordPress dashboard page saying, “ProfilePress needs to create several pages to function correctly.” Click on the Create Pages button to complete the plugin setup.

With this done, we have completed the initial setup of the ProfilePress plugin on our WordPress site.
Next, we utilize ProfilePress to restrict access exclusively to logged-in visitors. By employing this feature, unauthorized users or restricted visitors will be directed to either the login page or a custom page or presented with a personalized message.
To implement this, navigate to ProfilePress>>Settings>>Access and select the Accessible to logged-in users option.
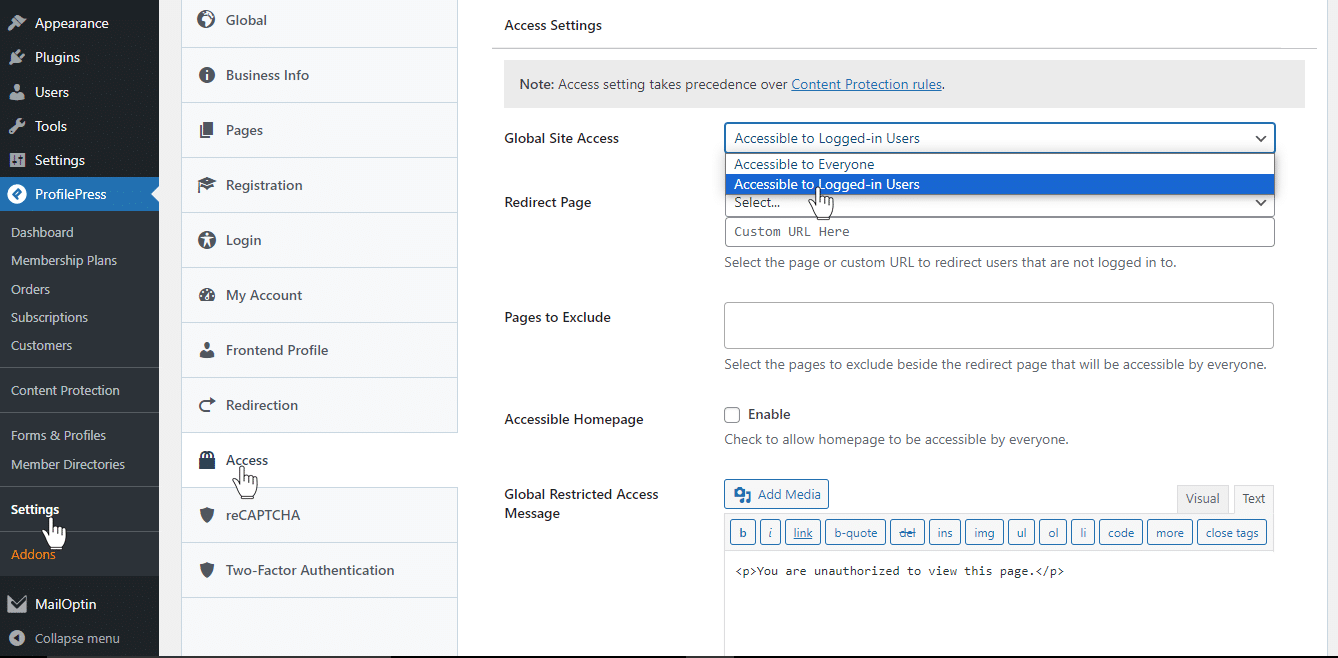
Next, you need to redirect users that try to access the site to another page or custom URL. Select the page from the drop-down or provide a custom URL to redirect users that are not logged in.

NB: For this to work, you MUST set a redirect page or custom URL.
You might need to exclude some pages besides the redirect page that will be accessible to everyone. You can select as many as you want here.

Sometimes, the homepage might be used as a landing page and must be accessible to all. ProfilePress allows you to do just that. To activate, just tick the checkbox.

And there you have it! You can restrict access to your entire website by following these simple steps.
How to Block Registration From Certain Domains
ProfilePress can block registration from specific email domains on your WordPress site. To implement this, follow these steps:
Navigate to ProfilePress and access the “Settings” section.
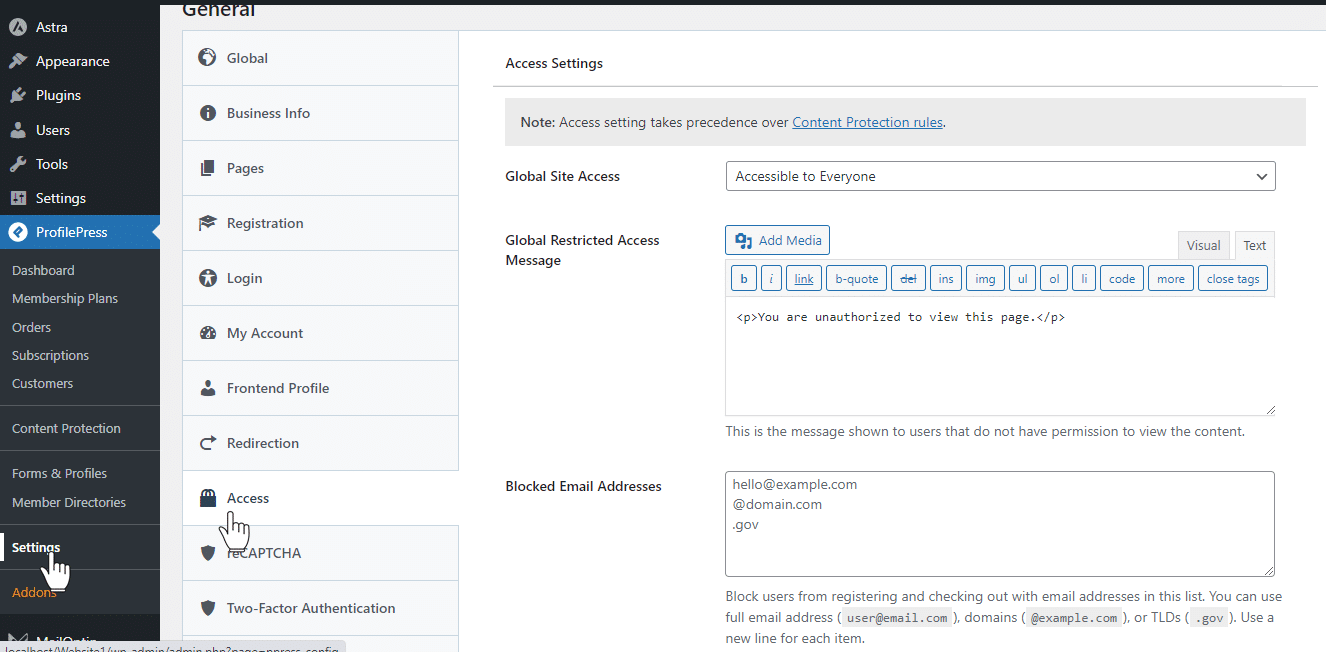
Within the “Access” settings, locate the “Blocked Email Addresses” section.
In the provided textarea, enter the email addresses you wish to block, one address per line.
For instance, to prevent user registration and checkout using Yahoo email addresses, enter “@yahoo.com” in the box.
Likewise, if you wish to block user registrations from email addresses with a .gov top-level domain (TLD), such as “[email protected],” enter “.gov” in the box.
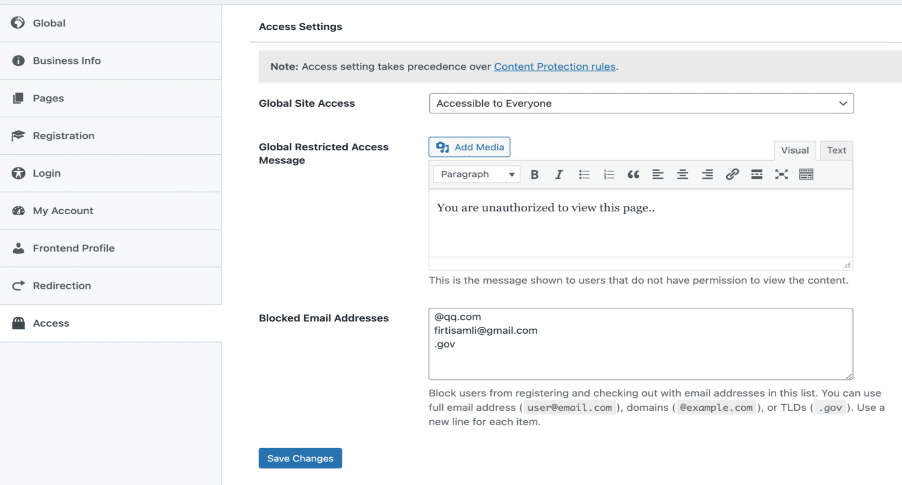
Then save changes.
How to Hide WordPress Admin Bar & Restrict Access to Dashboard
Sometimes, you may find it necessary to hide the WordPress admin bar at the top of every page when a user is logged in to your website. This admin bar provides quick access to tools and features for logged-in users, such as editing posts, accessing the dashboard, and managing site settings. However, there are several reasons why you might want to hide this admin bar:
- Improved User Experience: By hiding the admin bar, you can create a cleaner and less cluttered user interface for your logged-in users. This can enhance the overall user experience, especially if the admin bar’s options are not relevant or necessary for your site’s regular users.
- Non-Administrative Users: If your site has multiple user roles with varying access levels, non-administrative users may not need the admin bar’s features. Hiding it can simplify the interface for these users and avoid any confusion.
- Consistent Branding: For websites that prioritize branding and design consistency, hiding the admin bar ensures that the front-end of the site remains uniform and without any admin-related elements.
- Security and Privacy: In some cases, hiding the admin bar can be part of a security strategy to limit the visibility of administrative functionalities to unauthorized users.
How to Hide The WordPress Admin Bar
ProfilePress allows you to hide the WordPress admin bar according to your preferences easily. You enjoy the freedom to designate particular user roles, including subscriber, editor, author, contributor, and administrator, for which the admin bar will not be visible. Alternatively, if you intend to deactivate it for all users except administrators, leave all the user role options unchecked.
To implement this: Go to ProfilePress and enter the “Settings” section.
Then click on “Admin Bar & Dashboard.”
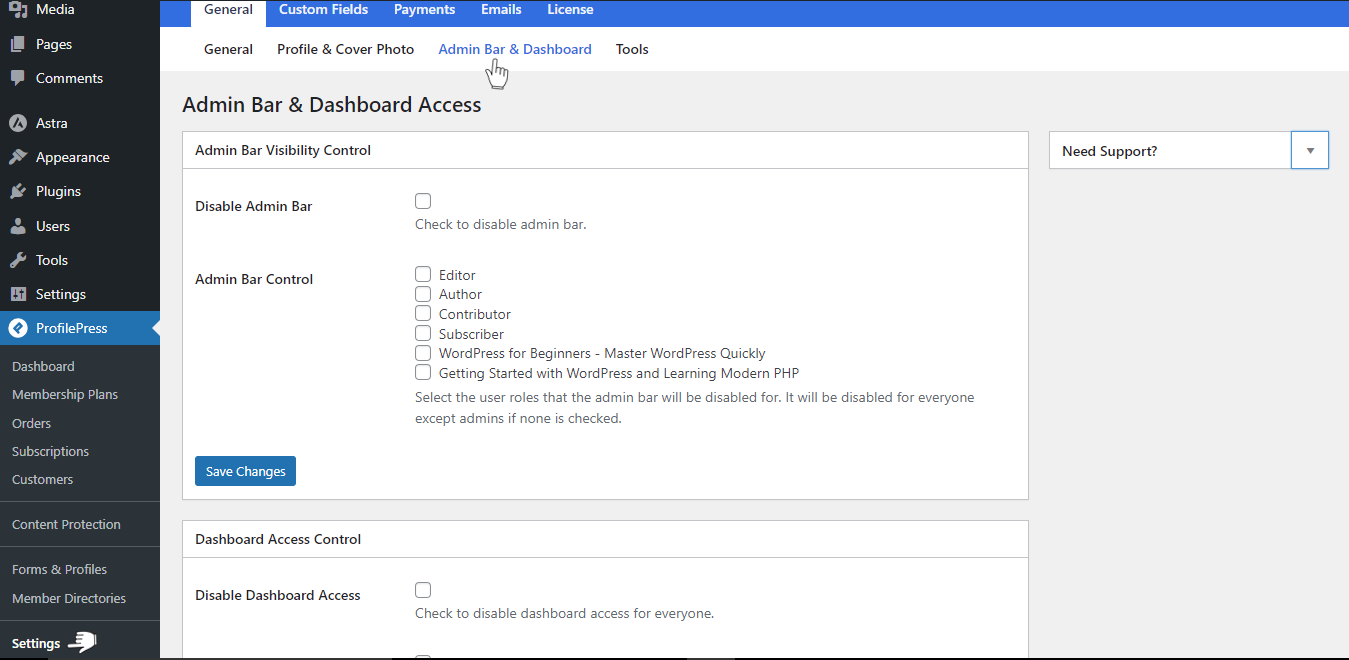
Restricting Access to the Dashboard
ProfilePress allows you to control who has access to your WordPress dashboard. You can restrict access for a certain user role while allowing others. If you want it restricted for everyone except admins, leave all the functions unchecked.
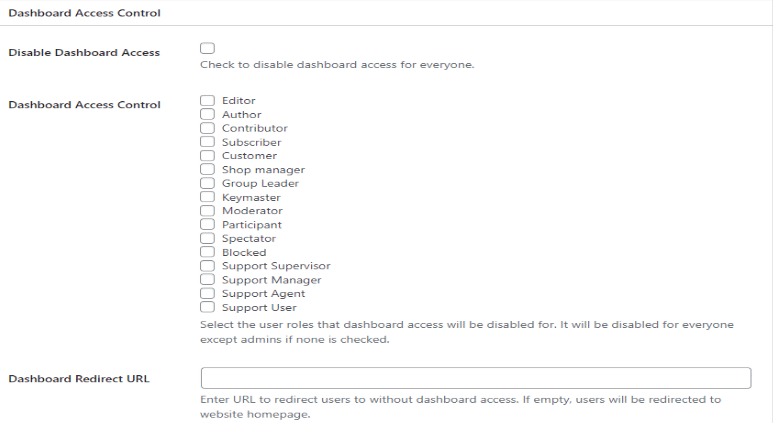
ProfilePress also allows you to redirect users without dashboard access to a custom URL whenever they try to access the dashboard. When you leave the URL field empty, users will be redirected to the homepage.
Make sure to click “Save Changes” whenever you make any changes.
Conclusion
Making a WordPress site private using the ProfilePress plugin effectively controls access to your content and creates exclusive communities or membership websites.
Whether you aim to restrict access to specific user groups or ensure exclusive content visibility, ProfilePress empowers you with the tools to make your WordPress site private.
Get ProfilePress today!