Are you looking for the best WordPress LMS plugins to create and sell courses?
Creating and selling courses online can be an excellent way to make money online, especially with the recent growth seen in the eLearning industry.
Today, more people online are willing to pay for knowledge than a few years ago. Many people now prefer eLearning because of its flexibility, cheaper cost, and global access.
Whether learning how to cook special delicacies or designing stunning websites, online courses have become popular for people to upskill and advance their careers or businesses.
You need a Learning Management System (LMS) to start selling courses online. A learning management system is software that provides all the tools for creating, selling, and managing an online learning platform.
Building an LMS does not have to cost you a fortune and several weeks of development. You can create a robust LMS for your online course business in a few hours and at a very low price by using WordPress and an LMS plugin for WordPress.
What is an LMS Plugin?
An LMS (Learning Management Plugin) is a WordPress software that helps you to turn your WordPress site into an eLearning platform.
An LMS plugin provides the tools to create, sell, manage, and deliver courses to students. It provides features that let you create different types of content like courses, quizzes, lessons, students, and instructors.
An LMS plugin also provides access control over your content. You can set up various rules to restrict users’ access to your courses, quizzes, or other content. Additionally, LMS plugins will provide you with additional features such as creating certificates, checking progress, viewing reports and statistics, and more.
An LMS plugin gives you absolute control over your eLearning platform.
There are many WordPress LMS plugins out there, but in this article, we will look at the ones we consider the best among the lots.
The Best LMS Plugins for WordPress
Below are our handpicked best LMS plugins for WordPress. Each plugin below will help you set up a complete LMS platform in WordPress.
1. LearnDash

LearnDash is one of the most popular WordPress LMS plugins, trusted by top companies, universities, and training centers. It offers an easy way to create and sell online courses with WordPress.
LearnDash has all the features you will need to build a learning portal. It allows you to create unlimited courses, drag-and-drop builders, quizzes, content drips, and premade templates.
LearnDash provides a simple structure and a clean user interface for the course pages, providing a good user experience.
Key features of LearnDash
- Unlimited courses
- Unlimited users
- Drip content
- Advanced quizzing
- Certification and badges
How to Sell Courses with ProfilePress LearnDash Add-on
Creating a course or training is not that easy, so it is a good thing if you want to charge a fee for your course. To do that, you will need the help of a monetization addon because LearnDash does not provide this feature; instead, it allows you to integrate with many monetization options, such as ProfilePress.
ProfilePress is an eCommerce and WordPress membership plugin that allows you to build powerful eCommerce websites. It is one of the best WordPress payment plugins and offers a simple and easy way to start accepting credit card payments on your website.
ProfilePress allows you to accept one-time or recurring payments via PayPal, Stripe, Paystack, and more.
Integrating ProfilePress with LearnDash is relatively straightforward. The first step is to get your copy of ProfilePress and install it on your website.
You will need to purchase a ProfilePress Pro License and install the ProfilePress plugin. To do that, go to the ProfilePress website to purchase a suitable license plan.
After purchasing your copy of the ProfilePress Plugin, you will receive a confirmation email with a link to download the plugin zip file and your license key. You can also download the plugin from your account page on the ProfilePress website.
Once you have downloaded the plugin, login to your WordPress admin dashboard, and navigate to the Plugins page; click on the “Add New” button and click “Upload Plugin“.
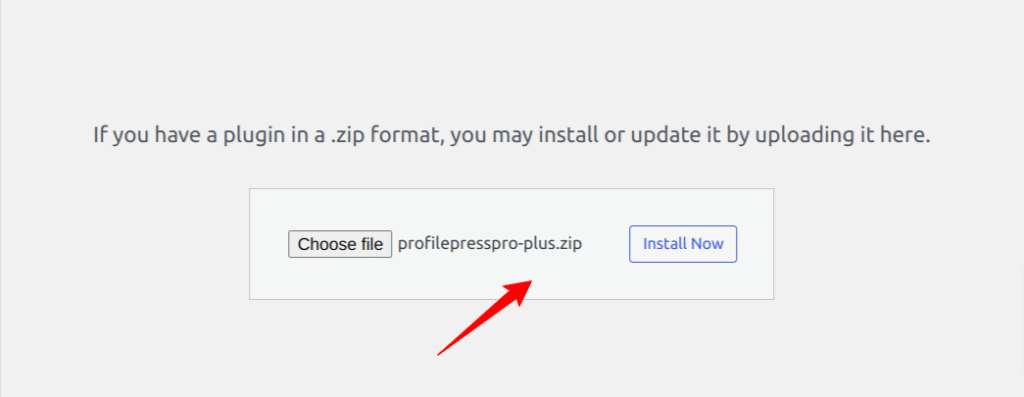
Next, click “Choose file” to select the previously downloaded plugin zip file. Click “Install Now.”
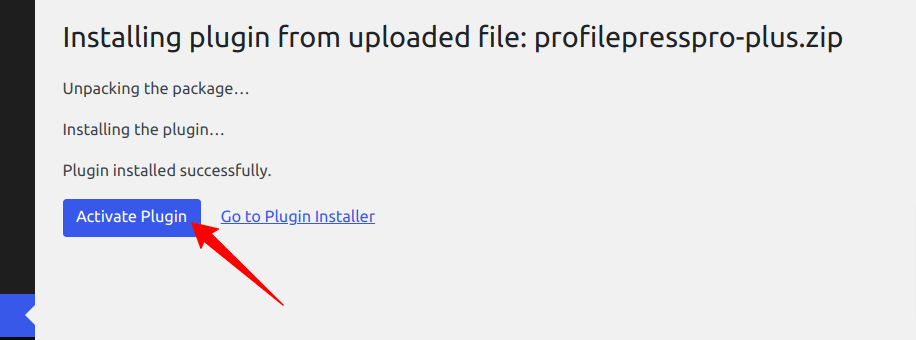
After installation is complete, click the Activate Plugin button.
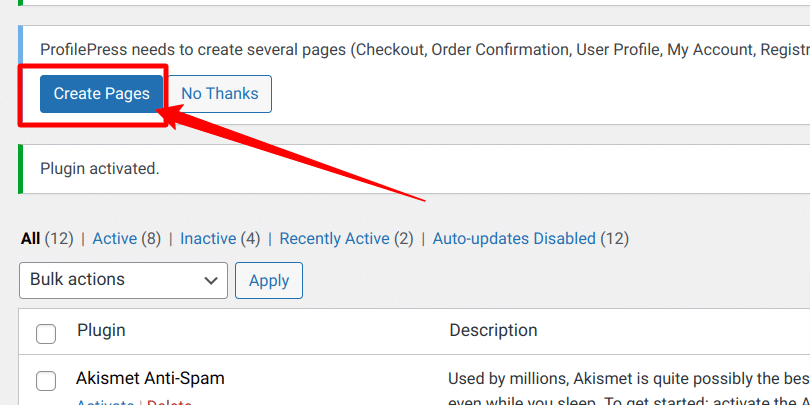
At the top of the page, you will see a notification that says, “ProfilePress needs to create several pages,” Click on the “Create Pages” button to complete the plugin setup.
If you do not see this notification, navigate to ProfilePress > Dashboard and click the “Create pages” button to complete the plugin setup.
With this done, we have completed the initial setup of the ProfilePress plugin on our WordPress site.
Integrate Stripe Payment Gateway
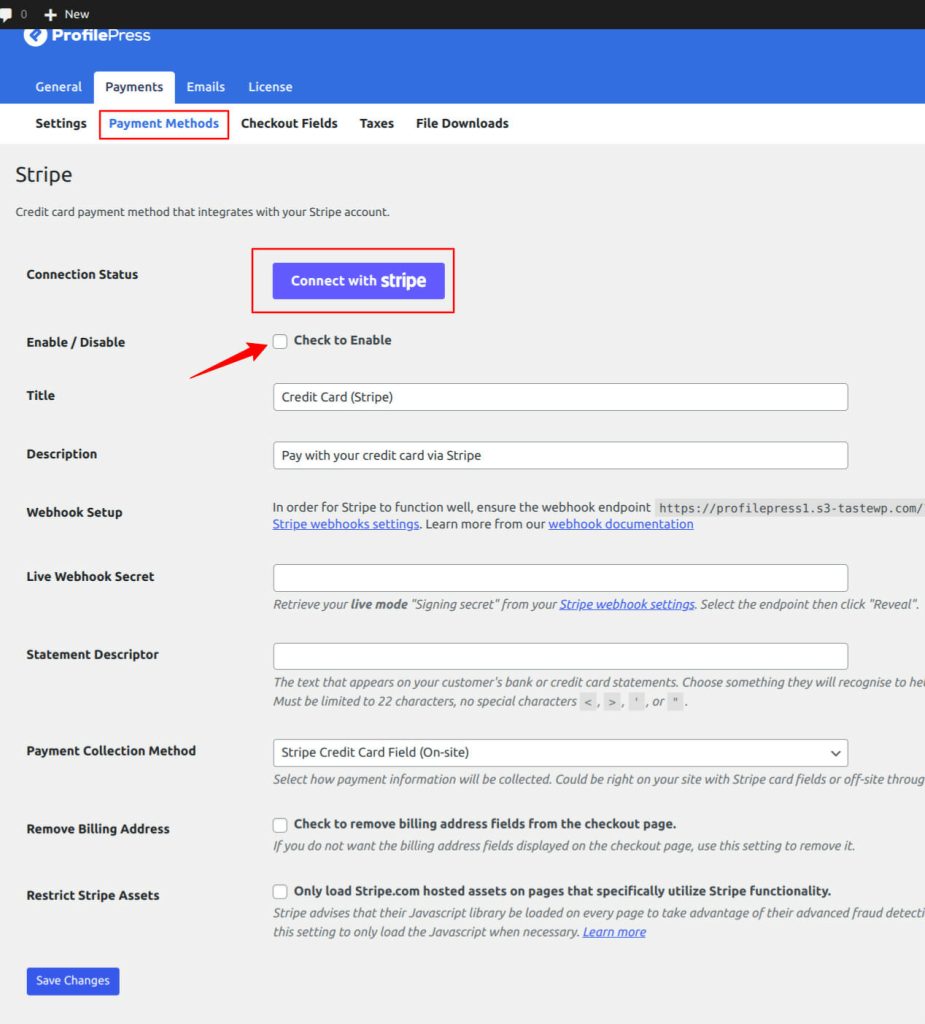
After installing and setting up ProfilePress, the next step is to set up a payment gateway. We will use the Stripe Payment gateway for our WordPress payment forms for this guide. You can configure the Stripe payments on your site by navigating to ProfilePress > Settings > Payments > Payment Methods and choosing Stripe.
Click on the “Connect Stripe” button, follow the prompts, and you are all set to start accepting payments from your customers.
If you don’t want to use Stripe, ProfilePress supports other popular payment gateways like PayPal, Razorpay, Paystack, and Mollie.
Activate LearnDash Addon in ProfilePress
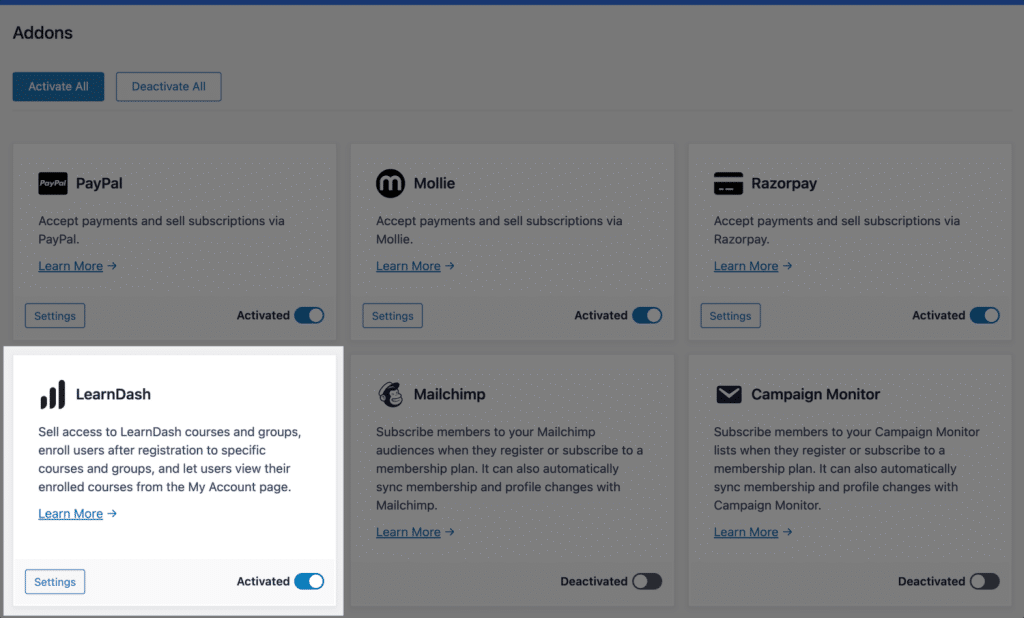
The next step is to activate the LearnDash Addon in ProfilePress. Navigate to ProfilePress > Addons, scroll until you find the LearnDash addon, and activate it.
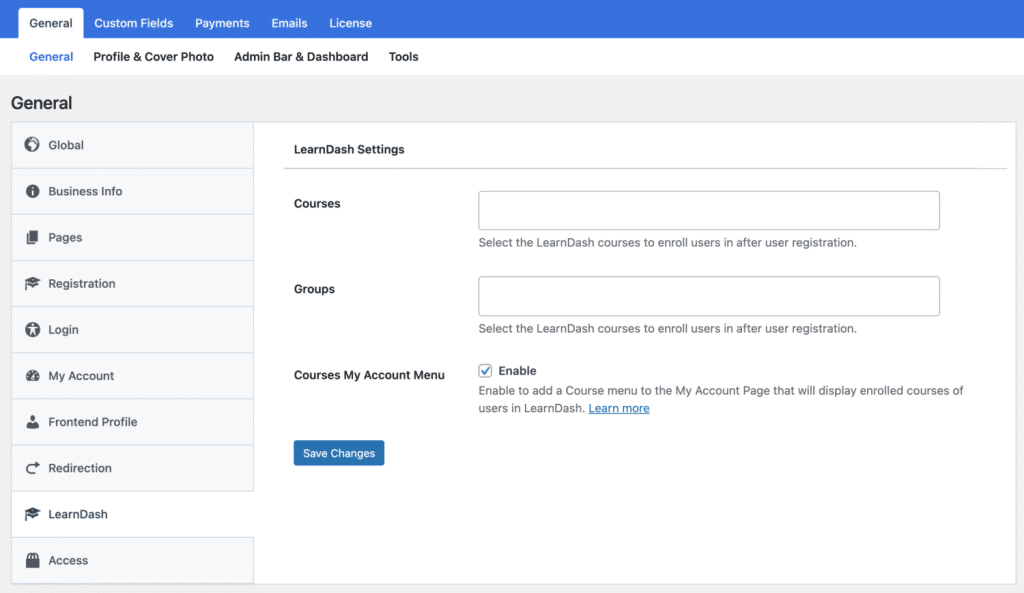
After activating the addon, you can find its settings by navigating to ProfilePress >> Settings >> LearnDash.
Selling LearnDash Courses with ProfilePress
The ProfilePress LearnDash addon enables you to sell courses in LearnDash. It works by associating one or multiple courses to a membership plan.
With the ProfilePress Learndash addon, You can bundle two or more courses together and sell them to your students at a discounted price than they cost individually.
To start selling your courses, navigate to ProfilePress > Membership Plans to create a new membership plan or edit an existing one you want to use to sell your course.
You will need to provide the plan name, description, and price.
ProfilePress has a built-in field called “Purchase Note” shown to the customer after a successful purchase on the order confirmation page and in the customer’s receipt email. You can use this field to provide instructions or the next steps for taking your course, along with a link to the course page.
This field accepts HTML so you can include a direct link to the course for the student. Here’s an example of creating a link to your course. Replace the URL with the URL to your specific course.
“<a href="https://yoursite.com/courses/build-websites-101/">Start this Course</a>”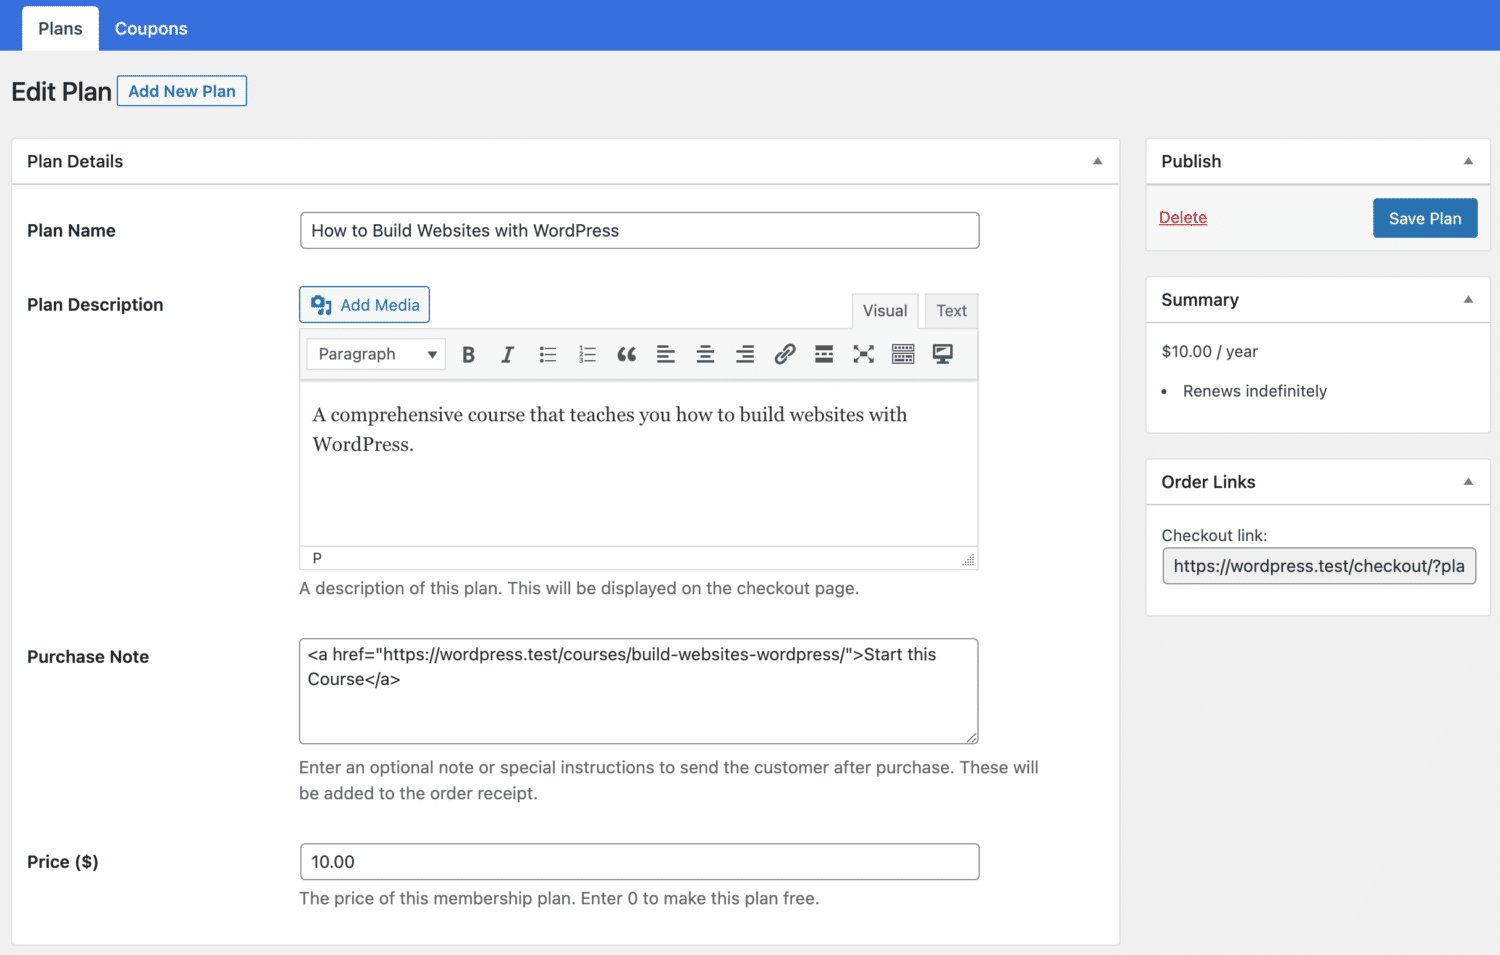
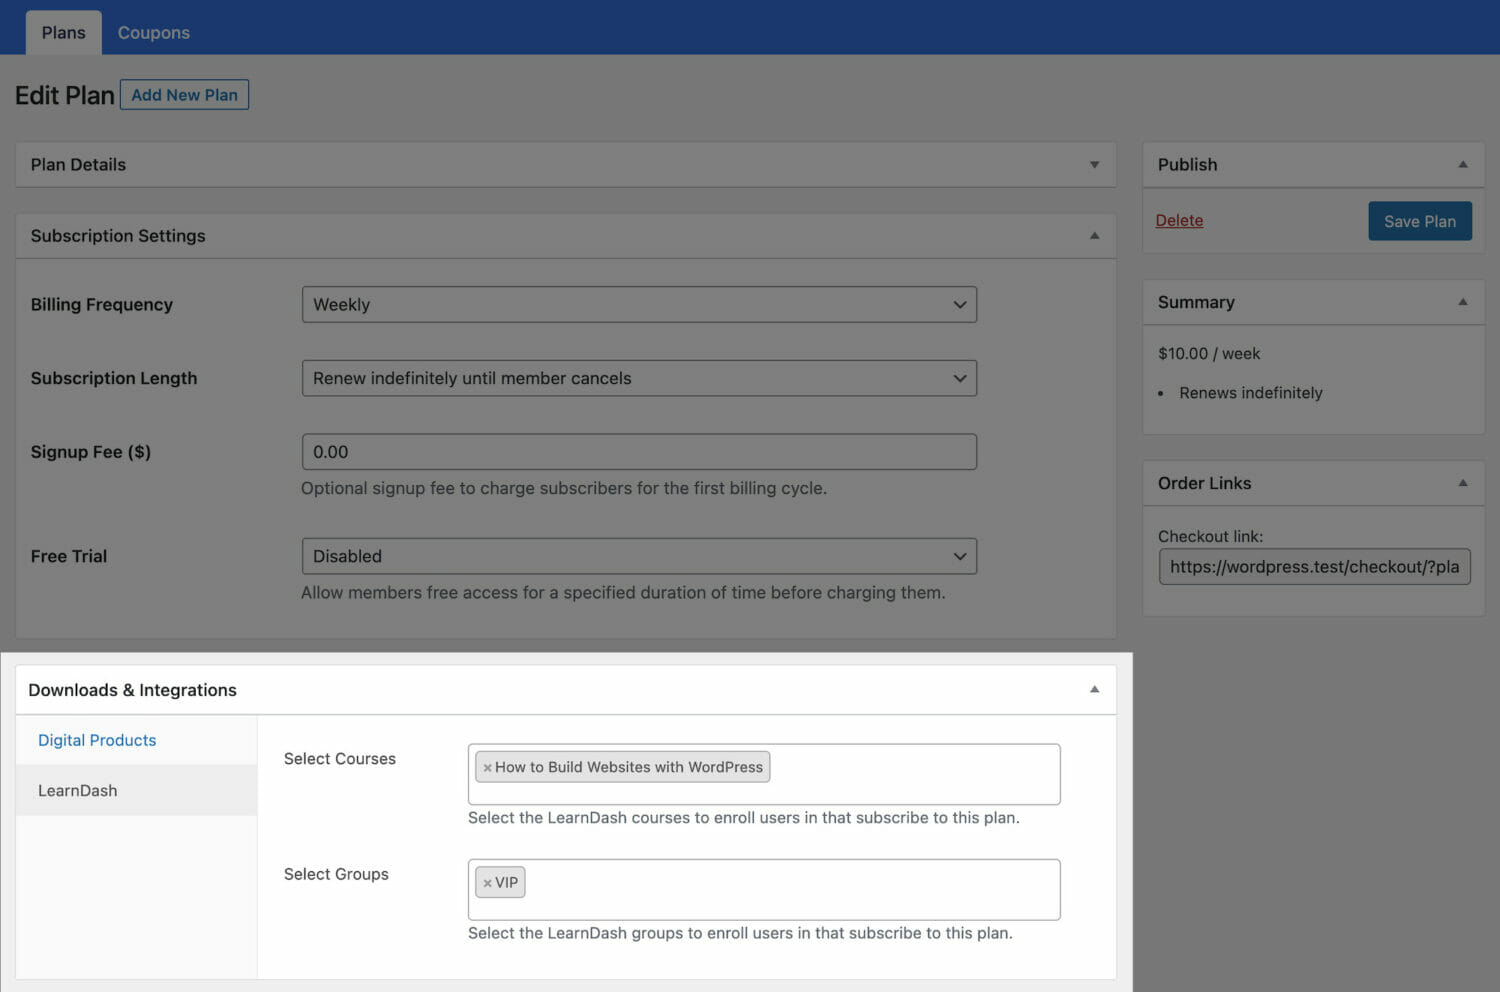
Scroll down to the Subscription Settings section to set the plan or course fee as a recurring payment that can be charged daily, weekly, monthly, quarterly, every six months, or yearly.
Finally, on the Downloads & Integrations section, select the LearnDash courses and groups to grant users access after purchasing the membership plan. Select any of the courses you have created so that you can start charging a fee for it.
Save your changes, and your membership plan will be created. Note that if the membership plan is a subscription that charges a recurring fee, access is automatically revoked if the subscription is refunded or expired.
LearnDash Courses and Groups Setup
After you’ve associated your courses and groups to a membership plan in ProfilePress, you’ll need to make a few adjustments to the courses and groups in LearnDash.
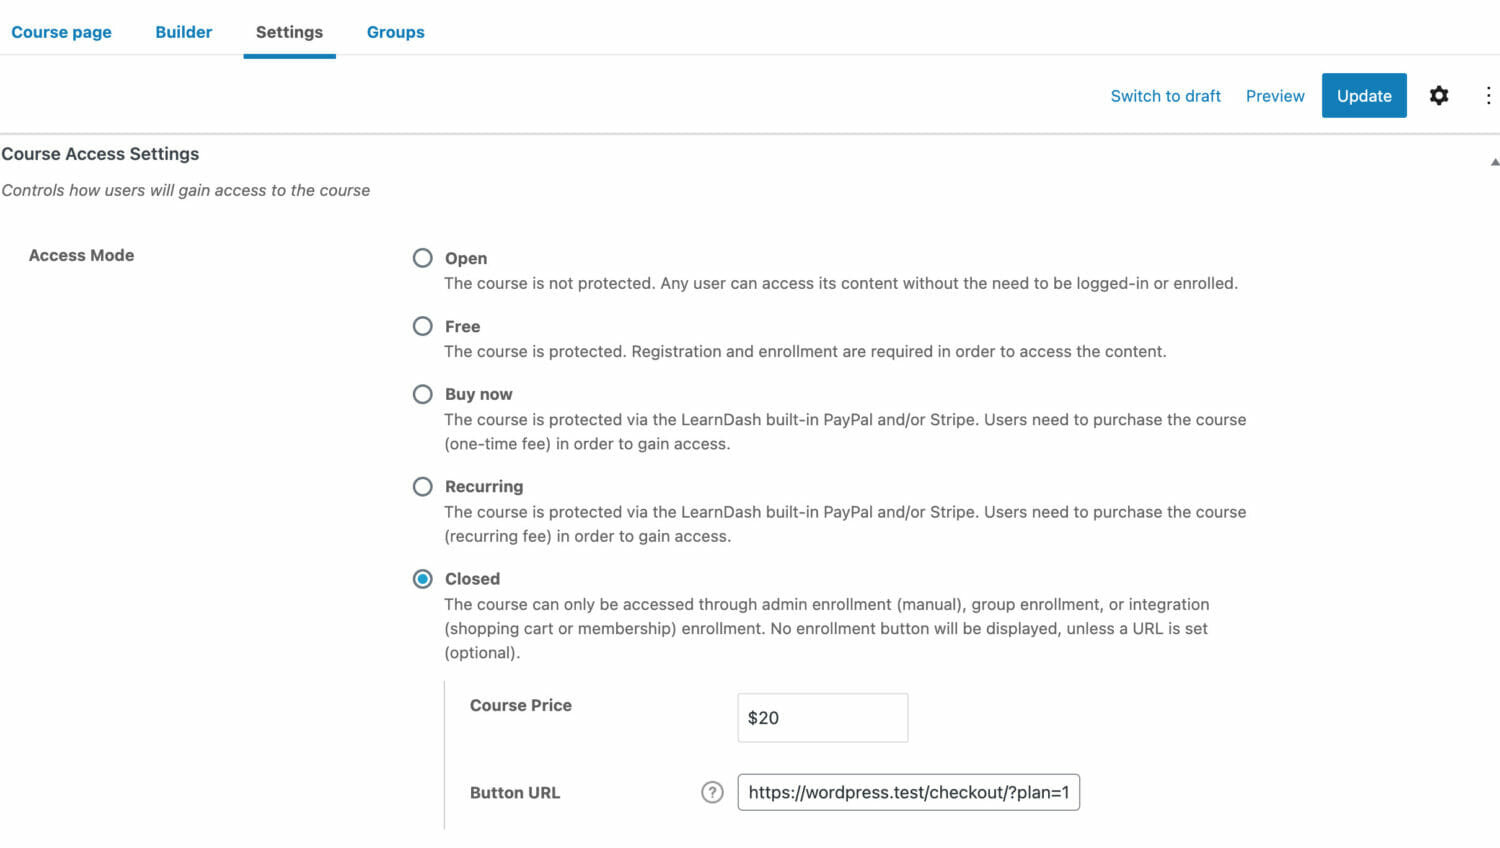
Navigate to LearnDash > Courses and open up the edit screen of the course. Click the Settings tab at the top.
Under Access Settings, look for Access Mode and set this to Closed. You will also see two fields to set the course/group price and the purchase button URL.
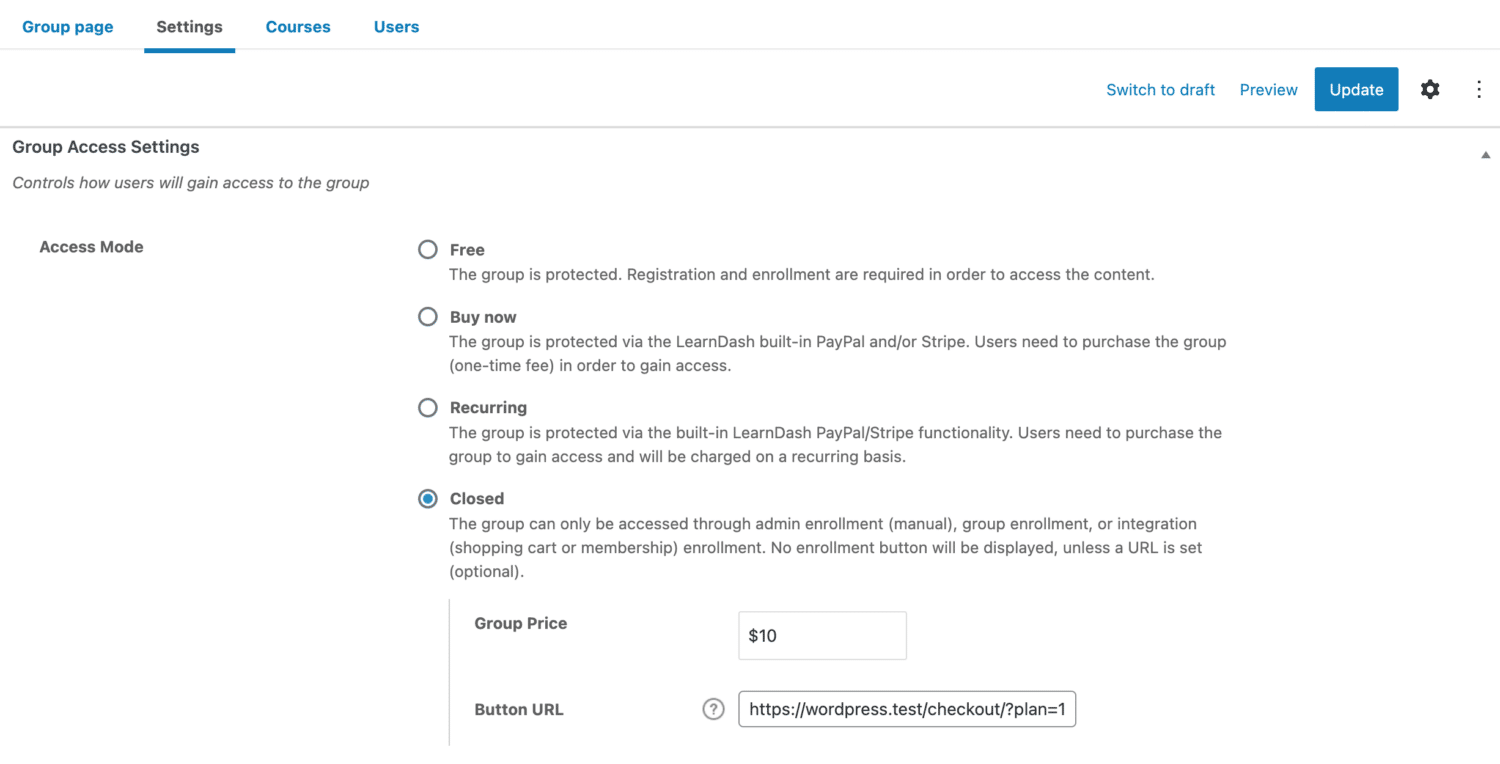
For groups, go to LearnDash > Groups and open up the edit screen of the group. Under Access Settings, look for Access Mode and set this to Closed. You will also see two fields to set the course/group price and the purchase button URL.
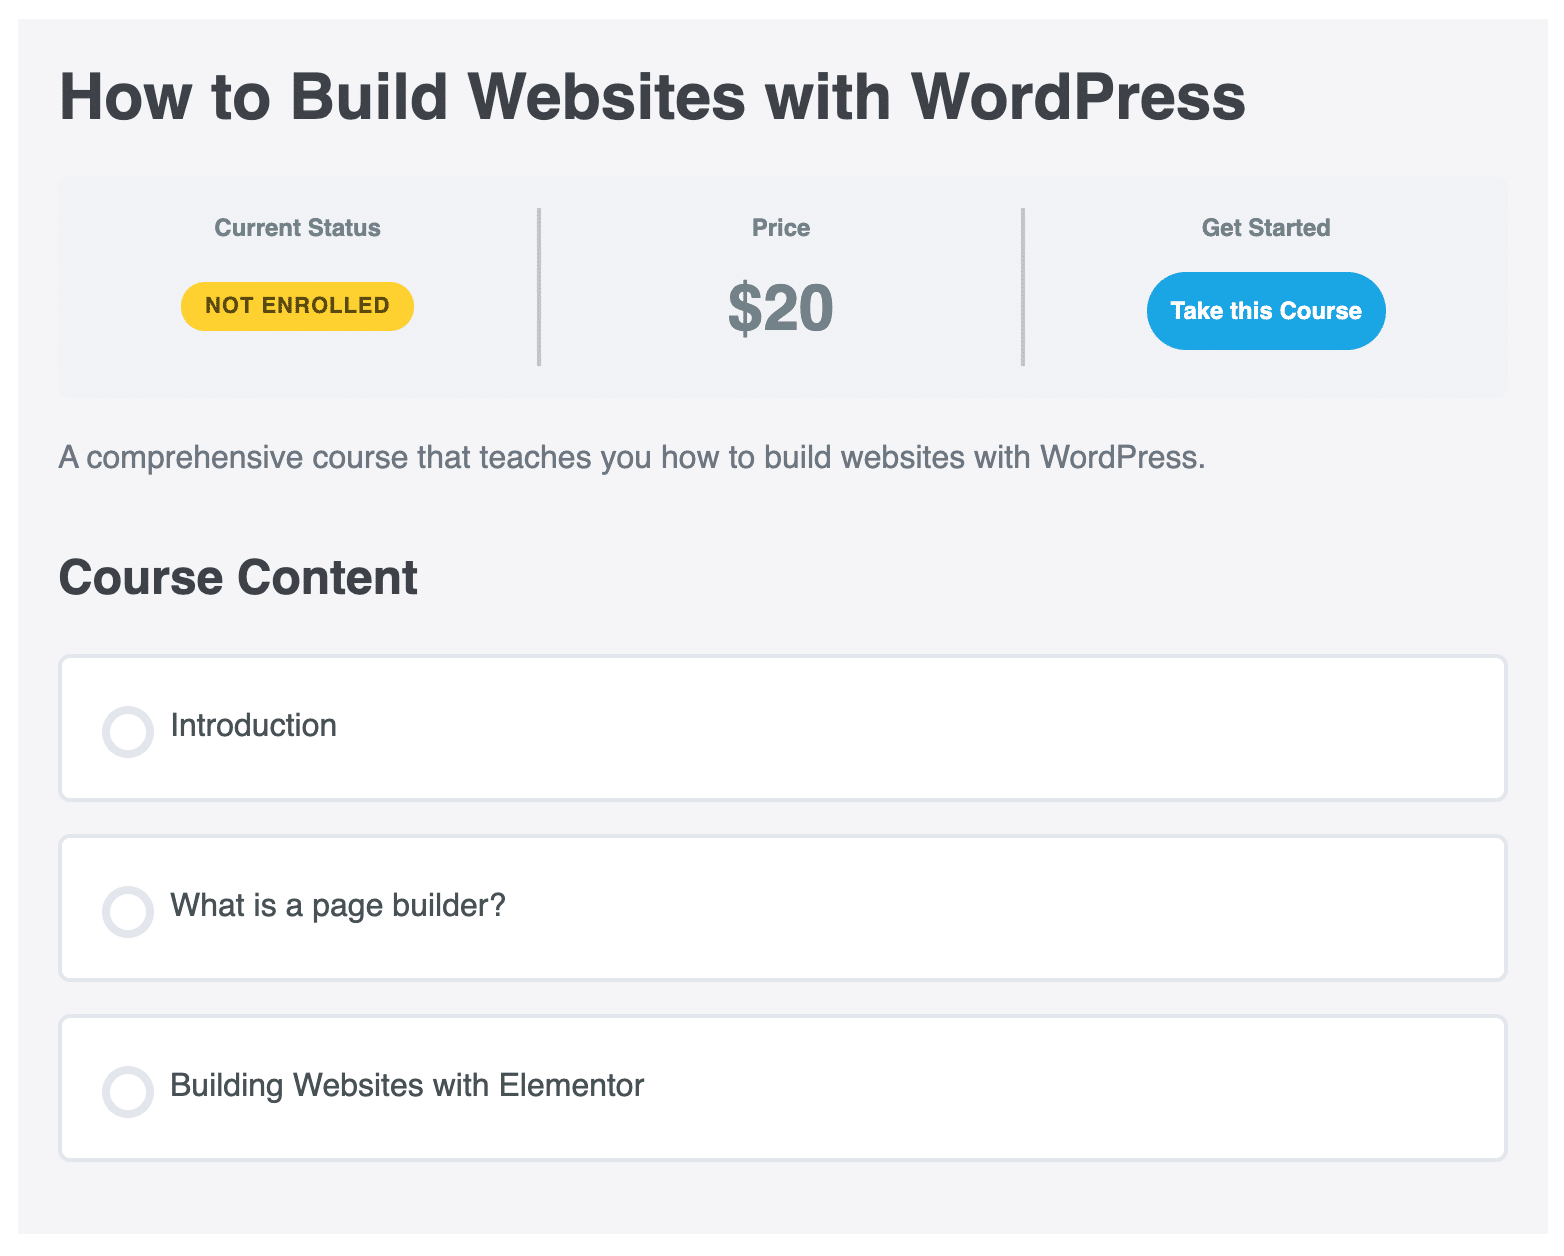
Now, when people visit your course page and click on the “Take this Course” or “Enroll in Group” button, they will be sent to the corresponding membership plan’s checkout page for them to complete the checkout process.
2. TutorLMS
TutorLMS is another popular WordPress LMS plugin, especially among those looking for a free LMS solution for creating and selling courses on WordPress.
TutorLMS offers many powerful features to help you turn your WordPress website into an LMS (Learning Management System). It comes with features such as a frontend course builder, drag and drop builder, certificate builder, reports, and more.
Apart from the free features, TutorLMS can be further extended with premium add-ons, but to a large extent, the free features will cater to your LMS needs.
Key features of TutorLMS
- Frontend student dashboard
- Unlimited courses
- Advanced quizzes
- Course rating and review system
- Commission allocation
How to Sell Courses with ProfilePress Tutor LMS Addon
In the previous steps above, we have covered how to install and set up the ProfilePress plugin, so we will not cover that in this section. If you missed that part, please scroll up to install and set up the ProfilePress plugin.
Activate Tutor LMS Addon in ProfilePress
The next step is to activate the Tutor LMS Addon in ProfilePress. Navigate to ProfilePress > Addons, scroll until you find the Tutor LMS addon, and activate it.
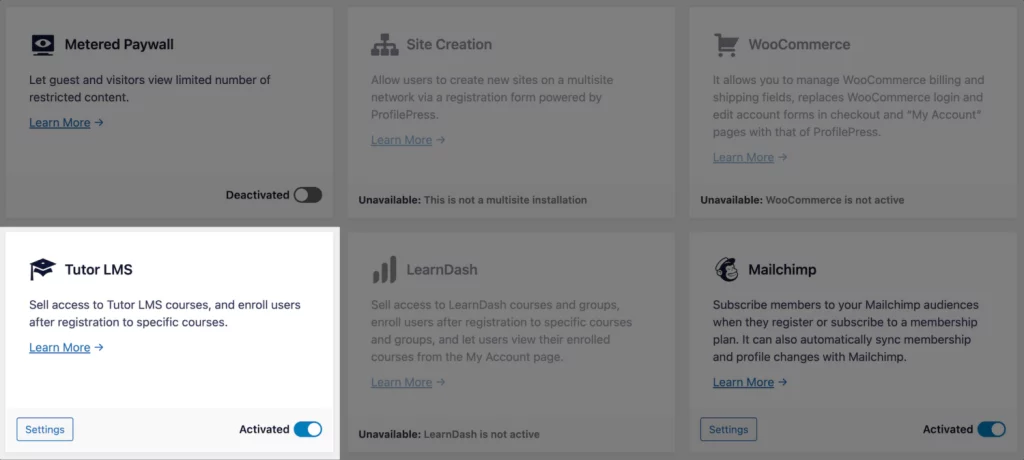
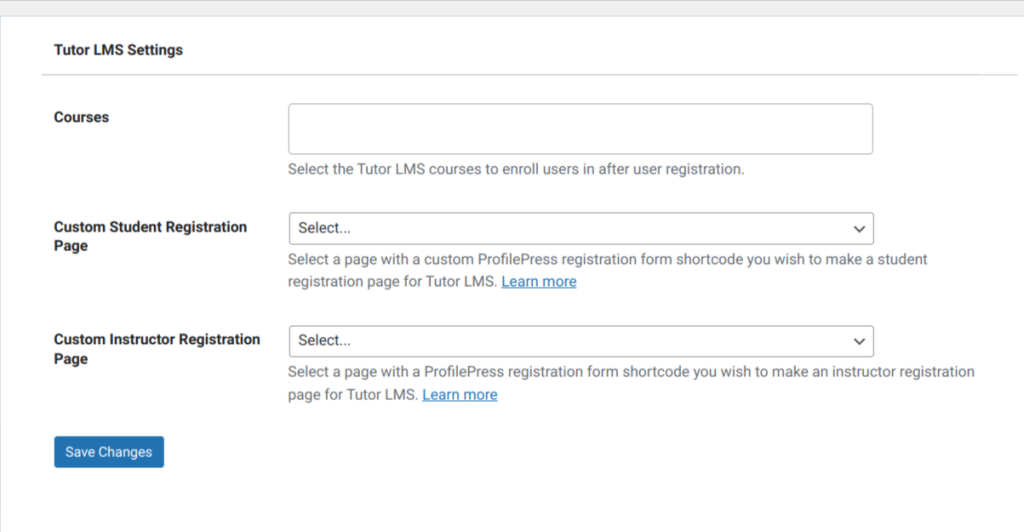
After activating the addon, you can find its settings by navigating to ProfilePress > Settings > Tutor LMS.
Selling Tutor LMS Courses with ProfilePress
ProfilePress Tutor LMS addon lets you sell your courses with ease. It works by associating one or multiple courses to a membership plan.
You can combine two or more related courses into a bundle, price it lower than the cost individually, and sell this to your users. There are a lot of things you can do with the ProfilePress integration.
Navigate to ProfilePress > Membership Plans to create a new membership plan or open up the edit screen of an existing plan that you want to use to sell your course.
Provide the plan name, description, and price.
ProfilePress has a built-in field called “Purchase Note” shown to the customer after a successful purchase on the order confirmation page and in the customer’s receipt email. Consider using this field to provide instructions or the next steps for taking your course, along with a link to the course page.
This field accepts HTML so you can include a direct link to the course for the student. Here’s an example of creating a link to your course. Replace the URL with the URL to your specific course.
“<a href="https://yoursite.com/courses/build-websites-101/">Start this Course</a>”
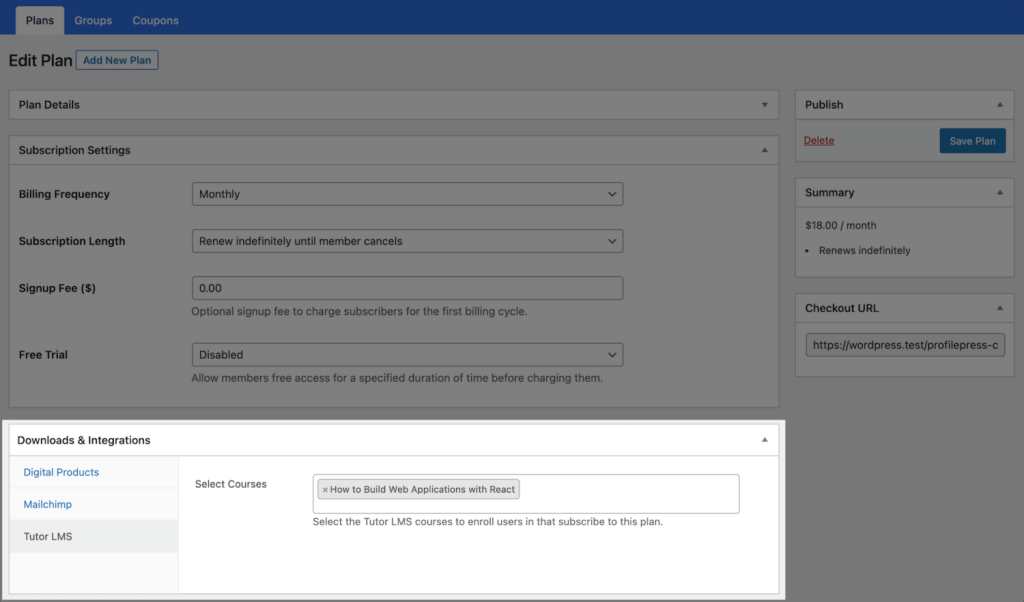
Scroll down to the Subscription Settings section to set the plan or course fee as a recurring payment that can be charged daily, weekly, monthly, quarterly, every six months, or yearly.
Finally, on the Downloads & Integrations section, select the Tutor LMS courses and groups to grant users access after purchasing the membership plan. Select the course you created earlier to start charging a fee for it.
Save your changes, and your membership plan will be created. Note that if the membership plan is a subscription that charges a recurring fee, access is automatically revoked if the subscription is refunded or expired.
Connect Tutor LMS with ProfilePress
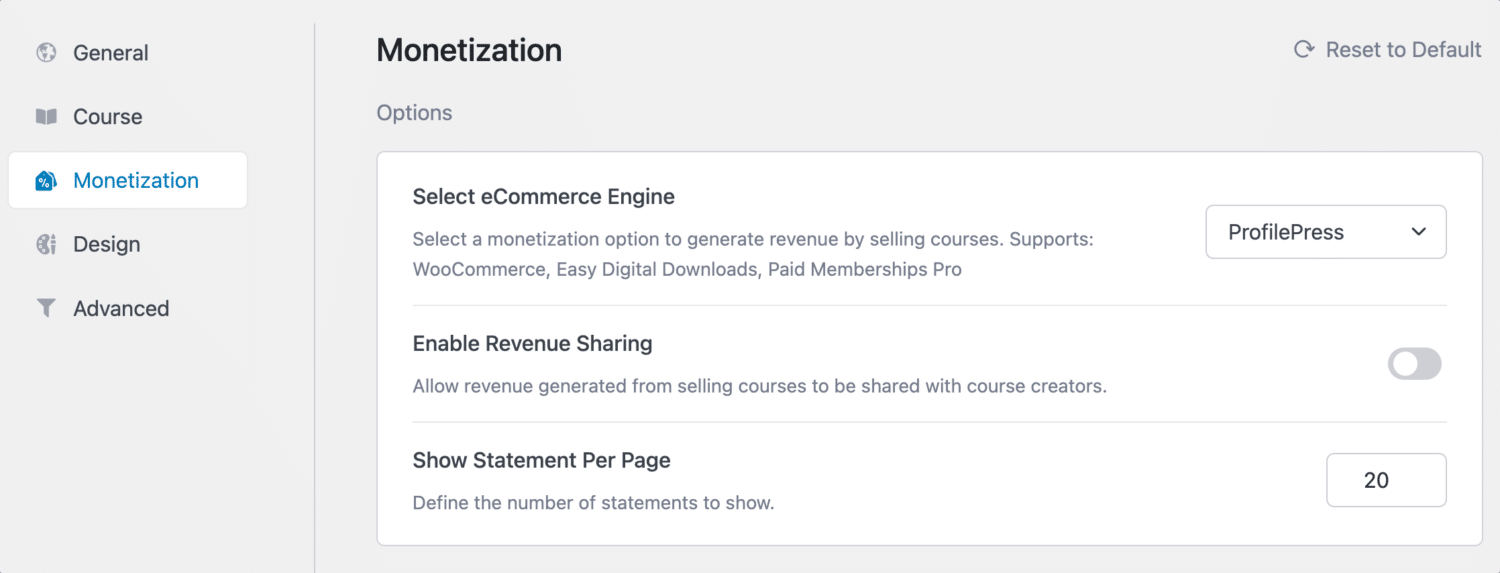
The next step is to connect Tutor LMS to ProfilePress. Tutor LMS has a Monetization page in its settings, which allows you to choose a Monetization engine for your eLearning website.
Navigate to Tutor LMS > Settings > Monetization. Select ProfilePress as your eCommerce Engine and click the Save Changes button at the top.
With this done, When users visit any course page protected by a ProfilePress membership plan, they will see a “Subscribe Now” button that takes them to the checkout page to complete their purchase.
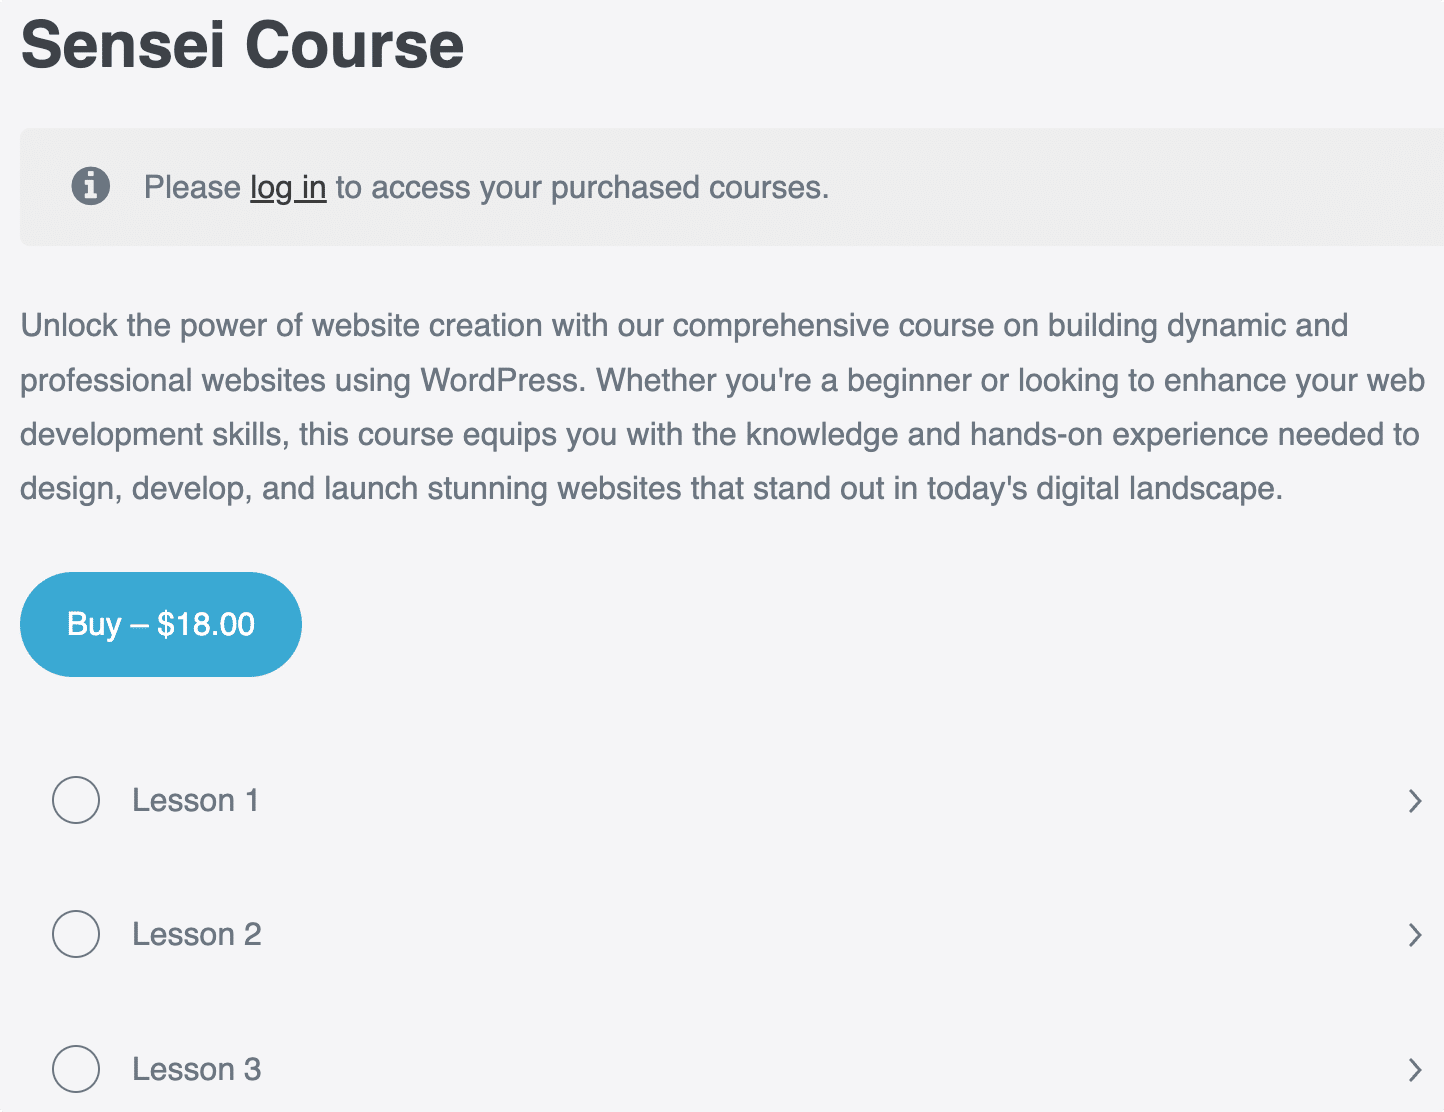
3. Sensei LMS
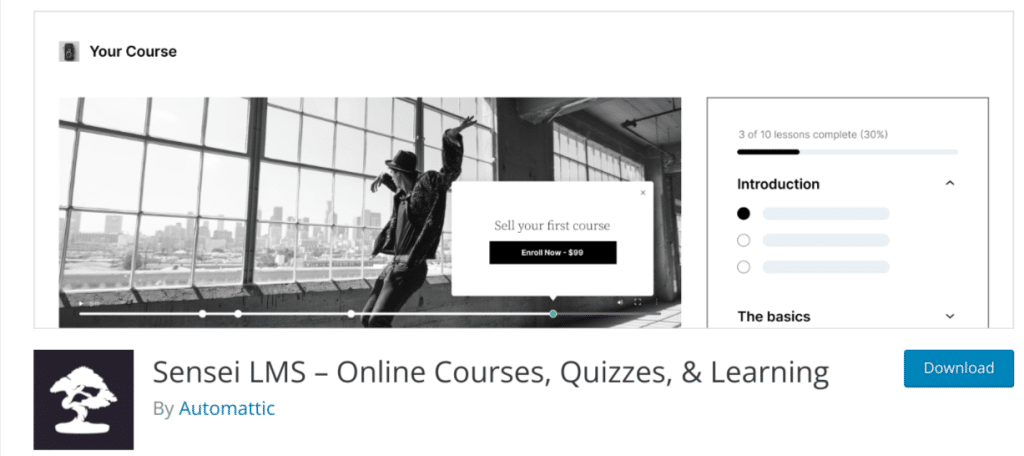
Sensei LMS is another solid LMS plugin for WordPress. It integrates with WooCommerce to sell your online courses. It was built by the team behind Woocommerce, so it is a perfect match for a Woocommerce-powered LMS website.
Sensei LMS allows you to create courses in the WordPress editor, with support for the WordPress block editor. You can create courses and quizzes and write lessons. It has an intuitive flow and interface, making it easy for everyone to use.
Key features of Sensei LMS
- Woocommerce integration
- Create quizzes and questions
- User Registration
- Beginner friendly
- Integrates with Gutenberg block editor
How to Sell Courses with ProfilePress Sensei LMS Addon
In the previous steps above, we have covered how to install and set up the ProfilePress plugin, so we will not cover that in this section. If you missed that part, please scroll up to install and set up the ProfilePress plugin.
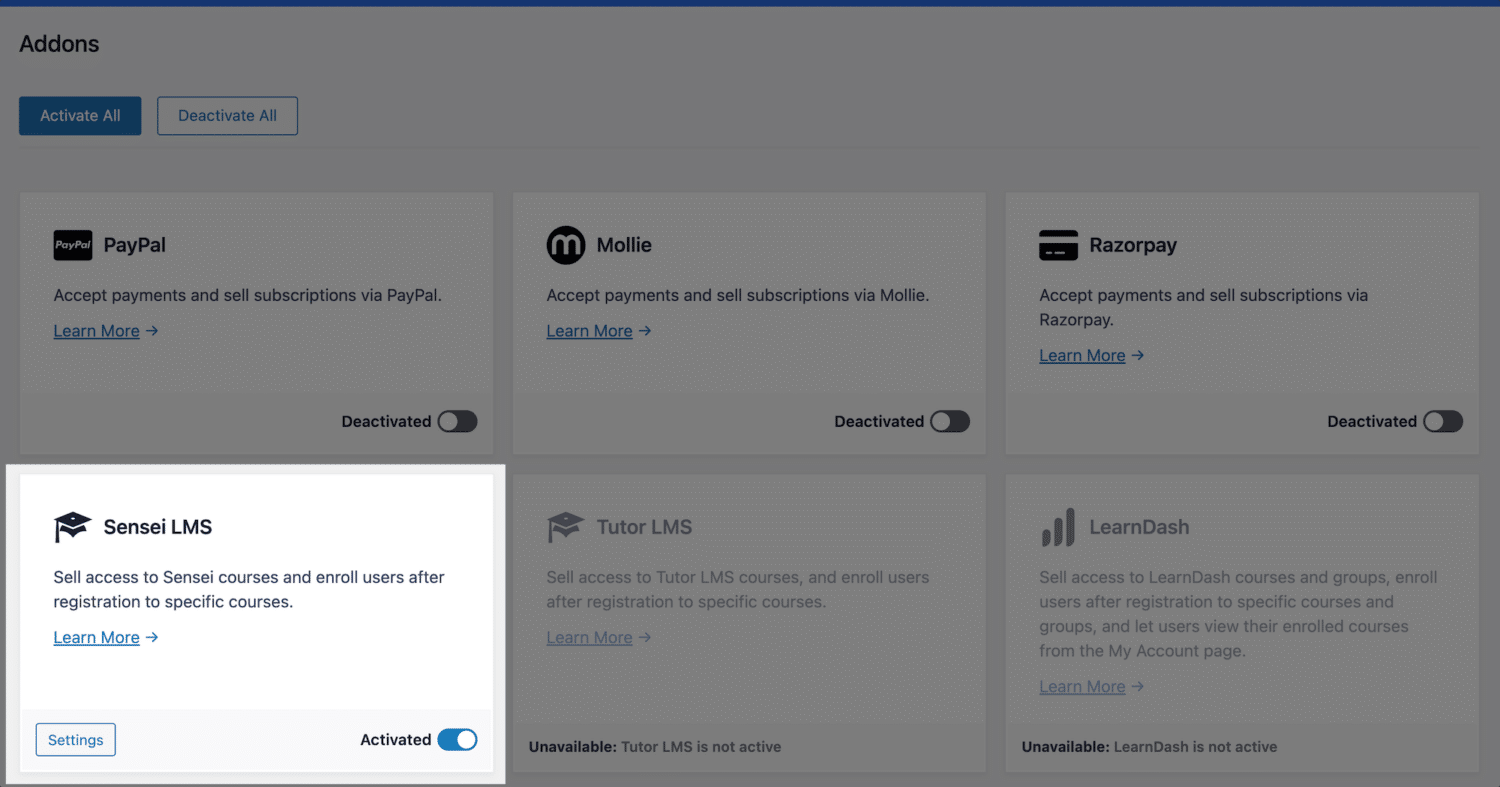
Activate Sensei LMS Addon in ProfilePress
Now that you have ProfilePress set up on your WordPress site, the next step is to activate the Sensei LMS addon. Navigate to ProfilePress >> Addons, scroll until you find the Sensei LMS addon, and then toggle the activate button.
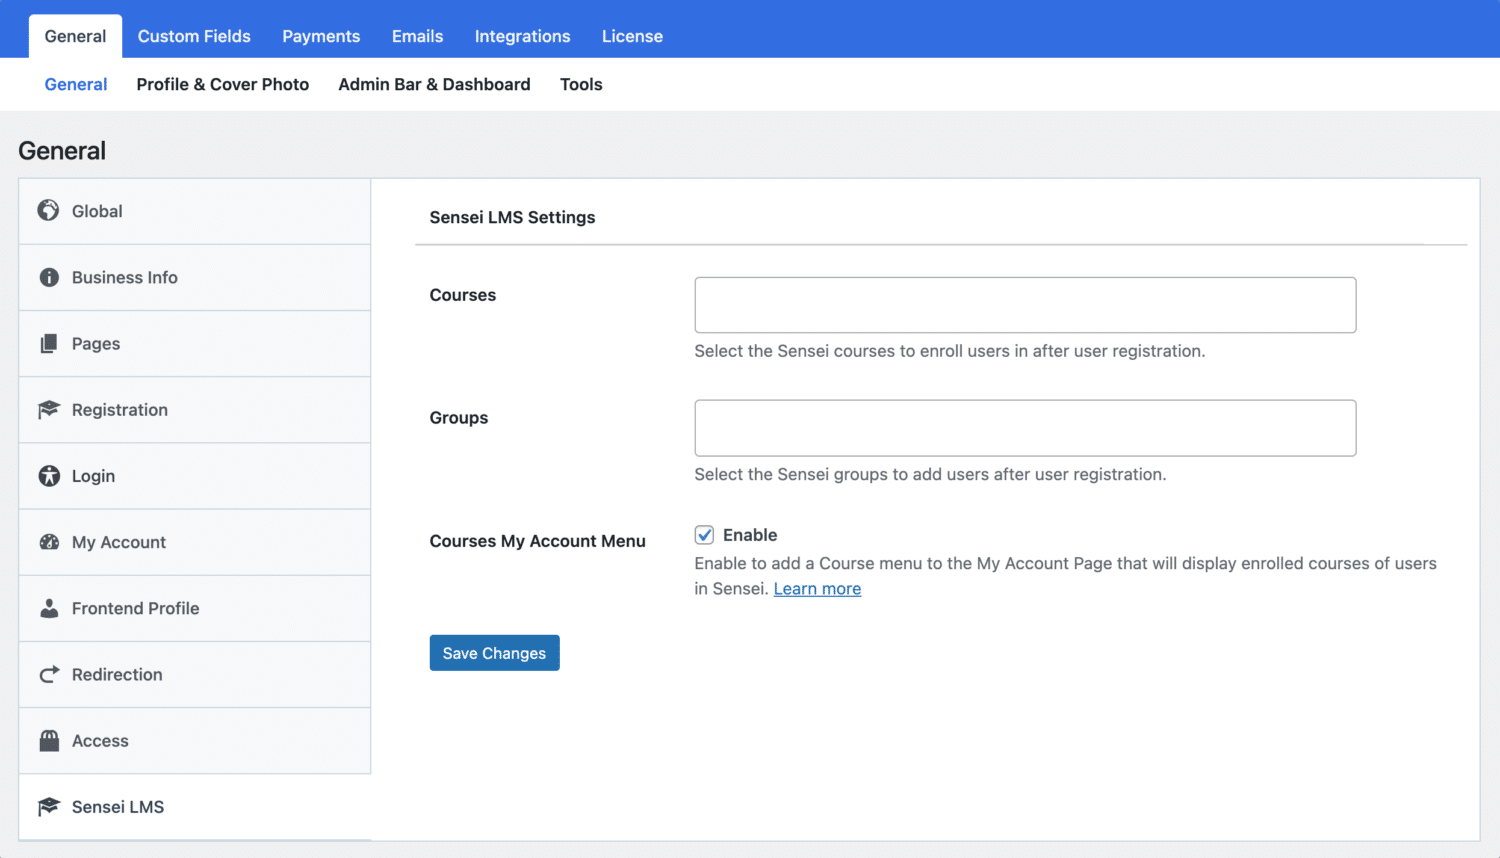
Sensei LMS Addon Settings
After activating the addon, you can find its settings by navigating to ProfilePress >> Settings >> Sensei LMS.
Selling Sensei LMS Courses and Group Access
ProfilePress Sensei LMS addon lets you sell your courses with ease. It works by associating one or multiple courses to a membership plan.
Go to ProfilePress > Membership Plans to create a new membership plan or edit any existing plans you want to use to sell your course.
You will need to provide the plan name, description, and price.
ProfilePress has a built-in field called “Purchase Note” shown to the customer after a successful purchase on the order confirmation page and in the customer’s receipt email. You can use this field to provide instructions for your students and also include a link to the course page.
This field accepts HTML so you can include a direct link to the course for the student. Here’s an example of creating a link to your course. Replace the URL with the URL to your specific course.
“<a href="https://yoursite.com/courses/build-websites-101/">Start this Course</a>”
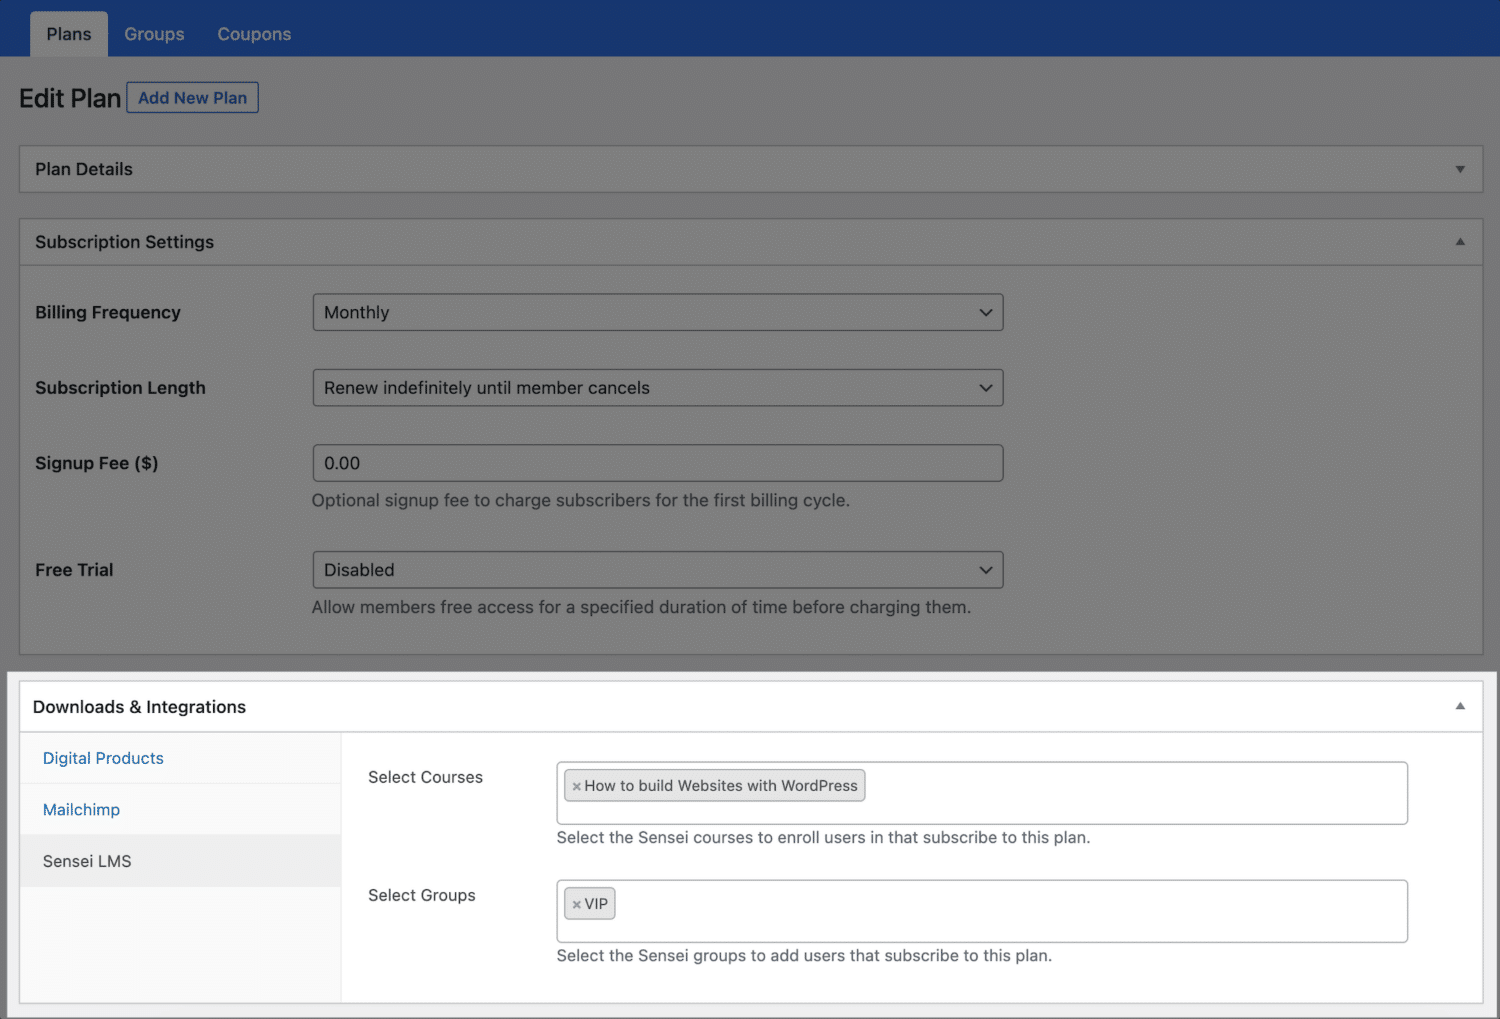
Scroll down to the Subscription Settings section to set the plan or course fee as a recurring payment that can be charged daily, weekly, monthly, quarterly, every six months, or yearly.
Finally, on the Downloads & Integrations section, select the Sensei LMS courses and groups to grant users access after purchasing the membership plan. Select any of the courses you have created earlier so that you can start charging a fee for it.
Save your changes, and your membership plan will be created. Note that if the membership plan is a subscription that charges a recurring fee, access is automatically revoked if the subscription is refunded or expired.
Once you have associated your courses with a membership plan in ProfilePress, your users will see a Buy button on the course page. After checkout or payment, the Buy button would be replaced with a button to start or take the course.
4. LearnPress
LearnPress is another popular WordPress LMS plugin for creating and selling online courses. It has a free version that provides you with the basic features, but you will need to purchase their premium add-ons to get other advanced features.
LearnPress is a good choice for anyone looking for a free LMS plugin for WordPress. The free version is enough to create and manage courses, and you can get the premium addons if you need to do more.
Key features of LearnPress
- Create unlimited courses
- Buddypress integration
- Create unlimited quizzes
- Supports multisite
- Prerequisite courses features
5. LifterLMS
LifterLMS is another feature-packed WordPress LMS plugin. It comes with all the tools you need to create, sell, and manage online courses in WordPress.
Like most other plugins, LifterLMS integrates with other plugins and themes, making it a good choice for adding LMS features to an existing WordPress website. It has a detailed settings dashboard for all its features and an intuitive user interface for managing your LMS website.
Key features of LifterLMS
- Create badges and achievements
- Drag and drop course builder
- Content dripping and course prerequisite
- Multi instructor support
- Multimedia support
How to Sell Courses with ProfilePress LifterLMS Addon
In the previous steps above, we have covered how to install and set up the ProfilePress plugin, so we will not cover that in this section. If you missed that part, please scroll up to install and set up the ProfilePress plugin.
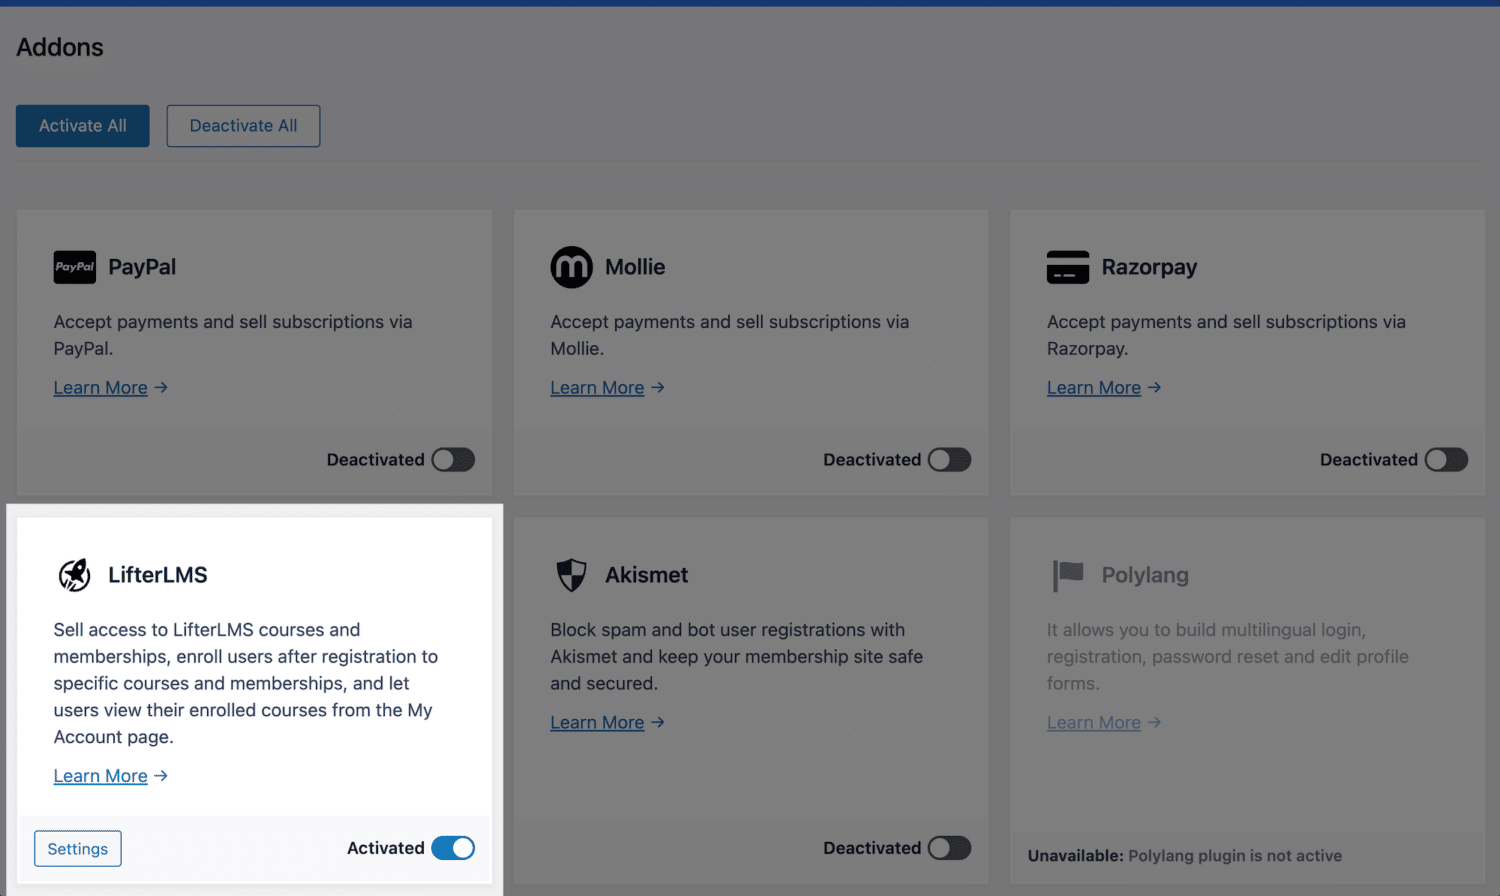
Activate LifterLMS Addon in ProfilePress
Now that you have ProfilePress set up on your WordPress site, the next step is to activate the LifterLMS addon. Navigate to ProfilePress>>Addons, scroll until you find the LifterLMS addon, and then toggle the activate button.
LifterLMS Addon Settings
After activating the addon, you can find its settings by navigating to ProfilePress >> Settings >> LifterLMS.
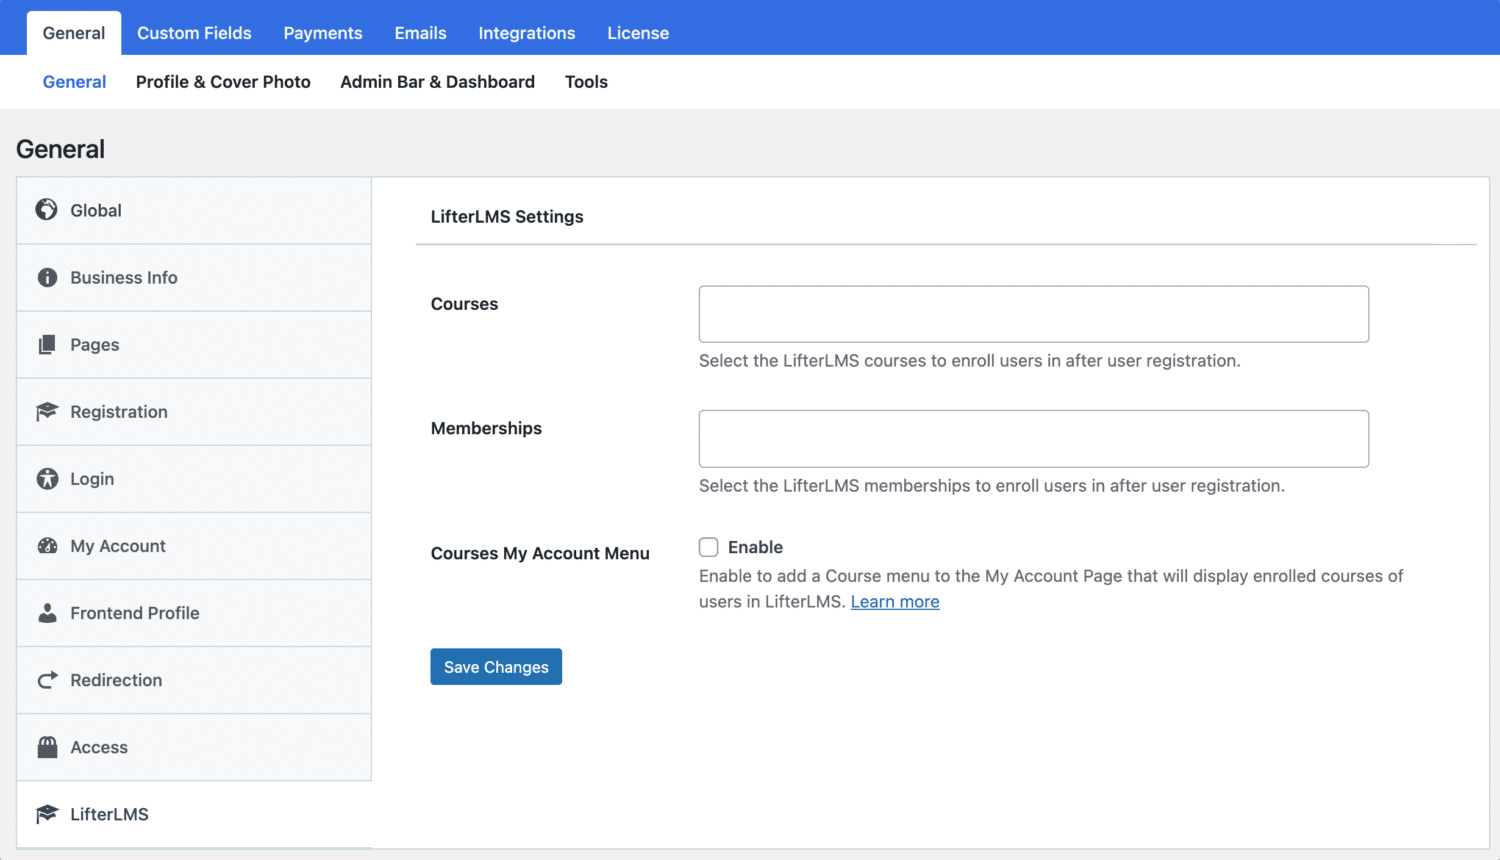
Selling LifterLMS Courses and Memberships Access
The LifterLMS addon lets you sell your courses in LifterLMS and membership access. It works by associating one or multiple courses and memberships with a ProfilePress membership plan.
Go to ProfilePress > Membership Plans to create a new membership plan or open up the edit screen of an existing plan that you want to use to sell your course.
Provide the plan name, description, and price.
ProfilePress has a built-in field called “Purchase Note” shown to the customer after a successful purchase on the order confirmation page and in the customer’s receipt email. Consider using this field to provide instructions or the next steps for taking your course, along with a link to the course page.
This field accepts HTML so you can include a direct link to the course for the student. Here’s an example of creating a link to your course. Replace the URL with the URL to your specific course.
“<a href="https://yoursite.com/courses/build-websites-101/">Start this Course</a>”
Scroll down to the Subscription Settings section to set the plan or course fee as a recurring payment that can be charged daily, weekly, monthly, quarterly, every six months, or yearly.
Finally, on the Downloads & Integrations section, select the LifterLMS courses and groups to grant users access after purchasing the membership plan. Select any of the courses you have created so that you can start charging a fee for it.
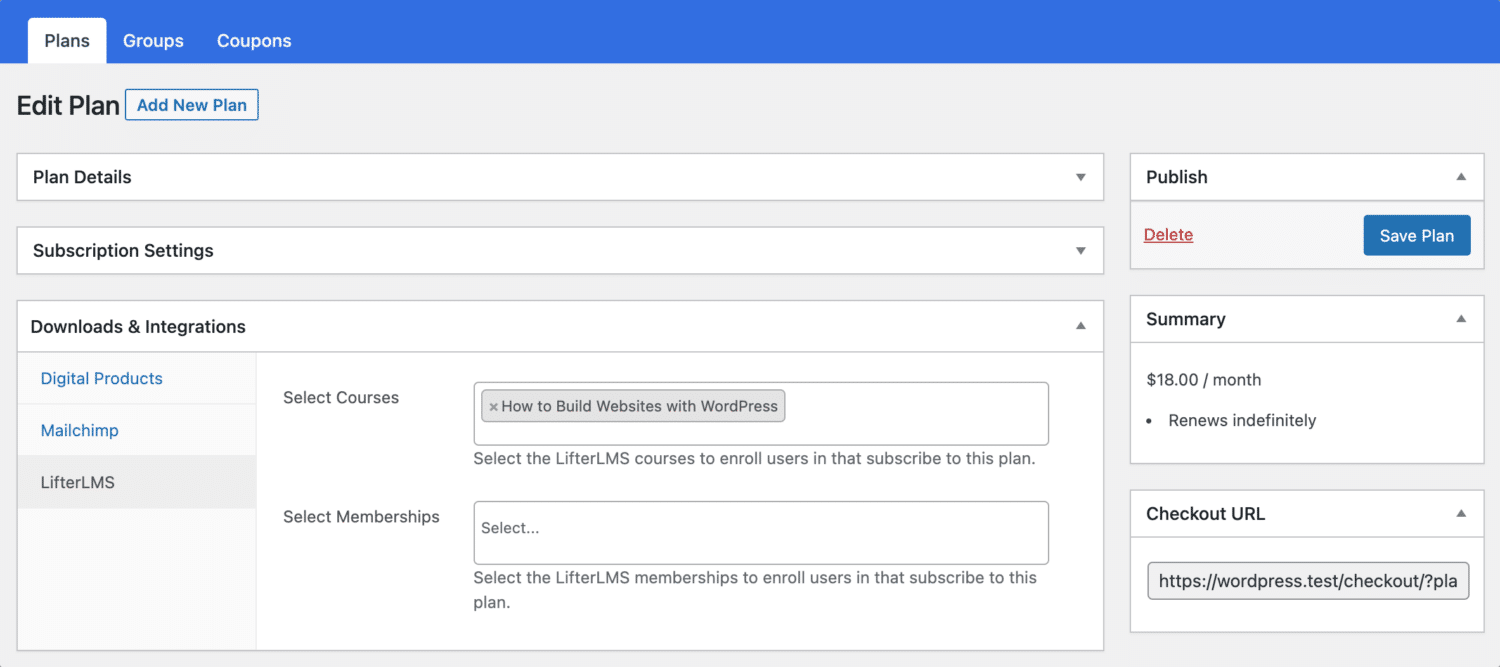
Save your changes, and your membership plan will be created. Note that if the membership plan is a subscription that charges a recurring fee, access is automatically revoked if the subscription is refunded or expired.
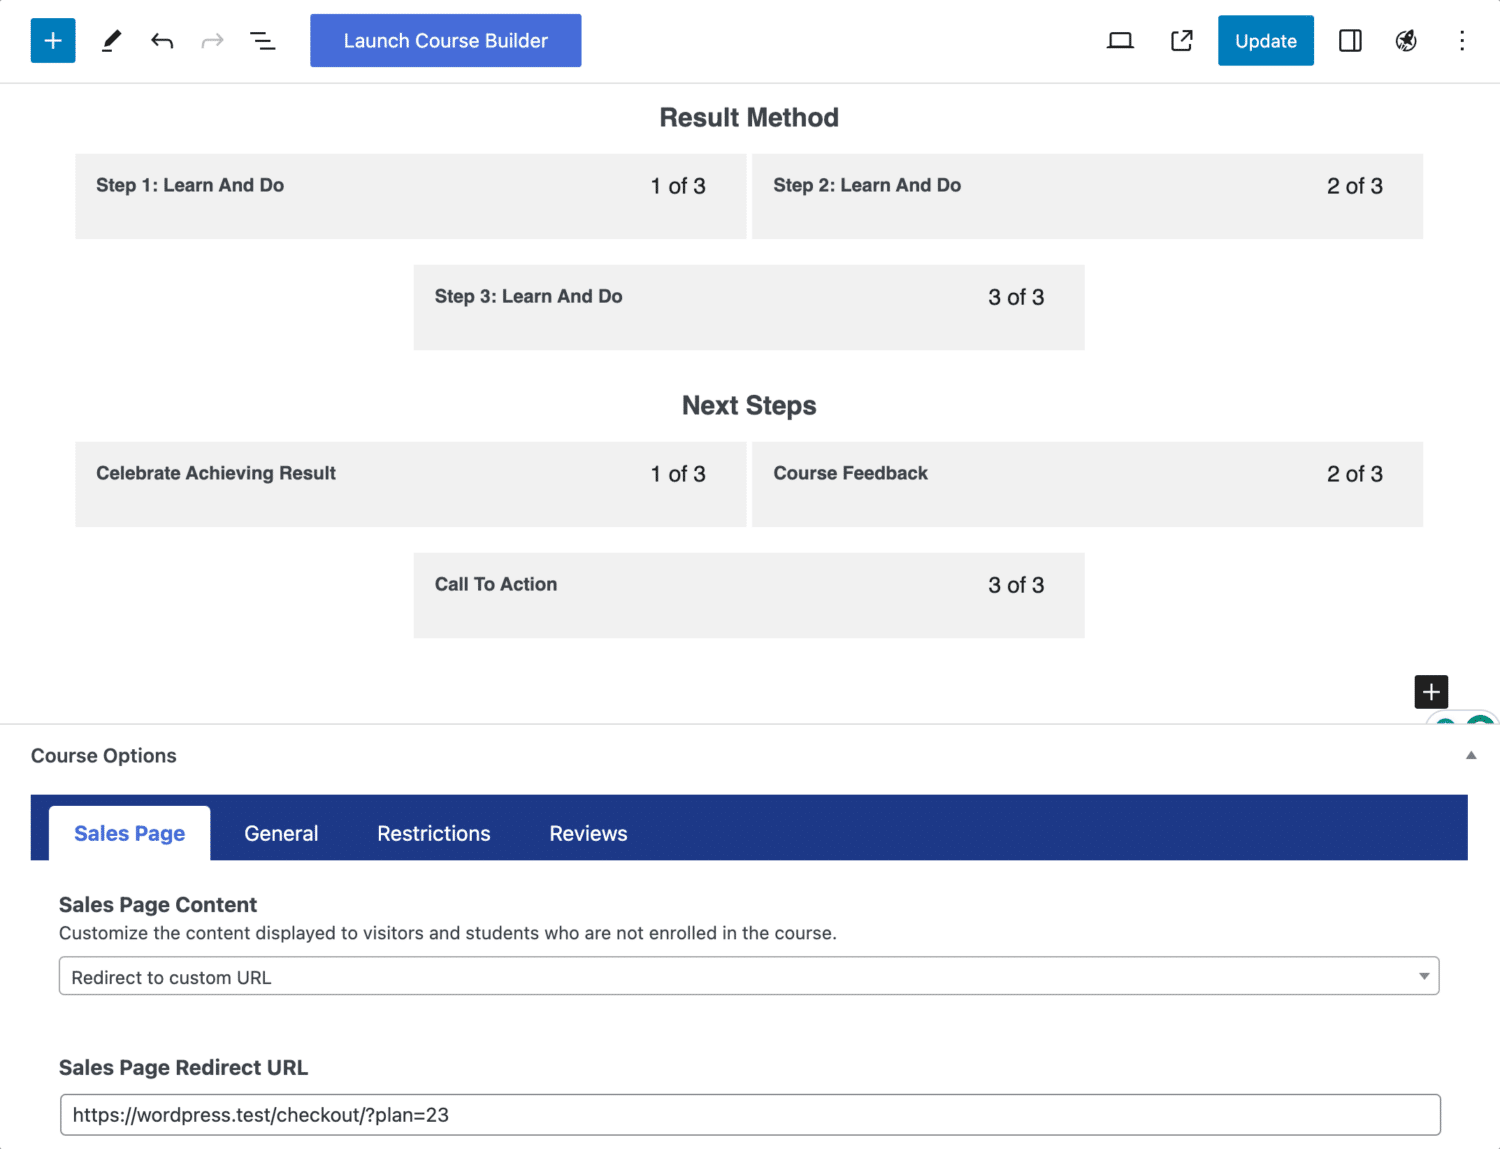
LifterLMS Courses and Memberships Setup
After you’ve associated your courses to a ProfilePress membership plan, you’ll need to make a few adjustments to the courses and memberships in LifterLMS so that your users are redirected to the checkout URL of the ProfilePress membership plan that will grant access to the courses and memberships after payments.
Click the Courses menu, open the edit screen, and set the checkout URL of the ProfilePress membership plan as the Sales Page URL.
After your students purchase a ProfilePress membership plan, they will automatically be enrolled in the specified courses and memberships in LifterLMS.
Conclusion
This article has looked at some of the best WordPress LMS plugins for creating and selling courses online. We did not just talk about these plugins but also looked at how to sell courses with them using the ProfilePress plugin.
Each of these LMS plugins has its strengths and weaknesses. It is up to you to check them out and choose the one that works best for you.
ProfilePress can help you extend your chosen LMS plugin by providing the payment infrastructure needed to sell one-time or recurring payment courses to our students effectively. Aside from the payment feature, ProfilePress also comes with other features that will be useful to your business, such as user profile management, coupons and discounts, paywall, email marketing, member directories, and more.