Do you want to create a custom LearnDash registration form for your WordPress online-course website?
The rise of internet accessibility and demand for knowledge has made learning management systems (LMS) popular. More people online today are interested in taking some courses and improving themselves.
There are various ways to build an LMS website, but one of the easiest ways, especially for non-programmers, is to use WordPress and enhance it with an LMS plugin such as LearnDash.
LearnDash is an excellent plugin for creating and selling online courses. This plugin lets you turn your WordPress website into a powerful learning management system (LMS). A learning management system will allow your readers or students to signup for courses and take these courses on your website; an LMS will provide you with all the tools you need to manage an online learning portal effectively.
Although LearnDash caters to all your need to create and sell courses, other areas are outside of its purview, and one such is to create a custom LearnDash registration form; you will need a third-party solution such as ProfilePress to help you create Frontend login forms and custom user registration forms for your LearnDash LMS website.
What is ProfilePress?
ProfilePress is a User profile and WordPress membership plugin that allows you to build stunning and flexible user profiles, registration forms, and membership sites. It is one of the most popular user registration forms plugins for WordPress.
ProfilePress will enable you to create a custom WordPress registration form for LearnDash easily. With the ProfilePress registration form, you can capture all the required user information.
ProfilePress provides a drag-and-drop form builder with an intuitive interface which makes creating a custom registration form a breeze, and it also comes loaded with many templates that you can choose from if you require a quick setup. Its simple interface will make it easy for your users to manage their courses, payment options, and learning profiles.
Another good thing about ProfilePress is that it provides a custom field addon which allows you to add as many custom fields as you require, and all this data will be available to you when your users sign up to take your courses.
If you require custom forms such as login, registration, order, payment, etc., then ProfilePress is your best tool for the job.
That said. Let’s create a custom registration form for LearnDash courses on your WordPress site.
1. Install and Activate ProfilePress
The first step in this process is to install and activate the ProfilePress plugin. You will need to purchase a ProfilePress Pro License and install the ProfilePress plugin. To do that, go to the ProfilePress website to purchase a suitable license plan.
After purchasing your copy of the ProfilePress Plugin, you will receive a confirmation email with a link to download the plugin zip file and your license key. You can also download the plugin from your account page on the ProfilePress website.
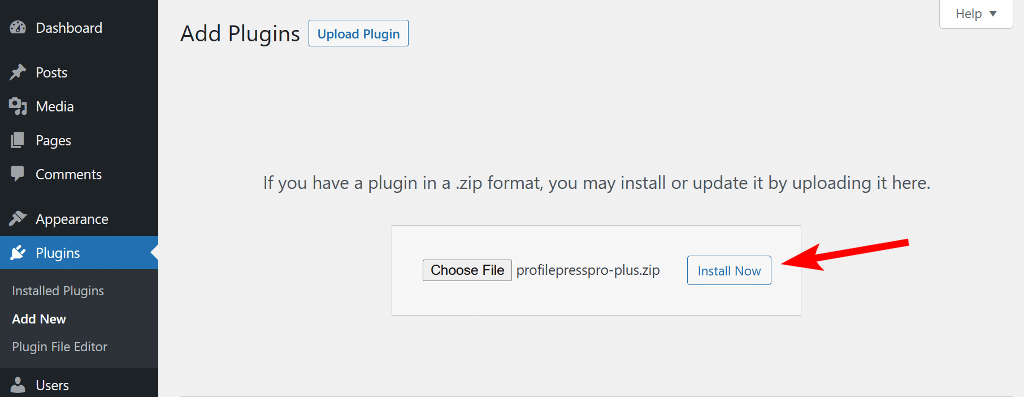
Once you have downloaded the plugin, login to your WordPress admin dashboard, and navigate to the Plugins page; click on the “Add New” button and click “Upload Plugin“.
Next, click “Choose file” to select the previously downloaded plugin zip file. Click “Install Now.”
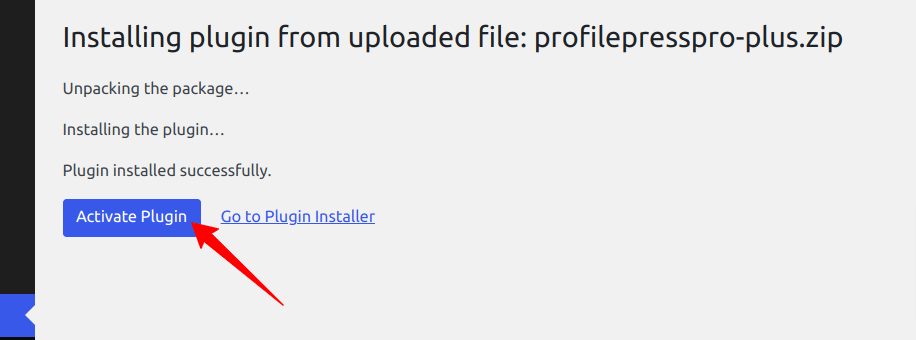
After installation is complete, click the Activate Plugin button.
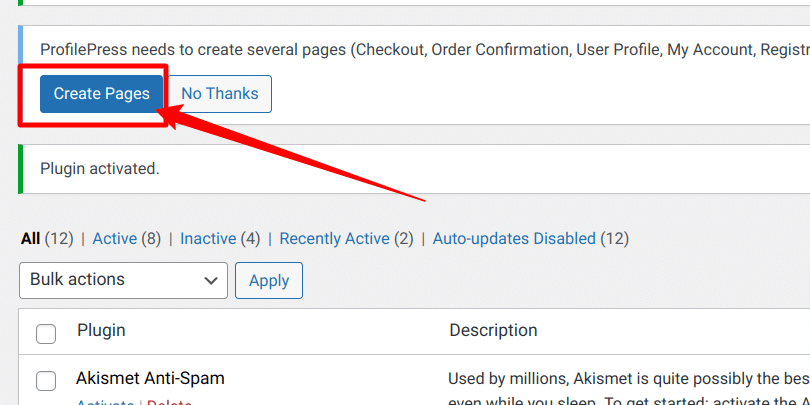
At the top of the page, you will see a notification that says, “ProfilePress needs to create several pages,” Click on the “Create Pages” button to complete the plugin setup.
If you do not see this notification, navigate to ProfilePress > Dashboard and click the “Create pages” button to complete the plugin setup.
With this done, we have completed the initial setup of the ProfilePress plugin on our WordPress site.
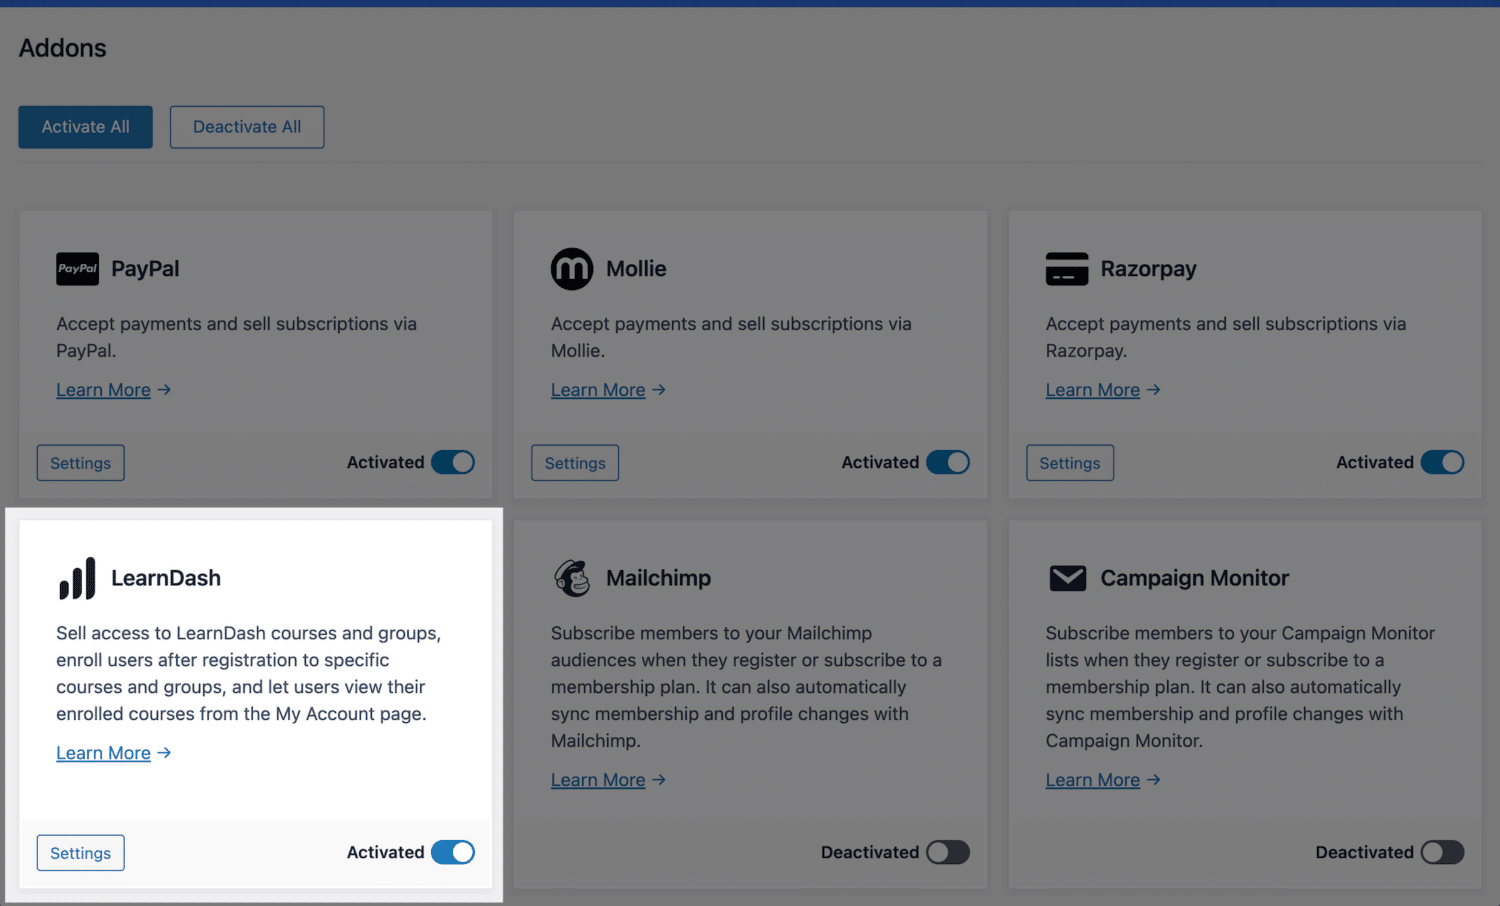
2. Activate LearnDash Addon
After we have installed and completed the ProfilePress setup, the next step is to activate the LearnDash add-on. To do this, navigate to ProfilePress > Addons, scroll until you find the LearnDash addon, and toggle the activation button.
3. Create a Custom LearnDash Registration Form
The next step is to create our custom registration form. This form will be shown to users when they want to register on our LearnDash WordPress site.
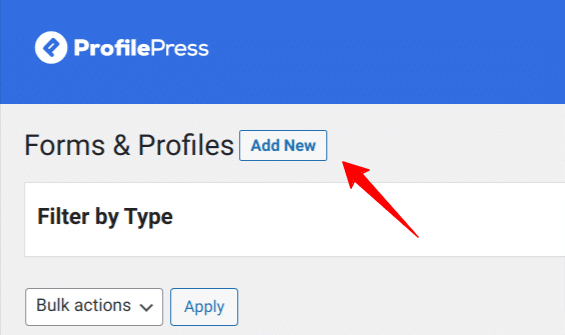
Navigate to ProfilePress > Forms & Profiles, and click on “Add New” Then you will need to select a builder type, and for this article, we will go with the “Drag & Drop Builder“.
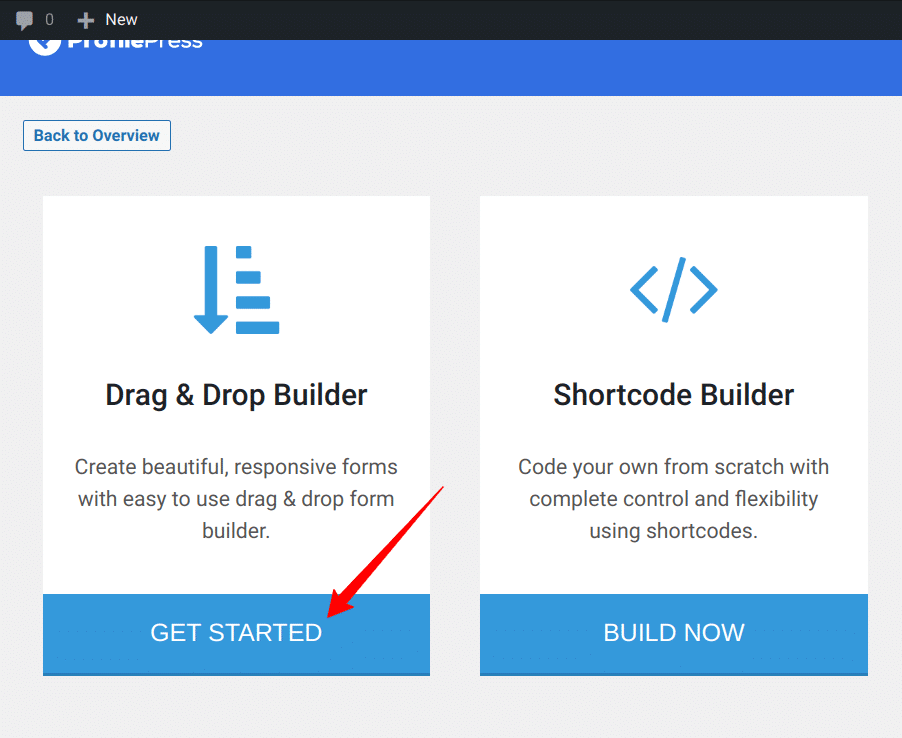
Click the “Get Started” button under the Drag & Drop Builder. Now you will see a field to enter the name for your form, enter a name – you can call it “Registration Form“, next change the form type to Registration by clicking the Registration tab.
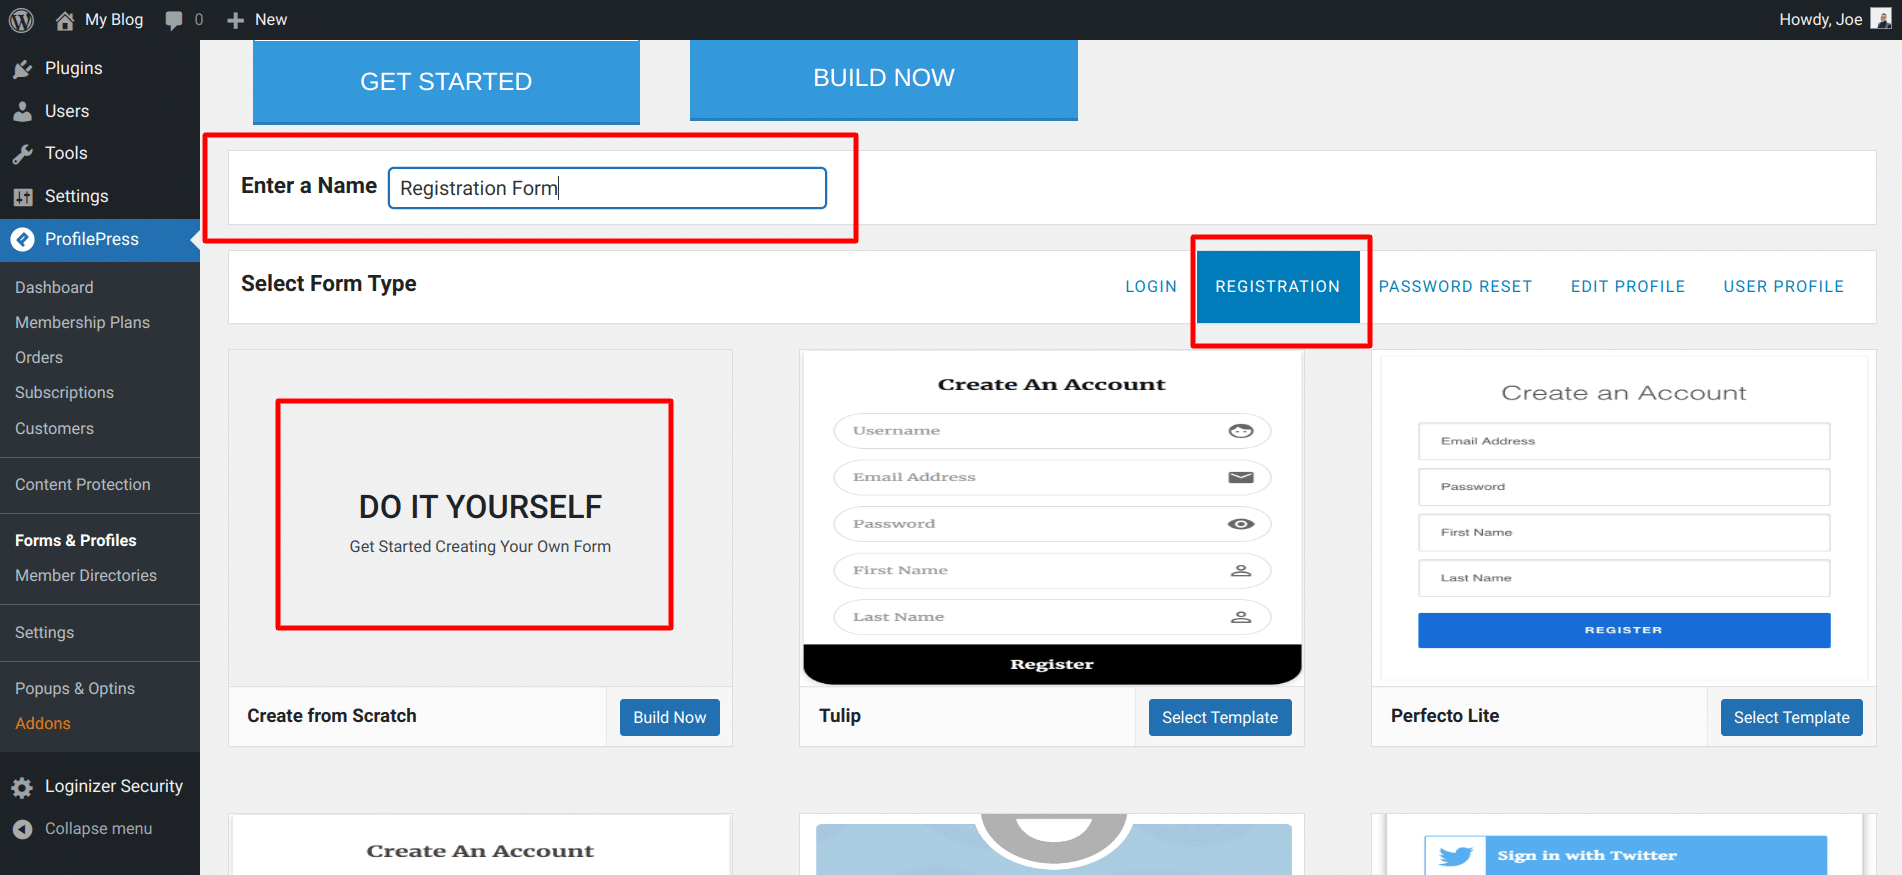
Now, you should see various pre-made registration form templates that you can choose from, and you should also see the “Do It Yourself” option. We will click the “Do It Yourself” option to build a registration form from scratch.
You will be taken to the form creation page, where you can see a lot of form fields that we can use to build our form. You can also see your form shortcode at the top of the fields and a live preview button to preview your form changes.
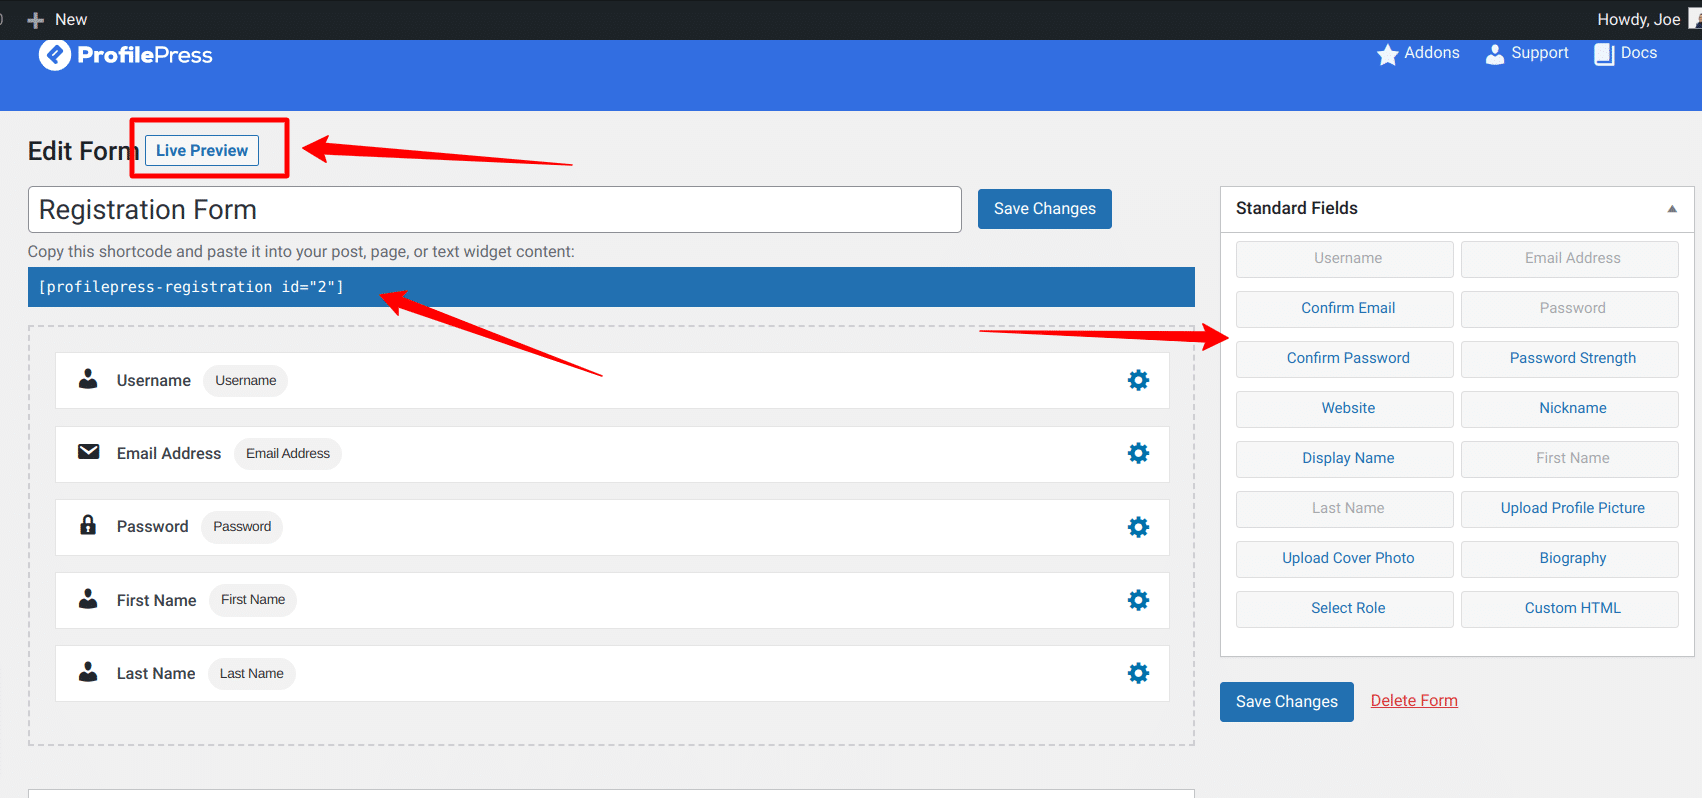
We can drag and drop form fields from the Standard Fields sections on the page’s right sidebar to customize our registration page.
Drag and drop the Confirm Password field into the form builder area and move it under the Password field. This field will allow our users to enter their password twice and confirm it matches before they can proceed with their registration.
If you’re worried about fake registrations or spam, use the ProfilePress Google reCAPTCHA add-on and add it as a block right before the Register button.
Form Settings
The Form Settings section at the bottom of the screen allows you to change some necessary settings for your registration page. These settings include things ranging from the title of your registration form to assigning a specific role to the registered user.
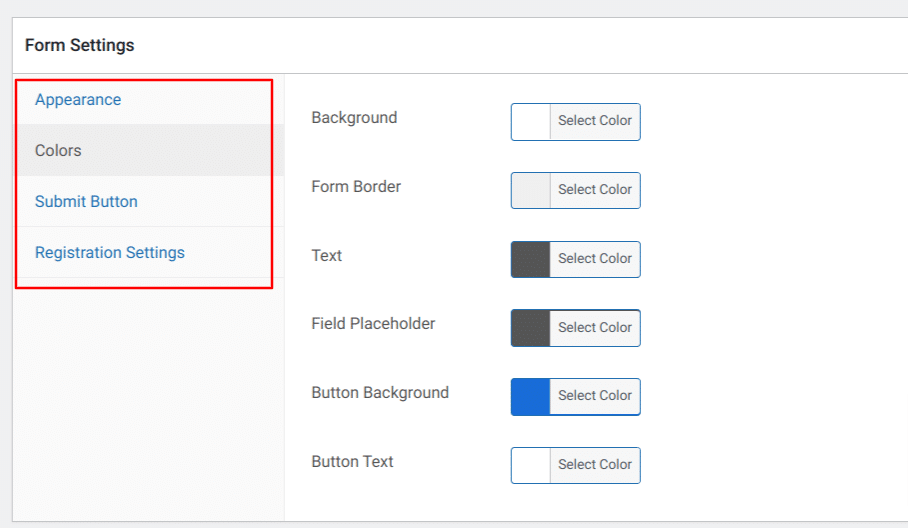
There are four tabs under these settings – Appearance, Colors, Submit Button, and Registration Settings – and you can go through all of them and make any changes as needed before finally creating your registration page.
4. Create the User Registration Page
After creating the form in the step above, we need to place this registration form on a page so that our users can access it and use it when they want to register on our LearnDash website.
The creation of the registration page is similar to how you create a regular WordPress page. The first step is to copy your form shortcode shown at the top of the form builder page.
Next, click Pages > Add New, and enter the page title – Register. If you are using the WordPress block editor, click on the plus icon, select the shortcode block, and paste the copied form shortcode into this block.

If you use the WordPress classic editor, paste the shortcode into the text editor. Next, click on Publish button to publish your new user registration page.
Now, open the registration page in a new incognito window to ensure that you are logged out, and you should see your user registration form displayed.
5. Replace LearnDash Registration Links
In the previous sections, we created a custom registration form for LearnDash and a registration page to display the form for the users. Next is to replace the default LearnDash registration links with our custom registration forms.
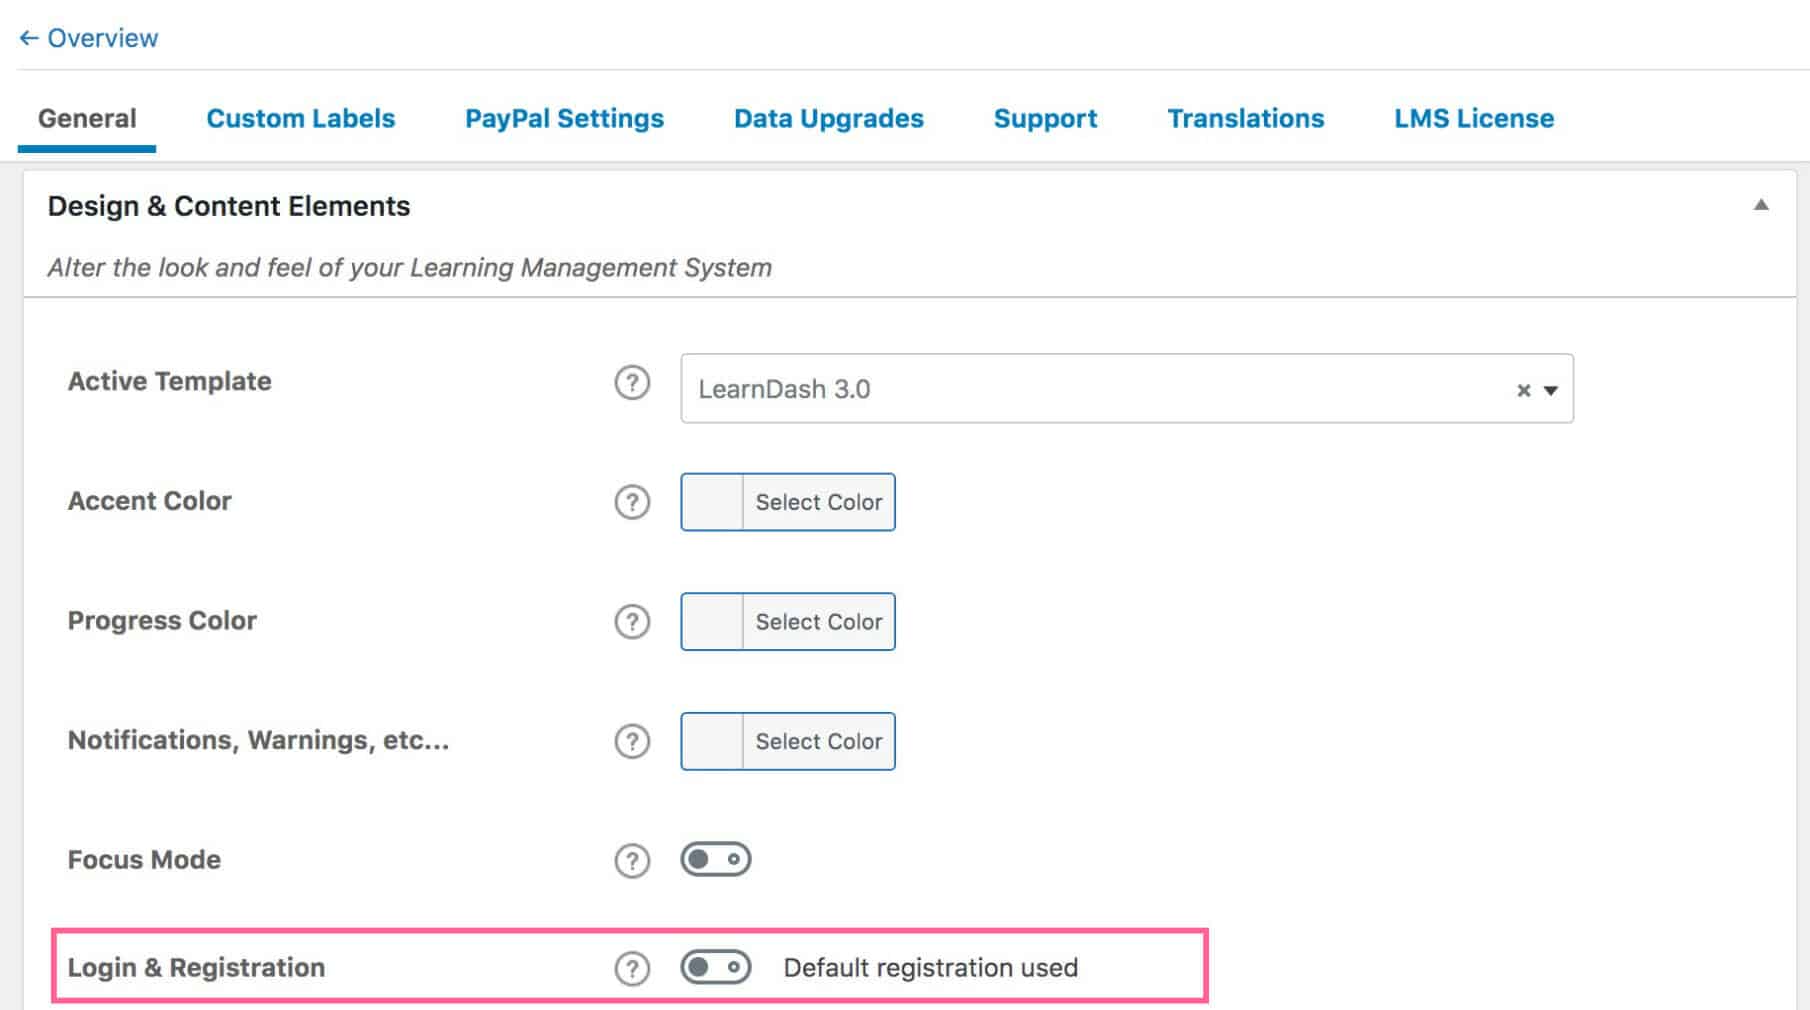
To replace the default LearnDash Registration and Login forms with your custom one created above, Go to LearnDash >> Settings >> General and ensure the “Login & Registration” option is disabled.
Finally, go to P “ofilePress >> Settings >> Global and ensure the registration page points to the custom registration page you created in the last step. That is the page where you pasted the registration form shortcode.
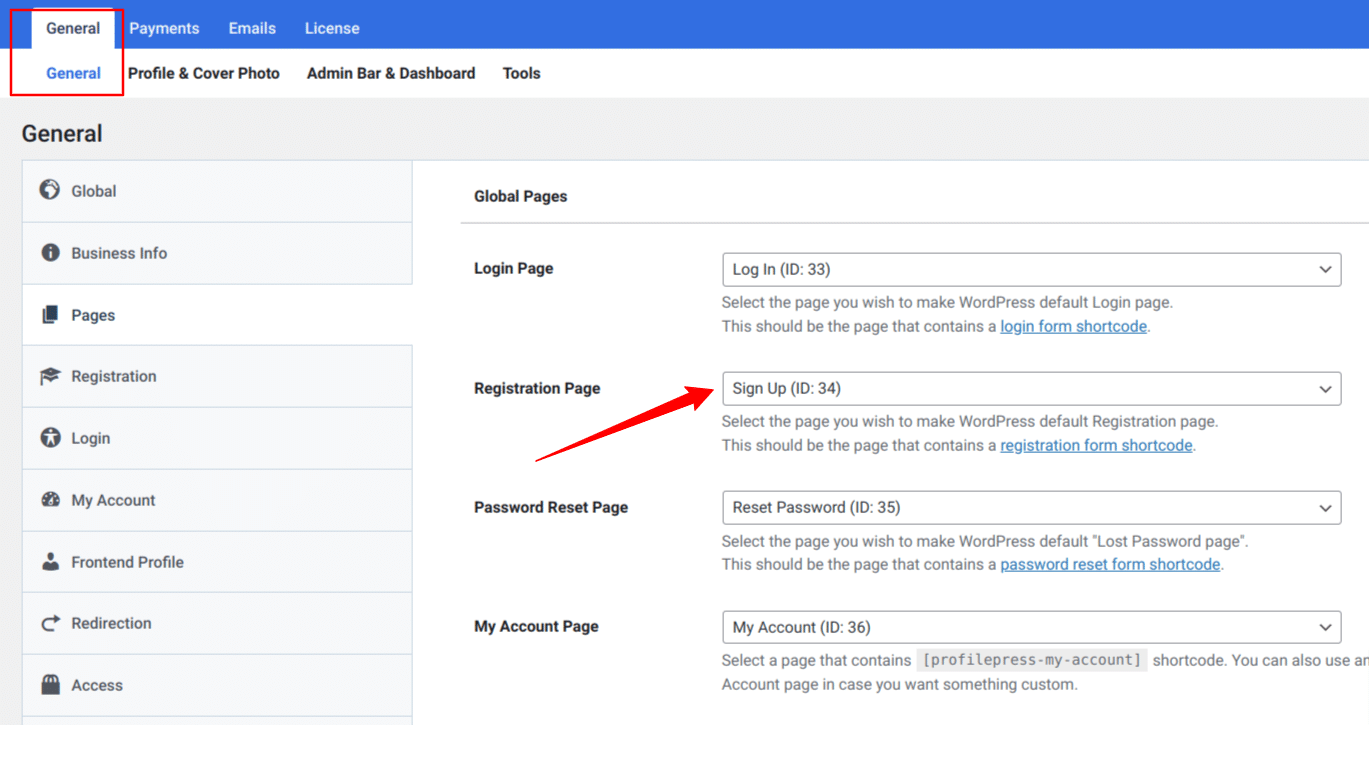
The purpose of setting the page in Global Settings is so all registration page links on your LearnDash LMS website point to the custom registration page we created in Step 4.
How to Enrol Users in Courses & Groups after Registration
The LearnDash addon allows you to automatically enroll users to specific courses and/or groups in LearnDash after registration, regardless of the custom registration form they registered through.
To do this, ensure the addon is activated (Step 1) and navigate to ProfilePress >> Settings >> LearnDash.
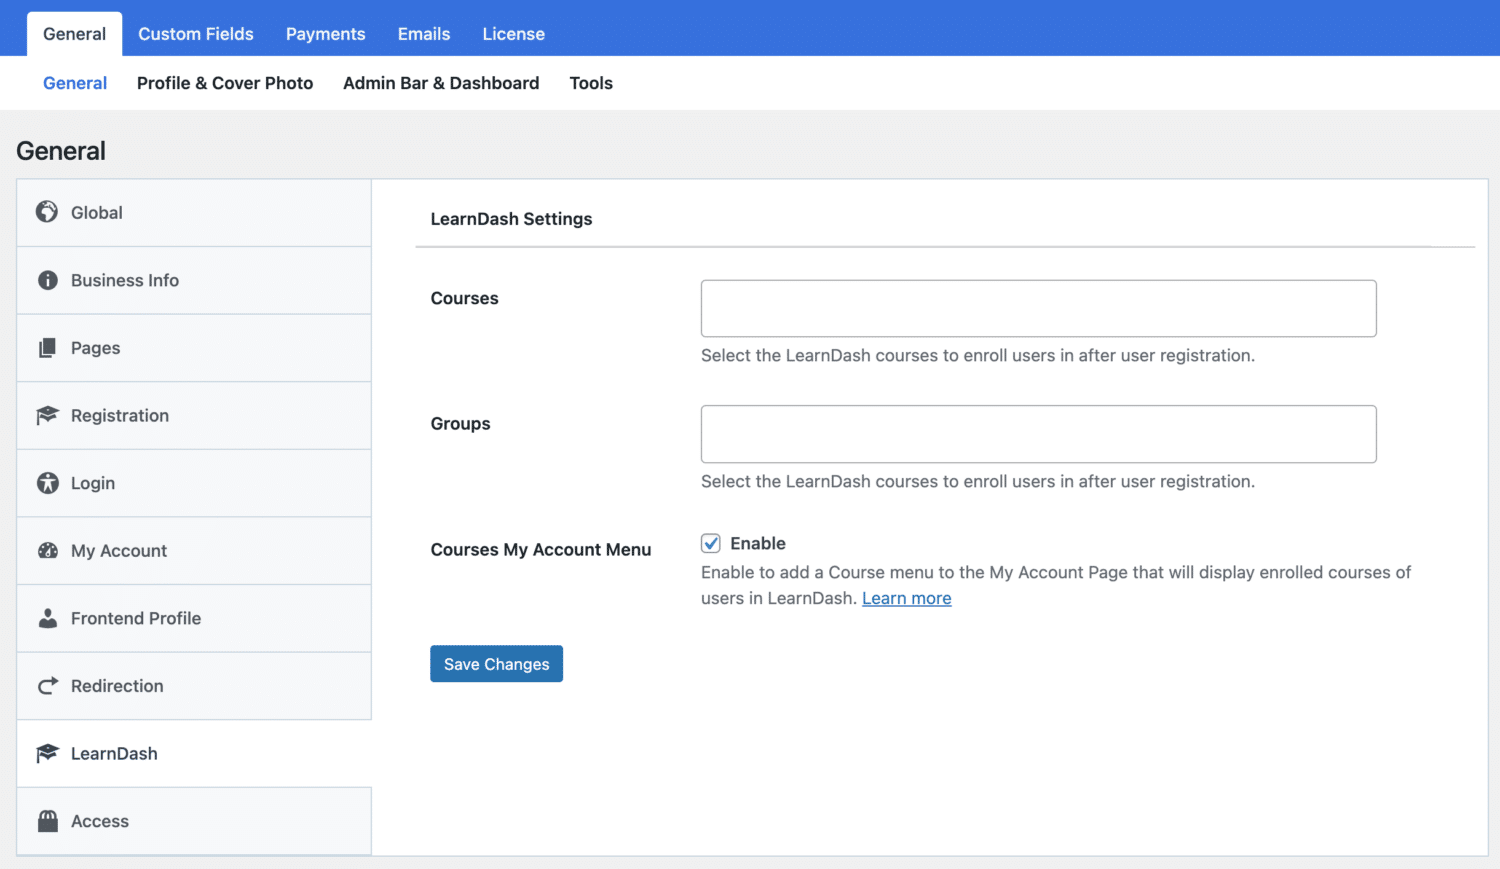
The ProfilePress LearnDash addon also allows you to sell access to LearnDash courses and groups while allowing users to view their enrolled courses from the “My Account” page.
Enrollment Based on the Registration Form
The LearnDash addon also integrates with the registration form to enroll users in specific courses and groups based on the registration form they signed up from.
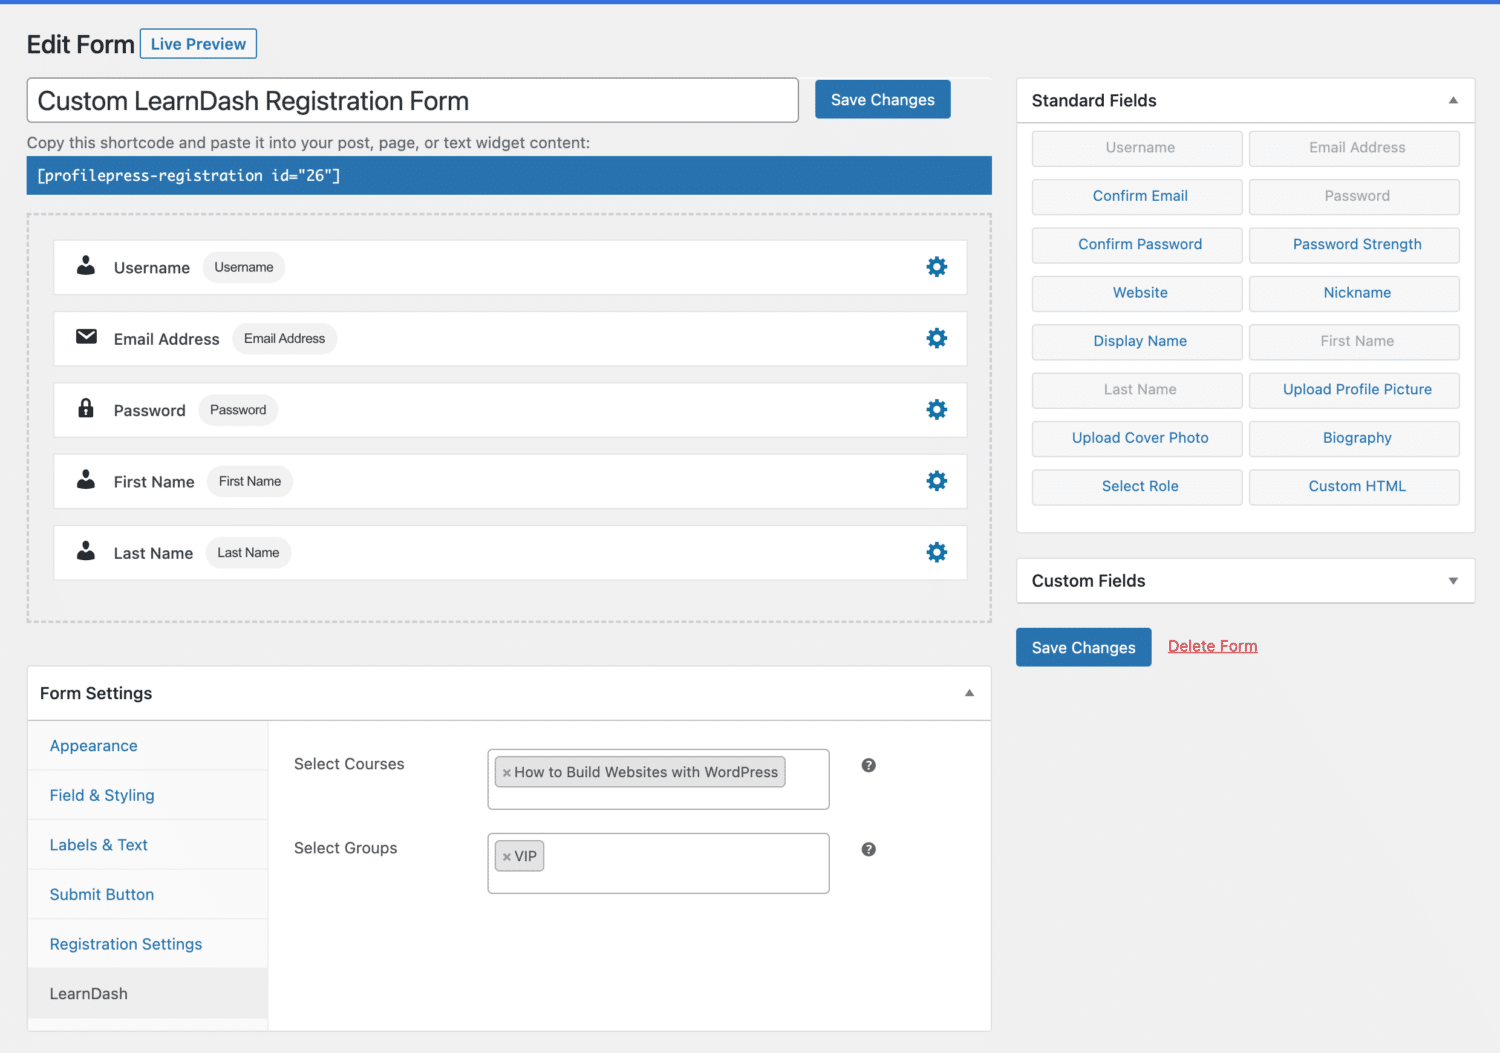
From the example above, all users who signup via this custom LearnDash registration form will be added to the “How to Build Websites with WordPress” course.
Wrapping it Up!
A custom LearnDash registration form gives you absolute control over the information that is requested from your potential users, and with a custom registration form built with ProfilePress, you won’t only be able to customize the form, but you can also automatically enroll your users into various courses immediately after they signup.
If you own a LearnDash LMS website, creating a custom form is the way to go. Aside from the custom registration forms for LearnDash, ProfilePress can also be used to set up user email verifications, registration approvals, social logins, and more.