Are you interested in setting up automated emails on your WordPress site?
With email automation, you can send messages to your subscribers, users, or customers based on specific events, schedules, or actions. This is a great way to build relationships and keep your readers up-to-date with your latest content.
According to research, half of all businesses use some form of email marketing automation, from welcome emails to new post notifications and email digests. By taking advantage of email automation, businesses, and website owners can save time and effort while providing better experiences for their customers.
In this article, we’ll show you how to send automated emails using the MailOptin WordPress plugin. This all-in-one solution helps you convert visitors into subscribers, create one-off newsletters, and send event-triggered emails. You can also customize and showcase professional opt-in boxes on your WordPress site.
MailOptin is an all-inclusive plugin that streamlines lead generation and email automation. With this tool, you can easily set up and send notifications for new posts, email digests, and newsletters. It integrates with numerous email marketing providers, CRMs, analytics, and WordPress solutions, such as Mailchimp, Campaign Monitor, Sendy, and many more.
How to Install and activate the MailOptin plugin
The first step in your email automation journey is to install the MailOptin plugin, and you can easily do this from your WordPress dashboard.
You will need to purchase a MailOptin License and install the MailOptin plugin.
After purchasing a copy, you will receive a confirmation email with a link to download the plugin zip file and your license key. You can also download the plugin from your account page on the MailOptin website.

Once you have downloaded the plugin, login to your WordPress admin dashboard, and navigate to the Plugins page; click on the “Add New” button and click “Upload Plugin“. Upload the zip file and install and activate the plugin on your WordPress site.
How to Send Automated Welcome Emails in WordPress
Automated emails, particularly the Welcome Email, help welcome new subscribers to your WordPress site.
This email can be sent immediately after they sign up and serves as a great opportunity to introduce your brand, products, and services. Additionally, it can guide them on what to do next or how to get started.
In the following steps, I will guide you on setting up an automated signup autoresponder on your WordPress site that will activate whenever a new user fills out a form on your website.
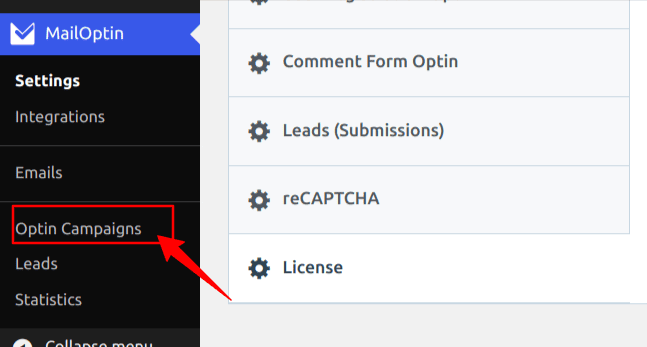
To set up an autoresponder, you will first need to create an opt-in campaign. To do this, navigate to MailOptin > Optin Campaigns and click on the Add New button.
Enter a title for the campaign, select the opt-in type, and choose the opt-in form theme of your choice, and you will be redirected to the form builder.
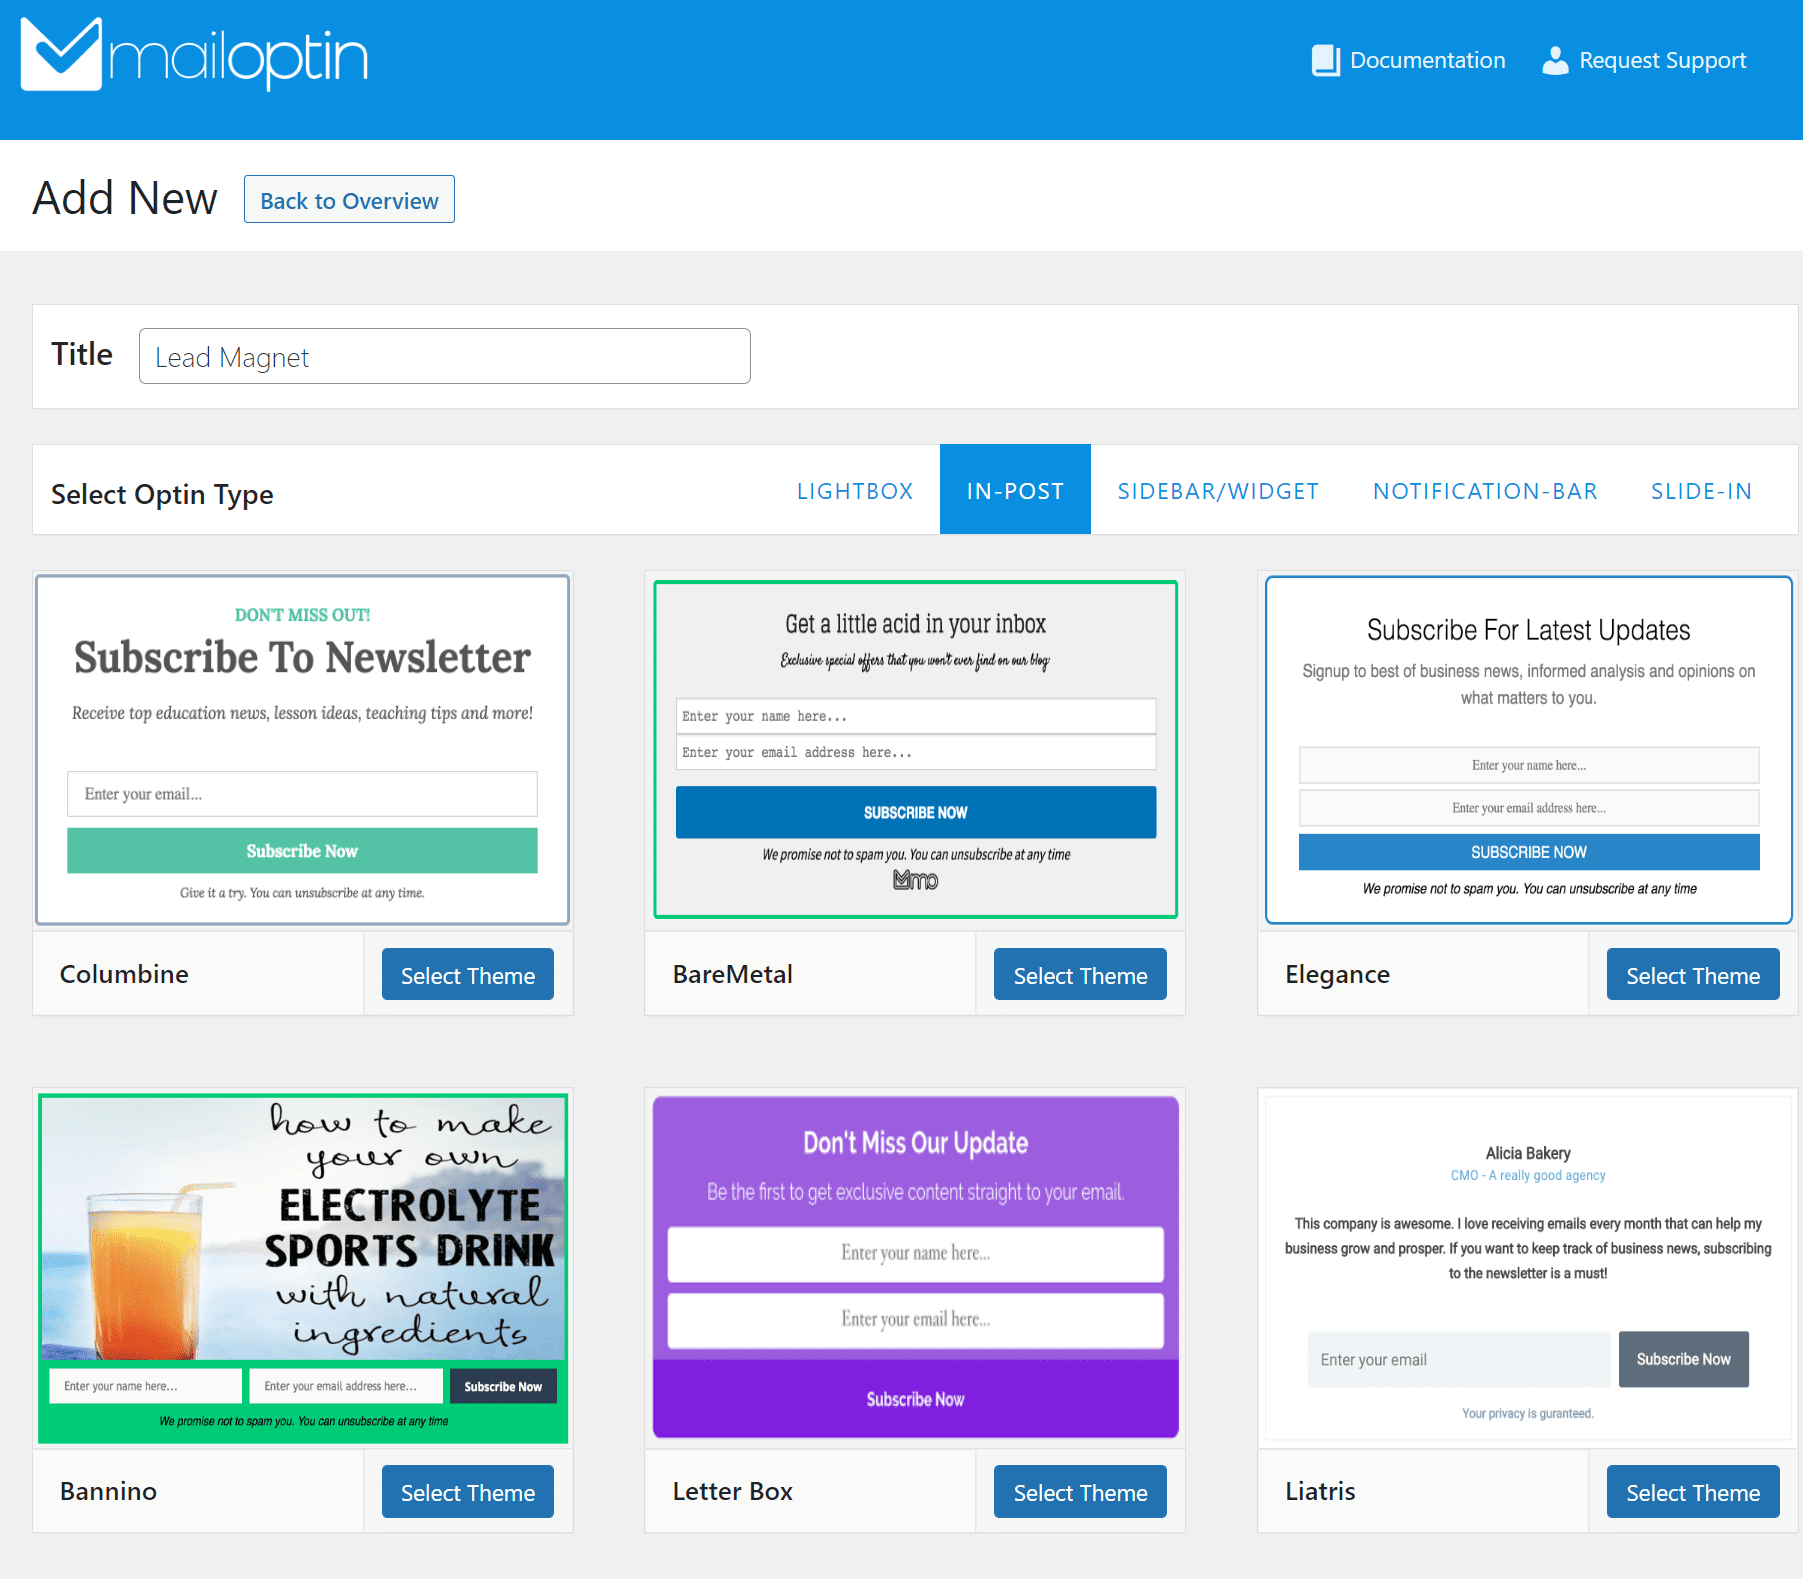
Next, select the template you want to start customizing. We’ve decided to go with the Letter Box theme for this example. Once you click on the Select Theme button, you will automatically be redirected to the customization page.
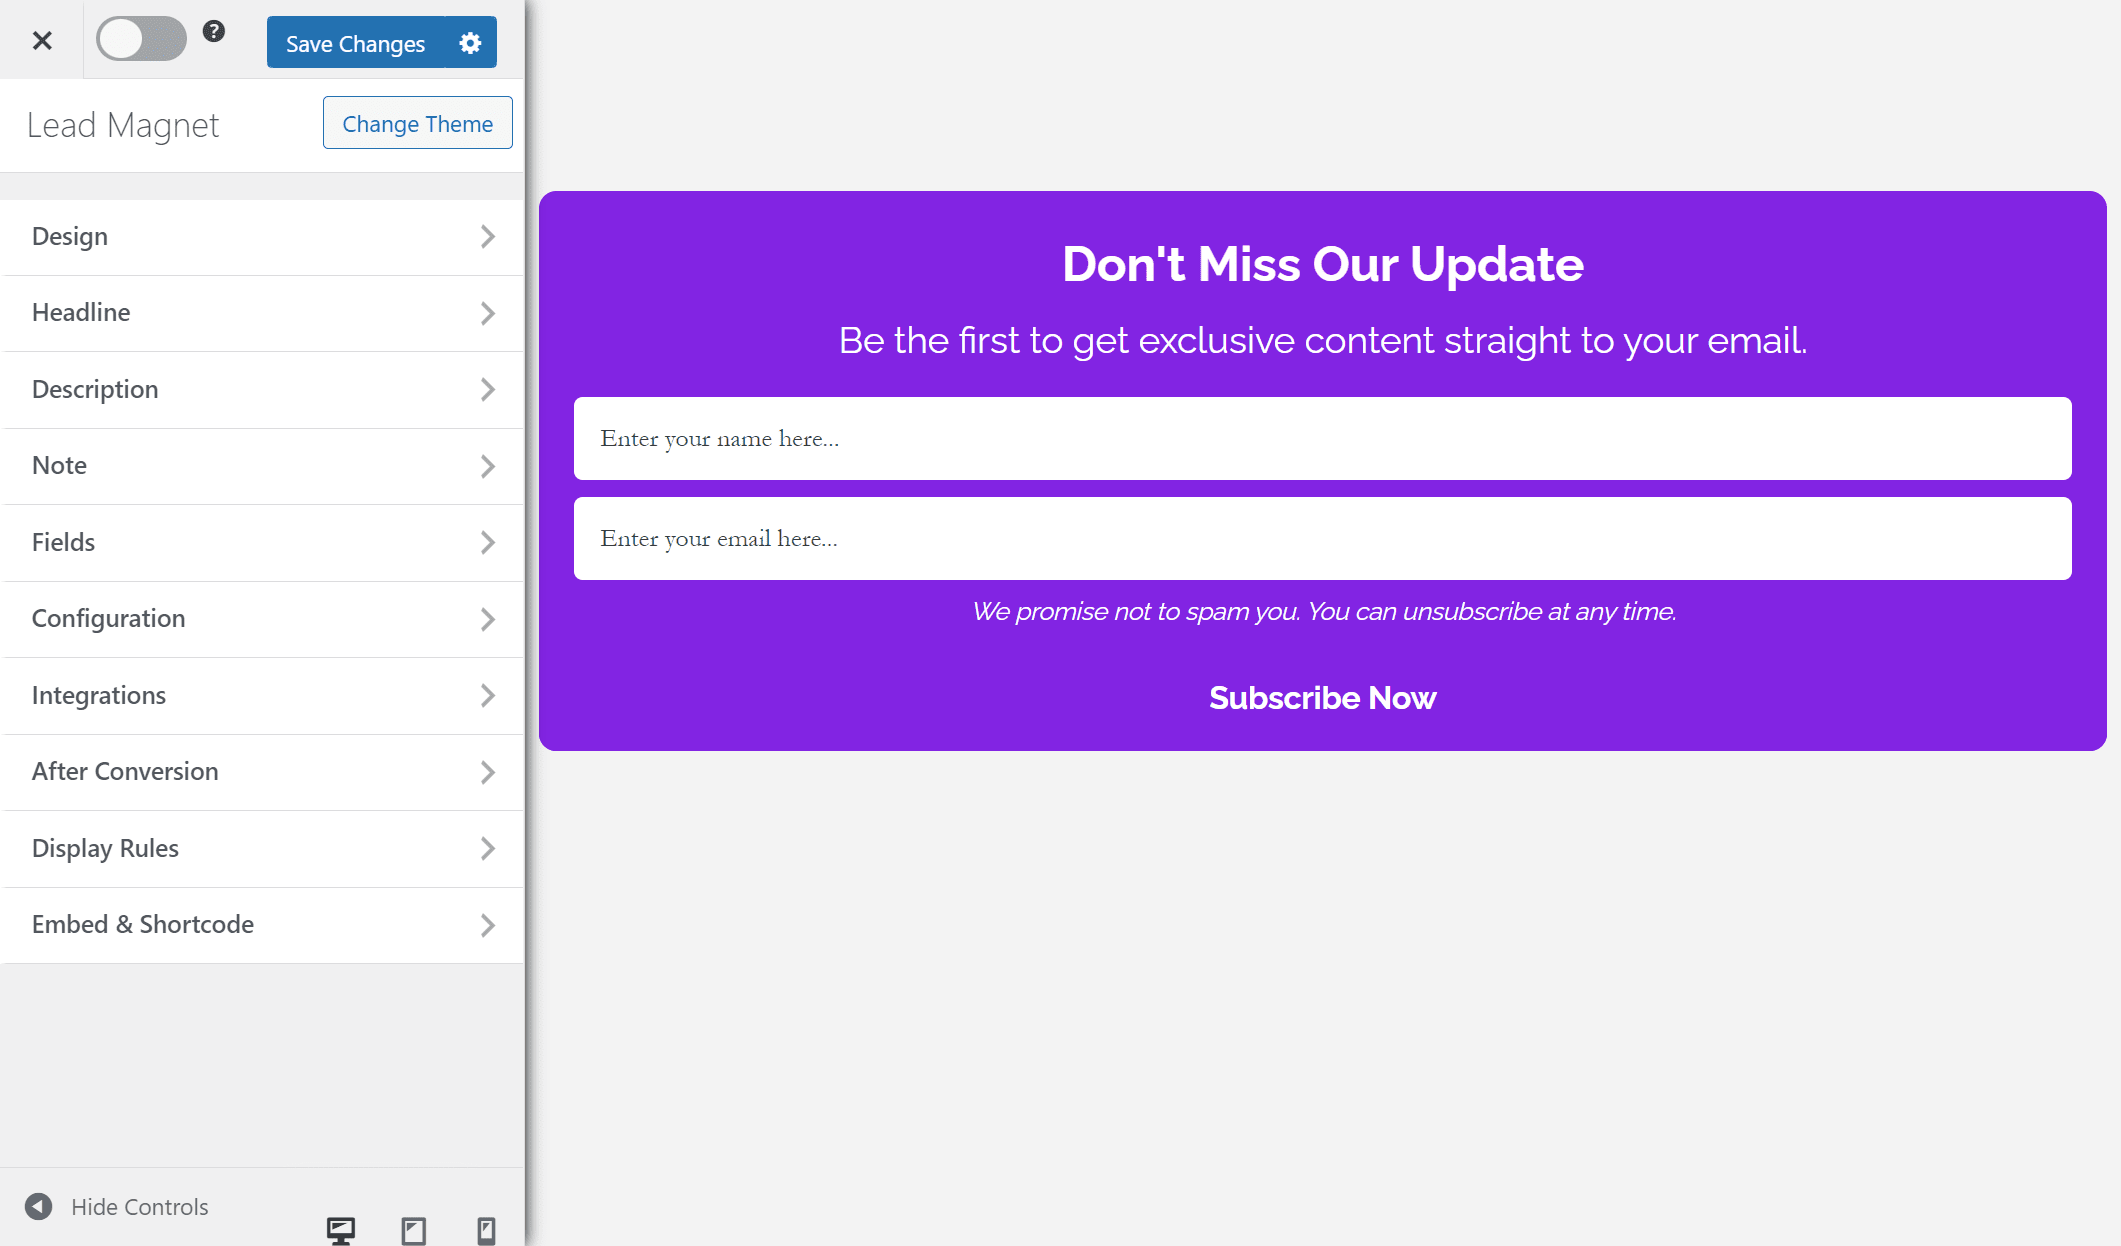
Using the options available on the form editing page, you can customize the opt-in form appearance and feel on the front end of your WordPress site.
Click on the Design tab to customize the background color of your opt-in form. You can customize the typography using the Headline and Description menus and set text colors.
The Headline panel allows you to add a custom headline, change the font and color, and more.
The Description panel customizes the sentence/text beneath the headline.
The Note panel customizes the sentence beneath the opt-in form.
The Fields panel allows you to customize the form fields, such as the name and email fields and the submit button. You can change the placeholder, colors, font, option to hide the name field, etc.
In the Configuration panel, you can do things such as change the opt-in title, hide the headline, description, and note, customize the success message, cookie duration, and success cookie duration, as well as remove the MailOptin branding.
The Effects panel allows you to add CSS3 animation effects that will capture your visitors’ attention and bring awareness to your opt-in campaigns.
The Integrations panel allows you to select the email marketing service provider and list to store your leads/conversions/subscribers. You could also use the MailOptin Leads feature to store your leads within MailOptin without needing an email service provider like Mailchimp, AWeber, Constant Contact, etc.
And finally, the Display Rules panel gives you fine-grain control of how your opt-in campaign will be displayed, such as the specific post(s) and/or pages(s) and/or custom post types, activities, or events that will trigger the opt-in, e.g., scroll, exit intent, time on site, page views, etc.
Next, select the After Conversion panel and click the “Configure Autoresponder” button.
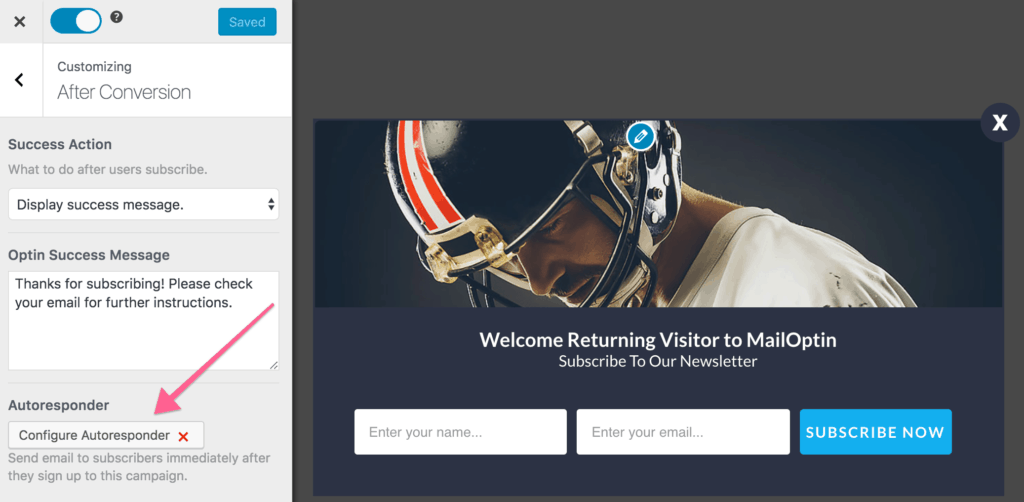
In the resulting modal that is displayed, activate the autoresponder and set up the content of the email. The UI is intuitive and easy to set up.
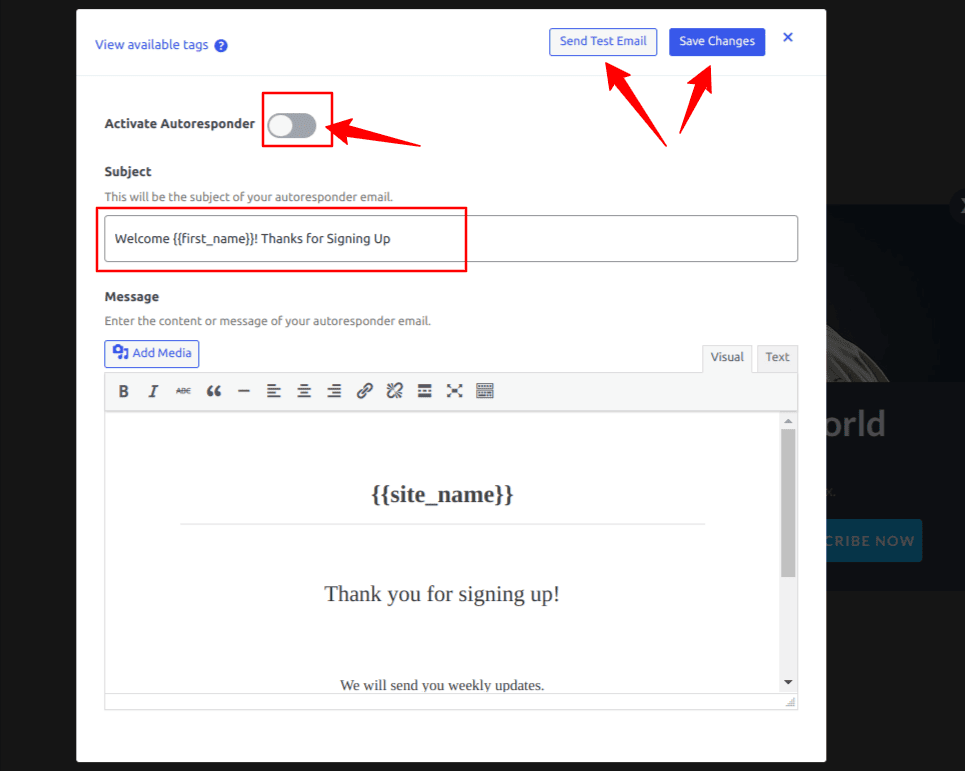
You can personalize the autoresponder email using the following tags.
- {{first_name}} : First name of subscriber.
- {{last_name}} : Last name of subscriber.
- {{email}} : Email address of subscriber.
- {{site_name}} : Site title or name.
Don’t forget to save the changes when you are done.
You can click the “Send Test Email” button to receive a copy of the email to preview the email that will be sent to your users immediately after the signup on your WordPress website.
How to Send New Post Notification Emails in WordPress
New Post Notification emails are sent each time you publish a new blog post on your WordPress site. Sending post-notification emails is a good way to inform your subscribers about recent updates and new content on your website. It is also a good way to promote your content and drive traffic to your website.
MailOptin ships with a highly customizable Email Automation feature. This feature allows you to send emails that a new post has been published to all or a segment of your website registered users, captured leads, and email list subscribers/contacts in Mailchimp, Campaign Monitor, Sendy, Constant Contact, AWeber, ConvertKit, MailerLite, GetResponse, Klaviyo, ActiveCampaign, Brevo (Sendinblue), SendGrid, Mailjet, Keap Max Classic (Infusionsoft), Zoho Campaigns, Moosend, Vertical Response, NewsMAN, CleverReach, WooCommerce, MemberPress, Easy Digital Downloads, Paid Memberships Pro, LearnDash, GiveWP, Restrict Content Pro.
In the next few step, you will learn how to easily set up new post notification emails on your WordPress site using the MailOptin Email Automation Feature.
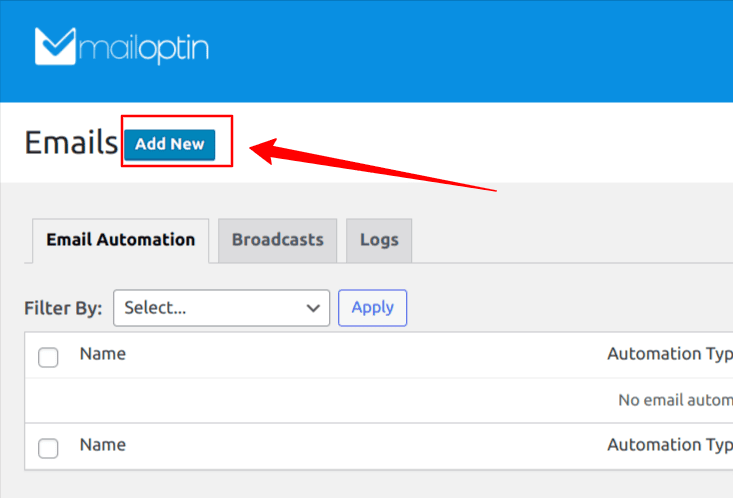
Navigate to MailOptin > Emails and next click on the “Add New” button.
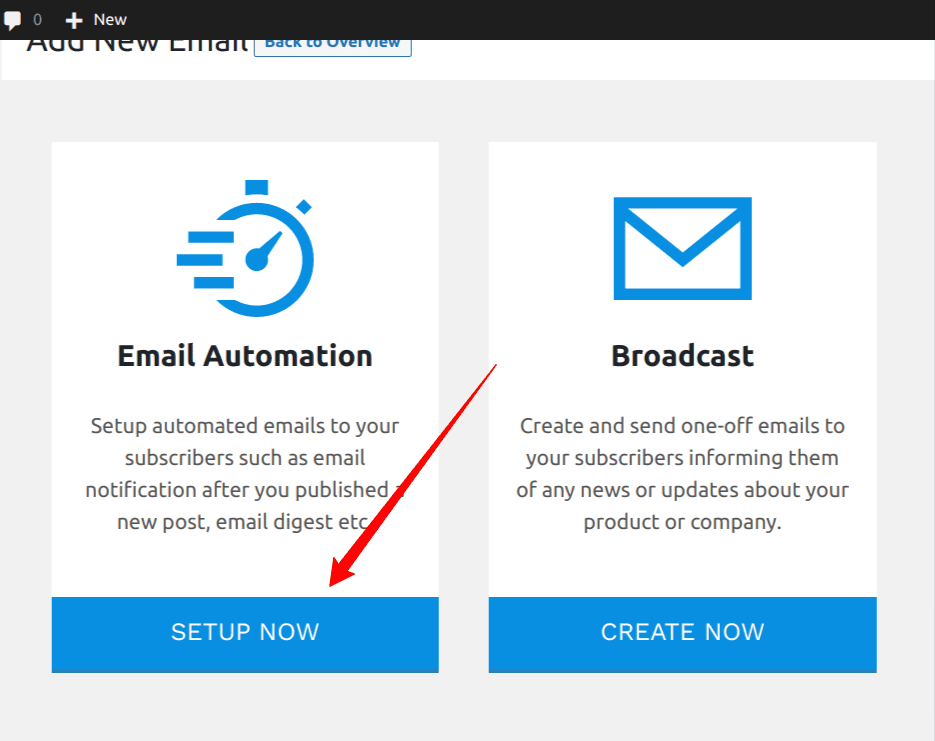
On the next page, click the “Set up Now” button under Email Automation.
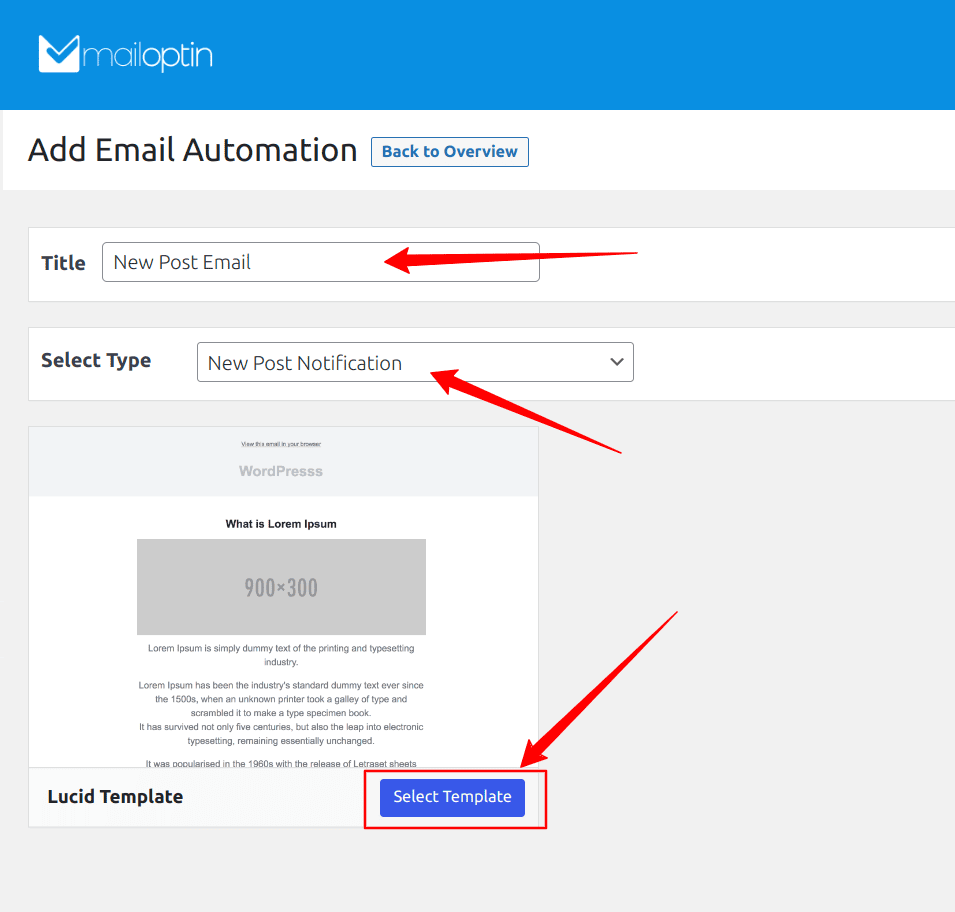
Enter a Title for this automation – “New Post Emails”, then select “New Post Notification” from the “Select Type” dropdown menu. You will be presented with a premade email template, select this template and you will be taken to the campaign builder page.
Here’s how to use your own custom-coded email template.
To customize your email campaign, use the left-side menu pane to access various customization panels like Template Page, Template Header, Template Content, Template Body, and Template Footer.
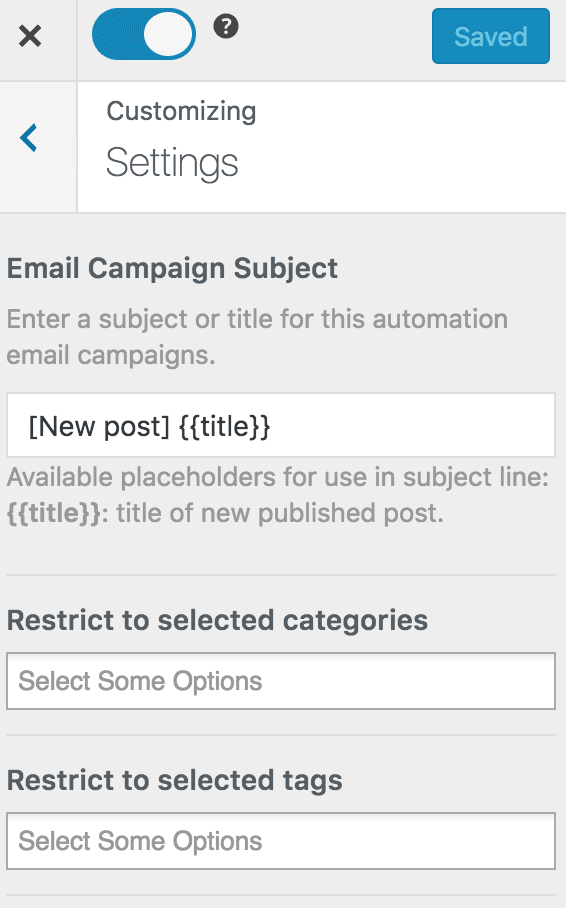
In the settings panel, configure automation settings like email subject, preview text, content type, content length, and post types. You can also select recipients from this panel.
Moreover, you can segment your subscribers based on categories and tags. This means you can send a newsletter to subscribers only if the post belongs to certain categories and/or tags, is written by a specific author, or is based on the language of the post. This enables you to create multiple automation for different email lists based on the categories and tags of each post.
If you are sending to registered users, you can also segment the users to receive the email by their roles.
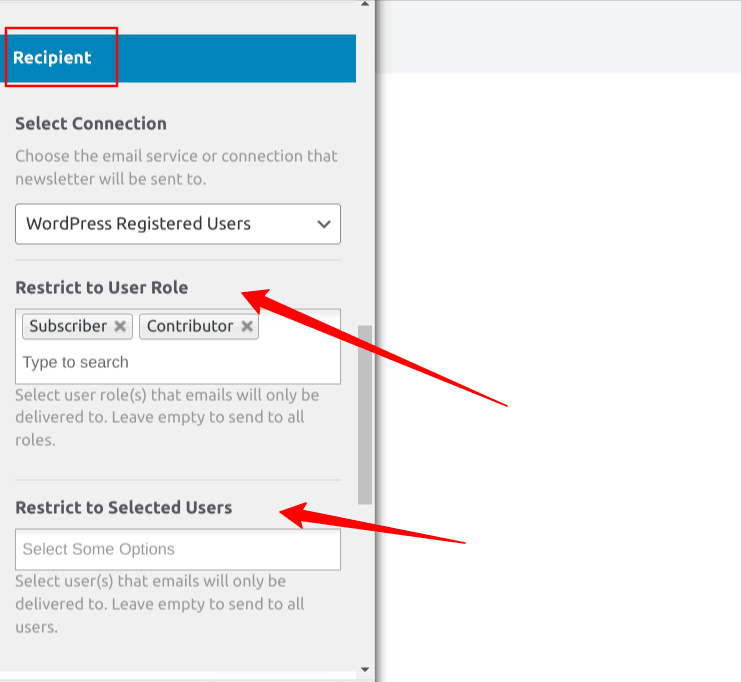
Next, you need to choose the connection that corresponds to your registered user or email marketing service provider, along with its email list. Then, you can decide when to send the notification – immediately after publishing or at a later time, such as a few minutes, hours, or days.
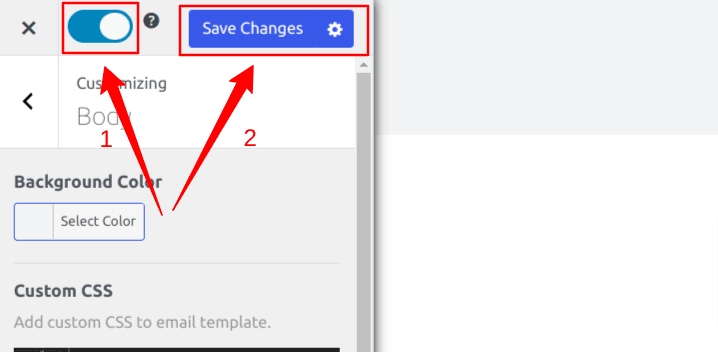
Activate the Email Automation and click the Save Changes button to save all changes.
So when a new post is published, your users or mailing list will receive the post notification in their email box.
How to Send Automated Posts Email Digest in WordPress
Sending a Post Email Digest is an effective way of staying in touch with your subscribers and providing them with a summary of your published content.
By sending daily, weekly, or monthly digest emails, you can keep your subscribers informed and ensure that they don’t miss out on any of your content during the set timeframe.
With MailOptin, you can automate the process of emailing your published content, articles, or posts to your WordPress users or email list subscribers using the Posts Email Digest feature.
In the next few step, you will learn how to easily set up an automated Email Digest on your WordPress site.
Navigate to MailOptin > Emails and next click on the “Add New” button.
On the next page, click the “Set up Now” button under Email Automation.
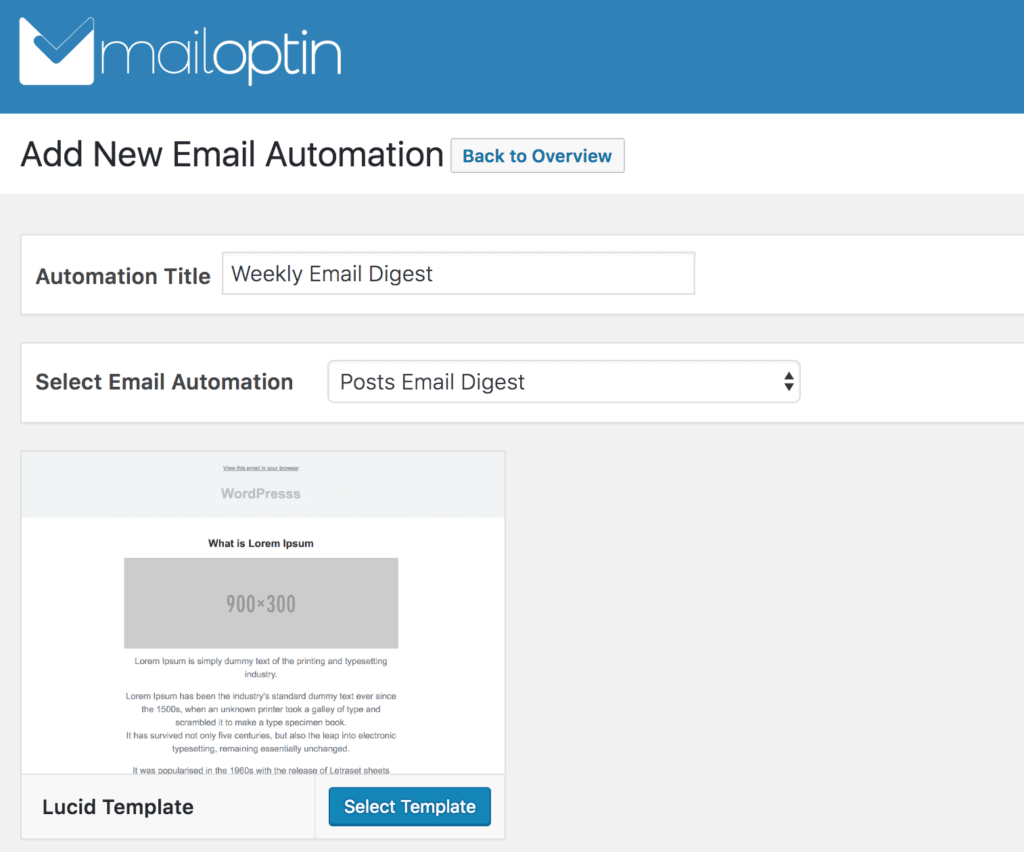
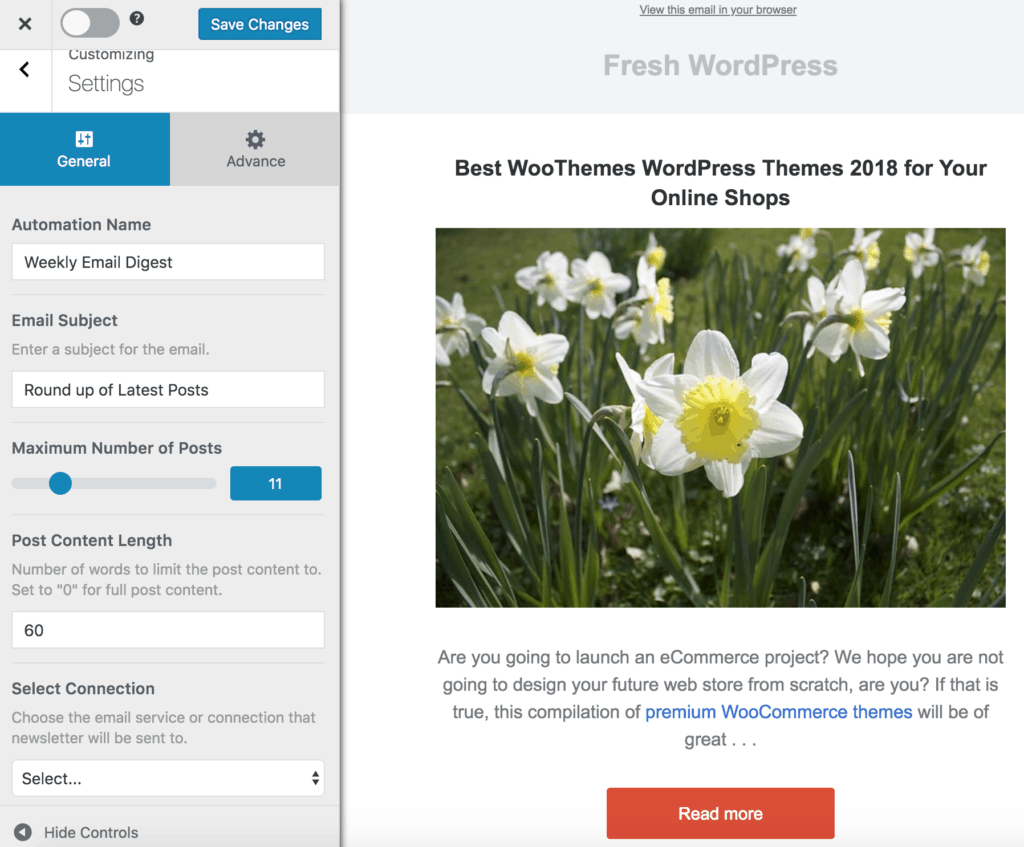
Enter a Title for this automation – “Email Digest”, then select “Post Email Digest” from the “Select Type” dropdown menu. You will be presented with a premade email template, select this template, and you will be taken to the campaign builder page.
In the campaign builder, you can configure the automation settings such as:
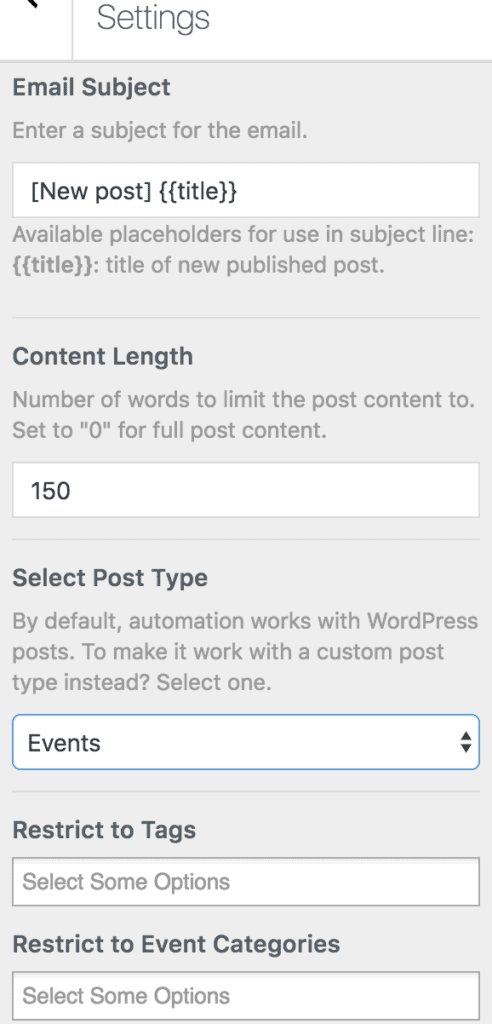
- Email Subject
- the Maximum number of posts to include
- Each post’s content length
- Categories and tags posts to be included must belong to
- Post languages (if using Polylang or WPML to make your WordPress site multilingual)
You can also select the custom post types (including supports for WooCommerce, and LearnDash, LifterLMS) you want to send a round-up or digest of its posts.
There is also the option to select the taxonomy (For “The Event Calendar” plugin, this could be the event category or tag.); the post must belong before the email is sent.
To choose who receives your email digests, simply go to the “Select Connection” dropdown and make your selection.
You can choose to send the digest to your WordPress users and filter them by role, or you can send it to a list hosted in your email marketing software, like Mailchimp. With Mailchimp, you can even send the digest to a saved segment of your list.
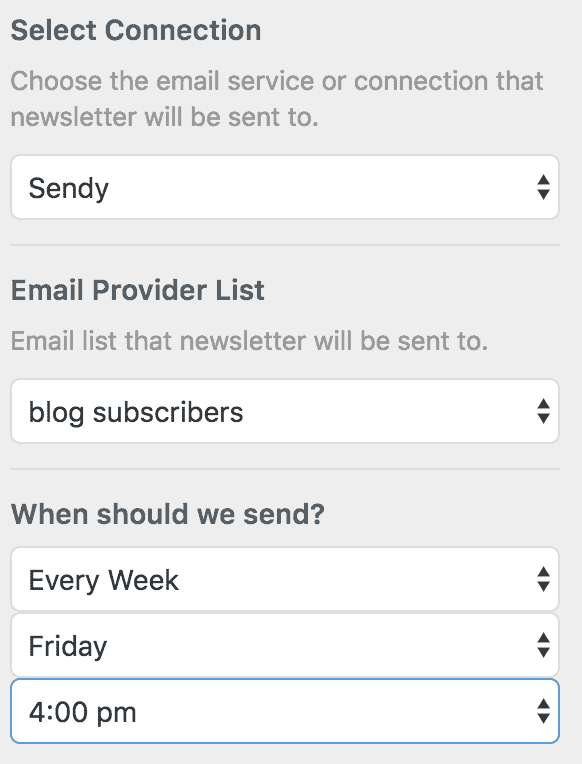
To set up an automatic newsletter with MailOptin, choose the interval, day, and time for the newsletter to be sent.
Options include daily, weekly, or monthly. Keep in mind that the time is based on the Timezone selected in your WordPress settings.
Additionally, MailOptin will use the day selected as the start of the week in your WordPress settings.
Once finished, activate the automation by toggling the switch at the top left-hand corner. Your setup is now complete.
Conclusion
As a business or website owner, you may have many tasks vying for your attention. However, sending emails doesn’t have to be one of them.
By automating your emails in WordPress using MailOptin, you can grow your business, engage your customers, and achieve results without spending a lot of time doing manual work.
With MailOptin, you can create email automation workflows that are triggered by predefined conditions, freeing up your time to focus on other important tasks in your business.